Cyclotron
Содержание:
- Usage
- Uses
- Mechanics
- Production
- Production
- Modular Design
- Custom Missiles
- Meteor Treasure loot
- Trivia
- NOTICE
- Fuel Data
- Circuits
- Pros and Cons
- Design Philosophy
- The Hell Zone
- Metallurgy 101
- Things to do before you start
- How To Install HBM Nuclear Tech Mod Reloaded
- Trivia
- Background
- Creation
- Dangers
- Uses/Farming
- How to Bring it Down
- Production
- Usage
Usage
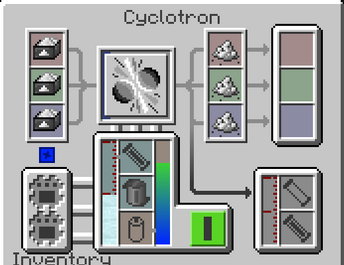
Example Cyclotron GUI
The compatible elements for boxes are: Lithium, Beryllium, Carbon, Copper, and Plutonium. They are made in the assembly machine combining one powder with one insulator.
Many of the elements produced have very few uses, usually for Nitanium production or being an intermediary step for another rare element, such as one of the Rare Earth Elements or trans-schrabidic super heavy elements, notably Australium.
Due to the expense of running, it should only be used for very rare elements (for further use in Nitanium or Desh for example) or Antimatter.
Although if you can afford to run this machine consistently (possibly utilizing a mining ship), you can use this machine as a stand-in for an energy-matter fabricator (think the replicator from Star Trek), though that would be purely for flex material as it is not sustainable in any sense.
The cyclotron can store up to 100 MHE and 32,000mb of coolant. Power is consumed very quickly at 690 million HE consumed per operation. Use all three slots at once to be most efficient. A Schrabidium Energy Storage Blocks at the minimum should suffice for a few operations. Coolant is consumed quite slow, so you don’t have to worry about that.
If it runs out of coolant, it will enter an overheat phase and shoot sparks and shrapnel all over. You have around a minute of continuous operation until it completely overheats and explodes into either: a mini-nuke explosion, a Balefire explosion, or spawn a black hole.
Antimatter and Antischrabidium
Antimatter is produced as a byproduct of operation, heavier element boxes produce more antimatter. The cyclotron has 8,000mb of internal storage for antimatter.
Antischrabidium is produced by bombarding an Antimatter cell with Plutonium.
Uses
Its ingot and compound plate forms are what are primarily used, but its powder and unrefined blend form can also be used.
It is used to make tools. While the tools don’t have a harvest level any higher than iron, they have the advantage of being completely unbreakable. These tools can then be upgraded into Schrabidium tools which gives them numerous abilities, at the cost of them being no longer indestructible.
It is used in various mid-late game machines to make them much tougher. One missile fuselage can even be plated in Desh to increase its HP.
Unrefined Desh blend has 2 uses: the Desh Dynosphere and a Radiation Absorber upgrade.
Compound plates with Schrabidium nuggets can be used to upgrade a CMB Steel shredder blade into an indestructible Desh one.
It is used for production.
A Desh stamp for use in Presses is currently being worked on as an indestructible stamp. Low priority, so it will take a while to be added, if at all.
Compound Plate Recipe
Desh cannot be stamped, so it has to be made into a compound plate instead in one of the Anvils:
- 2 Desh Ingots
- 2 Polymer Powder
- 1 High-Speed Steel Ingot
(Produces 4)
Mechanics
Neutrons
Neutrons are what make fuel split and heat up. Neutrons are generated by fuels marked as self-igniting are in a fuel rod or when fuel is impacted by the right neutron type. Fuel has a tooltip which shows which neutron type it needs to split, as well as what type it splits into. Neutrons only travel horizontally and follow a straight path until they reach another fuel rod or a reflector. Self-igniting fuels generate neutrons automatically, and can react with itself; too many self-igniting fuel rods can lead to a meltdown.
Neutron source rods are a «special» type of self-igniting rod, they do not fission and do not produce a lot of heat on their own. They also deplete quickly, so you should remove it and replace it with a regular fuel rod once the reaction has started to be most efficient.
Heat
Fuel rods, when experiencing fission, generate heat. Heat is transferred to adjacent components, and can be used to generate steam for power generation. Components also gradually cool down through passive cooling, which increases depending on how many components your reactor has. This means you should be careful with adding too many structural columns, as it could cool the reactor down beyond any usable temperatures.
Xenon Poison
Xenon-135 is a common product resultant from fission reactions, which can build up in the fuel rods of a reactor and act as an undesirable neutron absorber. Simply put, this is something that slows down fuel reaction when you don’t want it. Xenon «burns» away at higher power, so if your reactor can output enough neutrons, you shouldn’t worry much about it. It may be problematic if you wish to run your reactor at low power however, as it may drop the reaction too much or halt the reaction entirely.
Xenon can also be a problem with certain types of fuels that require an initial neutron flux burst to initiate criticality and become self-sustaining or requires a significant driver to keep it critical. Xenon prevents this initial neutron burst from being as effective and thus requires increased power (ie raised control rods) to burn it off and attain criticality. This means that once the Xenon is burned off, the flux level will be at a level far higher than what would’ve been necessary, potentially causing a meltdown if the reaction doesn’t stabilize itself or by means of lowering control rods.
Fuel Temperature
When fuel reacts, it generates heat, which is shown as core and skin temperature. As stated before, core temperature doesn’t matter too much, as it can be way higher than the skin temperature which is what transfers to the fuel rod block. Skin temperature is almost always higher than the reactor temperature even if you have good cooling due to heat transfer. As long as the skin temperature is nowhere near the melting point of the rod and flux is stable, you should be fine.
Meltdown
RBMK meltdown mid-explosion. Notice the debris flying out.
Probably the most interesting part, a meltdown is when things get out of control and the reactor literally melts. It happens when the skin temperature gets past the melting point of a given fuel, or when a reactor component’s temperature reaches more than 1500 ºC. It explodes violently, releasing debris and high amounts of radiation into the environment. Debris can be collected by hand and will give you the respective debris item. They can’t be processed yet, and are just waste for now. After a meltdown, Corium replaces the fuel rods and is highly radioactive, while regular RBMK debris variants replace the rest of the components. Corium solidifies over time, turning into corium blocks which are fatally radioactive in seconds; cleanup is extremely difficult until they have decayed as a result. Reactor Corium and Sellafite-Corium are not to be confused.
ReaSim (Realistic Simulation)
ReaSim is both a gamemode and set of alternate components that are meant to give a more «realistic» style to the reactor on top of its mechanics. ReaSim fuel columns emit neutrons in a random set of 6 directions, instead of the 4 cardinal directions (they can also be made automoderated with a cheaper recipe). Steam boiling can be done within any component column, water can be inserted and steam extracted with special inlets, however the only steam compression type usable is super dense.
Production
Desh blend must be refined and processed in a Chemical Plant with Mercury and Light Oil.
Desh blend itself is acquired from Rare Earth Ore, which must either be Centrifuged or Crystallized and then Centrifuged to get the best results. If you don’t have the Silk Touch enchantment, then the fragments dropped must be shredded and then crafted into the blend. Since Desh blend is just a collection of Rare Earth Metals, it can be artificially made using a Cyclotron.
Composition Breakdown
- 2 parts Boron
- 2 parts Lanthanum
- Lithium
- Cobalt
- Neodymium
- Cerium
- Niobium
- Some Mercury
For more information on the components themselves, see Rare Earth Elements.
Production
All circuit types are made using a lower tier circuit. A Basic Circuit is made by pressing a Basic Circuit Assembly using a Press and any of the Circuit Stamps. Alternatively once you have an Assembly Machine (which requires a Basic Circuit to craft), you can use it to assemble the Basic Circuit Assembly. Once the basic circuit is made, it can be upgraded into a higher tier circuit, and so on. This makes late-tier circuits even more expensive as they require all of the previous tier circuits. It is worth noting that you can downgrade a circuit to the next lower tier by smelting it, however this wastes all of the components used for upgrading to that tier.
Alternatively, if you feel like there’s too much effort in making circuits, lots of different circuits or circuit boards can be found in structures, though they are usually low to mid-tier and are only there for early game progression assistance.
Military Grade Circuit Boards can be turned back into the 2 respective circuits required to craft it using any crafting grid. However, you lose the powder required to craft the military grade circuit board.
All circuits except the basic one follow the template of 4 items:
1 previous tiered circuit
1 base plate
4 wires
1 powder
Keep this in mind when reading ahead about the circuits.
Modular Design
The large 3 at the top of the GUI signifies the size of the reactor. This means that the reactor’s size can be expanded (up to size 15) so it runs much faster. The reactor control computer must preferably be in the middle of the reactor, with up to 7 layers below and 7 above and one in the middle, totaling 15. If you don’t want it like this, you can just expand on the default size upwards and have up to 9 layers.
With the increased size, the reactor runs much faster, which means it consumes its fuel faster and produces energy faster. All of its buffers increase in size too (water, fuel, etc).
Comparison: Largest (15), Normal (3), Smallest (1).
Reactor Stats
| Reactor Size | Water | Coolant | Steam | Fuel/Waste | Consumption Rate |
|---|---|---|---|---|---|
| + Per size | 128,000 | 64,000 | 32,000 | 240 | N/A |
| 1 | 128,000 | 64,000 | 32,000 | 240 | N/A |
| 2 | 256,000 | 128,000 | 64,000 | 480 | N/A |
| 3 | 384,000 | 192,000 | 96,000 | 720 | N/A |
| 4 | 512,000 | 256,000 | 128,000 | 960 | N/A |
| 5 | 640,000 | 320,000 | 160.000 | 1200 | N/A |
| 6 | 768,000 | 384,000 | 192,000 | 1440 | N/A |
| 7 | 896,000 | 448,000 | 224.000 | 1680 | N/A |
| 8 | 1,024,000 | 512,000 | 256,000 | 1920 | N/A |
| 9 | 1,152,000 | 576,000 | 288,000 | 2160 | N/A |
| 10 | 1,280,000 | 640,000 | 320,000 | 2400 | N/A |
| 11 | 1,408,000 | 704,000 | 352,000 | 2640 | N/A |
| 12 | 1,536,000 | 768,000 | 384,000 | 2880 | N/A |
| 13 | 1,664,000 | 832,000 | 416,000 | 3120 | N/A |
| 14 | 1,792,000 | 896,000 | 448,000 | 3360 | N/A |
| 15 | 1,920,000 | 960,000 | 480,000 | 3600 | N/A |
Custom Missiles
Targeting Circuits
| Name | Inaccuracy |
|---|---|
| Tier 1 Missile Targeting Circuit | 10.0% |
| Tier 2 Missile Targeting Circuit | 5.0% |
| Tier 3 Missile Targeting Circuit | 1.0% |
| Tier 4 Missile Targeting Circuit | 0.5% |
| Tier 5 Missile Targeting Circuit | 0.0% |
Warheads
| Name | Size | Type | Strength | Weight | Health | Variant | Loot Box Rarity |
|---|---|---|---|---|---|---|---|
| Size 10 HE Warhead | 1.0m | HE | 15 | 1.5t | 5HP | ||
| Size 10 Incendiary Warhead | 1.0m | Inc | 15 | 1.5t | 5HP | ||
| Size 10 Bunker Buster Warhead | 1.0m | Buster | 5 | 1.5t | 5HP | ||
| Size 10 Micro Nuclear Warhead | 1.0m | Nuclear | 35 | 1.5t | 10HP | Tater Tot | |
| Size 10 Nuclear Warhead | 1.0m | Nuclear | 75 | 2.5t | 15HP | Chernobyl Boris | |
| Size 10 Tainted Warhead | 1.0m | Taint | 15 | 1.5t | 20HP | Uncommon | |
| Size 10 Pink Cloud Warhead | 1.0m | Cloud | 15 | 1.5t | 20HP | Rare | |
| Size 15 HE Warhead | 1.5m | HE | 50 | 2.5t | 10HP | ||
| Size 15 Incendiary Warhead | 1.5m | Inc | 35 | 2.5t | 10HP | ||
| Size 15 Nuclear Warhead | 1.5m | Nuclear | 125 | 5.0t | 5HP | Auntie Berta | |
| 1.5m | Nuclear | 125 | 5.0t | 15HP | Discount Bullet Bill | Uncommon | |
| Size 15 Boxcar? | 1.5m | TX | 250 | 7.5t | 35HP | Legendary | |
| Size 15 N² Mine | 1.5m | N² | 100 | 5.0t | 20HP | Rare | |
| Size 15 BF Warhead | 1.5m | BF | 100 | 7.5t | 15HP | Legendary |
Fuselages
| Name | Size (Top) | Size (Bottom) | Fuel Type | Fuel Amount | Health | Variants | Loot Box Rarity |
|---|---|---|---|---|---|---|---|
| Size 10 Kerosene Fuselage | 1.0m | 1.0m | Kerosene | 2.5kl | 20HP | ||
| 1.0m | 1.0m | Kerosene | 2.5kl | 20HP | Camo | Common | |
| 1.0m | 1.0m | Kerosene | 2.5kl | 20HP | Desert Camo | Common | |
| 1.0m | 1.0m | Kerosene | 2.5kl | 20HP | Sky Camo | Common | |
| 1.0m | 1.0m | Kerosene | 2.5kl | 20HP | Sick Flames | Uncommon | |
| 1.0m | 1.0m | Kerosene | 2.5kl | 25HP | Orange Insulation | Common | |
| 1.0m | 1.0m | Kerosene | 2.5kl | 35HP | IF-R&D | Rare | |
| 1.0m | 1.0m | Kerosene | 2.5kl | 30HP | Bolted Metal | Uncommon | |
| 1.0m | 1.0m | Kerosene | 2.5kl | 20HP | Tainted | Uncommon |
WIP
Fins
| Name | Size | Inaaccuracy | Health | Loot Box Rarity |
|---|---|---|---|---|
| Size 10 Flat Fins | 1.0m | 50% | 10HP | |
| Size 10 Cruise Fins | 1.0m | 25% | 5HP | |
| Size 10 Space Fins | 1.0m | 35% | 5HP | Common |
| Size 15 Flat Fins | 1.5m | 50% | 10HP | |
| Size 15 Thin Fins | 1.5m | 35% | 5HP | |
| Size 15 Pointy Fins | 1.5m | 25% | 15HP | Common |
Thrusters
| Name | Size | Fuel Type | Fuel Consumption | Max. Payload | Health | Variant | Loot Box Rarity |
|---|---|---|---|---|---|---|---|
| Size 10 Liquid Fuel Thruster | 1.0m | Kerosene | 1.0l/t | 1.5t | 10HP | ||
| Size 10 Solid Fuel Thuster | 1.0m | Solid Fuel | 1.0l/t | 1.5t | 15HP | ||
| Size 10 Ion Thruster | 1.0m | Xenon Gas | 1.0l/t | 1.5t | 5HP | ||
| Size 15 Liquid Fuel Thruster | 1.5m | Kerosene | 1.0l/t | 7.5t | 15HP | ||
| Size 15 Liquid Fuel Twin Thrusters | 1.5m | Kerosene | 1.0l/t | 2.5t | 15HP | ||
| Size 15 Liquid Fuel Triple Thrusters | 1.5m | Kerosene | 1.0l/t | 5.0t | 15HP | ||
| Size 15 Solid Fuel Thruster | 1.5m | Solid Fuel | 1.0l/t | 5.0t | 20HP | ||
| Size 15 Solid Fuel Hexdecuple Thrusters | 1.5m | Solid Fuel | 1.0l/t | 5.0t | 25HP | Uncommon | |
| Size 15 Hydrogen Thruster | 1.5m | Hydrogen | 1.0l/t | 5.0t | 25HP | ||
| Size 15 Hydrogen Twin Thrusters | 1.5m | Hydrogen | 1.0l/t | 2.5t | 15HP | ||
| Size 15 BF Thruster with Nuclear Preheater (Shortened) | 1.5m | BF | 1.0l/t | 5.0t | 25HP | ||
| Size 15 BF Thruster with Nuclear Preheater | 1.5m | BF | 1.0l/t | 5.0t | 25HP | ||
| Size 15 BF Thruster with Nuclear Preheater (Heavy Duty Nozzle) | 1.5m | BF | 1.0l/t | 7.5t | 35HP | ||
| 1.5m | BF | 1.0l/t | 7.5t | 35HP | Rad* | Uncommon | |
| Size 20 Liquid Fuel Thruster | 2.0t | Kerosene | 1.0l/t | 100.0t | 30HP | ||
| Size 20 Liquid Fuel Twin Thrusters | 2.0t | Kerosene | 1.0l/t | 100.0t | 30HP | ||
| Size 20 Liquid Fuel Triple Thrusters | 2.0t | Kerosene | 1.0l/t | 100.0t | 30HP | ||
| Size 20 Solid Fuel Thruster | 2.0t | Solid Fuel | 1.0l/t | 100.0t | 35HP | ||
| Size 20 Solid Fuel 30-Fold Thrusters | 2.0t | Solid Fuel | 1.0l/t | 100.0t | 35HP | ||
| Size 20 Solid Fuel 47-Fold Thrusters | 2.0t | Solid Fuel | 1.0l/t | 100.0t | 35HP |
Meteor Treasure loot
More information about this can be found in the loot tables page
The meteor treasure block has a high chance of spawning in most meteors and will drop 1-3 loot items when broken. Items that get dropped are randomized from a list of 36 items. These items are:
Super Conducting Coil, Advanced Alloy Plate, Desh Blend, Desh Ingot, Advanced Battery, Lithium-Ion Power Cell, Advanced Power Cell, Schrabidium Nugget, Plutonium Ingot, Ingot of Thorium Fuel, u233 Ingot, Reinforced Turbofan Blades, High-Speed Steel Ingot, Polymer Ingot, Tungsten Ingot, CMB Steel Ingot, Semi-Stable Lanthanium Ingot, Semi-Stable Actinium Ingot, Meteorite Block, Plasma Heater, Fusion Reactor Control, Watz Reaction Chamber, Rare Earth Ore, Superconducting Magnet, Reactor Control, Diesel Generator, RT Generator, Plutonium 238 Fuel Pellet, Weak Uranium RTG Pellet, RTG Unit, Electromagnetic Cartridge, Mini Nuke, Eightfold MIRV, Defabricator Energy Cell, Combine Ball, and Glitch.
Note: The glitch has plenty of its own effects, outlined in the glitch article. Use at your own risk!
Trivia
- Circuits are known internally by their wiring (eg the basic circuit is circuit_aluminium and the overclocked circuit is circuit_gold). The assembly circuit is referred to as circuit_raw
Circuit boards are known internally as tiered targeting circuits (eg circuit_targeting_tier2).
.
- All circuit boards follow the same color scheme as their normal circuit form (eg enhanced circuit is green with dark red wiring and the tier 2 circuit is the same) except the High-Performance circuit. The High-Performance circuit is black with cyan blue wiring whereas the tier 5 circuit board is yellow with black/dark grey wiring.
- Curiously, there is a tier 6 circuit board only used in the most endgame components, but no regular tier 6 circuit.
- In some versions, the Advanced circuit has a spelling error and becomes «Advanved Circuit»
- Interestingly, in terms of raw materials (excluding the previous circuit tier), the overclocked circuit is (almost) less expensive than the advanced ones.
- The unused textures are mentioned in the Scrapped Features page.
NOTICE
The Watz Reactor is currently being reworked, this article may no longer be accurate when said reworking is completed and released.
The Watz Power Plant is a multiblock reactor that generates power and Poisonous Mud using Pellets and a Titanium Filter. Using a Multiblock Structure marker is recommended when building it.
The Watz Plant is very large, here is the breakdown of all its required components:
- 96 Watz Stability Elements
- 88 Watz Reaction Chambers
- 44 Watz Supercoolers
- 88 Reinforced Control Rods
- 12 Electricity Ports
- 1 Watz Reactor Control Computer Core
- 4 Access Hatches
- 172 Reinforced Stone
Fuel Data
Operating Level(0%-100%): HE(1 rod) — HE(2 rods) — HE(4 rods)
Th fuel
25%: 8.01M — 16.03M — 32.08M
50%: 9.04M — 18.81M — 37.63M
75%: 9.02M — 18.05M — 36.11M
100%: 9.45M — 18.9M — 37.81M
U fuel
25%: 10.06M — 20.14M — 40.31M
50%: 11.79M — 23.6M — 47.22M
75%: 11.25M — 22.51M — 45.03M
100%: 11.81M — 23.61M — 47.23M
Pu fuel
Not tested
MOX fuel
Not tested
Sa fuel
I don’t think there is any way I can get the operating level above 30ish%.
Conclusion: 50% and 100% give the biggest amounts of energy. Between these two, there’s an insignificant difference, the 100% giving better results. Maybe with bigger amounts of fuel or just hotter fuel, there would be a bigger difference.
I didn’t take notes about coolant consumption, and I am not planning to complete this thing. Feel free to do it yourself.
Circuits
Circuit Assembly
Can be made with 1x Aluminium Wire, 1x Redstone, and a Steel Plate in a crafting table, very cheap. Not technically a circuit in itself.
Basic Circuit
The most basic circuit. Required to make the Assembly Machine for further progression. Can be made by pressing a circuit assembly or in an assembly machine. Only useful for the simplest machines and items.
Enhanced Circuit
Used in many basic machines like the Electric Press, the Nuclear Reactor, Siren, etc. Required to make the Chemical Plant for further progression. Can be made by upgrading a basic circuit with Copper wiring, Quartz Powder (presumably for silicon), and a Copper Plate. Most mid-tier items and devices will use these.
Advanced Circuit
Used a lot in machine components, weapons, and tools. Is also rather expensive due to the amount of gold it requires. Required to make the Chemical Plant and Oil Refinery. Can be made by upgrading an enhanced circuit with Red Copper wiring, Gold Powder, and an Insulator. Very frequently used circuit in devices in both mid and late-tier. It is probably the most commonly used circuit in recipes.
Overclocked Circuit
Used in a lot of mid to late-game machines like the Radar, the Schrabidium Transmutation Device, the large nuclear reactor’s control core, the Ore Acidizer, as well as some high-tier nukes. Can be made by upgrading and advanced circuit with 400mb of Hydrogen Peroxide, 200mb of Petroleum Gas, Gold wiring, Lapis Lazuli powder, and a Polymer Bar. Devices that use this typically lean on the high-tech side.
Note that this and the next recipe is made using the Chemical Plant and not the Assembly Machine.
High-Performance Circuit
The most expensive circuit requiring Schrabidium to make. Only used in a lot of endgame machines and components. Can be made by upgrading an overclocked circuit in the Chemical Plant with 800mb of Hydrogen Peroxide, 200mb of Mercury, Schrabidium wiring, Diamond powder, and a Desh Ingot. Used in only the most advanced and high-tech machines and devices.
Tier 6 Circuit Board
An upgrade on the High-Performance Circuit board (Tier 5), it takes 1 Spark blend and a PotatOS. It has only a few uses: the satellite, B92 Energy Pistol, Schrabidic Terra Miner, and the DNT 1 & 20Hz transformers.
Versatile Chipset
(Not related to the main line)
Made from the rare element Bismuth, it is used for a few highly specialized purposes, namely the control cores for the Fusion Reactor, Fusionary Watz Plant, and even Dark Fusion Core. Once the assembly is crafted, it must be stamped in the same way as basic circuit assemblies.
Crafting:
| Redstone | Polymer Bar | Redstone |
| Asbestos Sheet | Bismuth Ingot | Asbestos Sheet |
| Redstone | Polymer Bar | Redstone |
Pros and Cons
Pros
- BWR, no coolant required.
- Can make huge amounts of power with the right setup and fuel.
- 100% modular, allows creativity.
- Can run on a multitude of fuels for your needs, capabilities, and desires.
- Will maintain use even in Fusion or Watz stages.
- Very aesthetic compared to the regular reactors.
- Extremely violent meltdown.
Neutral
- Designing can be complicated or take a lot of space.
- Fuel depletion percentage very slowly decreases effectiveness of the rods.
- Can take a long time to «fully» deplete (rather deplete to an appreciable percentage), which means breeding can take a very long time but the power produced is incredible even from little fuel.
Cons
- Egregiously expensive.
- Self-igniting fuels cannot be fully stopped from reacting unless manually removed.
- Steam production can be very high, requiring use of numerous Industrial or Leviathan Steam Turbines, which are also expensive.
- Extremely violent meltdown.
Design Philosophy
The most important goals of any RBMK reactor is to generate energy whilst preventing a meltdown. Heat is necessary to produce steam in steam channels and heat is generated by fuel rods receiving and outputting neutrons. This means that the most optimal placement for steam channels is somewhere near the fuel rods of a reactor; ideally diagonally from them. However, since neutrons travel horizontally, and most fuel types require slow neutrons to react whilst splitting into fast neutrons, some thought must be placed into where the neutrons in your reactor are going and what type they are. Fuel rods should be placed horizontally from each other. Neutrons that reach the edge of a reactor are wasted, but reflectors can be placed there to reflect neutrons back into the fuel rods, increasing the efficiency of your reactor. If a fuel rod requires slow neutrons, moderators should be placed between it and any other source of neutrons, such as reflectors and other fuel rods.
An RBMK reactor utilizing absorbers.
Preventing a meltdown is important as well, since a destroyed reactor is not very useful. Making the fuel rods of a reactor too reactive or not having enough sources of cooling, will lead to the reactor overheating and causing a meltdown. The primary way to reduce reactivity is control rods; which will reduce the amount of neutrons passing through depending on how much of the rod is inserted. Control rods should be placed between fuel rods and other sources of neutrons, whether it be another fuel rod or a reflector. An alternate way is neutron absorbers. As seen in the example to the right, neutron absorbers can be used instead of reflectors to prevent these three fuel rods from becoming too reactive, since they are receiving plenty of neutrons from other sources.
Steam channels are important for cooling down a reactor. Boiling water into steam takes heat away from the reactor, and as such steam channels should be placed regularly and have enough water to be boiled, lest the reactor overheats. Similarly, since increasing the amount of components in a reactor increases passive cooling, there should also be enough additional columns in a reactor to provide a passive cooling effect.
Designs
There are more designs in the #rbmk-designs channel in the discord server.
(Note that some of these designs were made before critical RBMK fuel changes, and as such, might cause an immediate meltdown or not work at all. Please test the optimal fuel rods and power settings for them before use! This area will be updated soon with better reactor designs.)
The Hell Zone
The nether has not changed significantly since installing Nuclear Tech, aside from two things:
- There’s now a couple of ores spawning in the nether, most notably uranium, tungsten and sulfur, all of which are also found in the overworld
- The nether in its entirety is now slightly radioactive
The last fact might frighten you, but be assured it’s just a mild 0.1 RAD/s which isn’t all that big of a deal. It would take almost 3 hours for you to die in the nether from radiation, so take your time and get some quartz. Might as well use some phosphorous, but watch out for the white ingots — they’ll set you on fire if you don’t have a suit to protect yourself from them. There’s also plenty of uranium which becomes interesting later.
Metallurgy 101
Armed with copper plates (which you can make into copper panels at an anvil for 4 pieces each) and hopefully some tungsten, you can now craft your second machine, the blast furnace. This machine has many recipes, but for now you’ll only need the two most important ones: Steel and minecraft grade copper (also known as red copper). The blast furnace can be powered with coal or lava, which gets stored internally so that nothing is lost when the furnace is currently idling.
- Steel: A piece of iron and a lump of coal make two ingots of steel
- Red copper: It’s an alloy of redstone and regular «industrial grade» copper.
The mod makes use of many alloys, but these two are the most important ones. The furnace is slow, so it would be a good idea to make multiple (or to steal them from a factory structure).
Things to do before you start
One thing that you can do before engaging in the progression, as well as something you should always do if you have the time, is looting structures. Your world is littered with buildings and dungeons alike, all full of stuff free for the taking. You shouldn’t solely rely on structures for your resources, but they give you a head-start when it comes to progressing through the mod. Here’s a list of structures which are great for raiding in early-game:
- Antennas: A common structure with a few resources, mainly steel ingots, wires and basic circuits.
- Radio stations: A great source of concrete and steel, the small side building also has tanks filled with diesel. The chests often also contain revolvers and sometimes weaker shotguns which are fantastic alternatives to your stinky old vanilla bow.
- Relay stations: Huge antenna-like structures with loads and loads of steel. Steel sets are only marginally better than iron — but with steel so easily accessible and in such quantities, you’ll be able to make steel tools quickly.
- Crashed space ships: Somewhat rare and filled with items that aren’t very useful in early game, they still contain a considerable amount of steel and a chest full of rare items, more often than not consumables and rocket launchers.
- Crashed vertibirds: Helicopters that are buried in the desert, they are a good source of steel and often contain parts for power armor.
- Factories: Large structures made of brick which have many machines and chests full of raw materials. Some say there’s a treasure hidden in the lava.
However, this world isn’t a place filled with just candy and free stuff, there’s also places which you absolutely should not enter, or even approach, unless you are well equipped:
- Nuclear power plants: Easily recognizable by their large cooling towers and by the fact that everything in proximity to it is dead, these structures contain many valuable resources. However, every power plant also has its own on-site nuclear waste storage, which causes ambient radiation levels to skyrocket. Unprotected players may die within less than a minute if they choose to approach a power plant. To add insult to injury, high levels of radiation can also turn creepers into mutated nuclear creepers, may Lauren have mercy on your soul if you encounter one of these.
- Radiation hotspots: Rare, but extremely dangerous craters filled with rocks that are boiling from radiation. They offer no noteworthy loot, so it’s best to avoid them.
- Nuclear waste storage tanks: Tower-like structures with nuclear waste leaking out of them. Buried deep within all the nuclear waste usually lies a treasure chest, but without the equipment, you are unlikely to even get to see any of it without dying a dozen times.
- Duds: Not very dangerous per se, but you should not meddle with them. There are certain ways to extract resources from them, but those are very dangerous and not relevant to you unless you have reached end-game.
- Poison geyser: Easily recognizable from the lack of grass surrounding a patch of crumbled rock, the geyser periodically spits out a jet of poison gas. Below it there are a few blocks of yellowcake, although these aren’t very useful until you have reached the nuclear age.
How To Install HBM Nuclear Tech Mod Reloaded
Steps To Install
| 1 | Download Forge 1.12.2>> Forge download page |
|---|---|
| 2 | Download Shotguns & Glitter on CurseForge. Select the latest version>> Download from CurseForge |
| 3 | Run the Forge Java file*there is no need to change the install directory if you used the default directory to install Minecraft |
| 4 | Transfer the mod .jar files to your Minecraft’s mod folder>> Know how to access it here |
| 5 | Run «Minecraft Launcher» |
| 6 | Select the Forge version that you want to play on. In this case, select «Forge 1.12.2» |
| 7 | Press «Play» to run Minecraft with the mods |
Does Not Require Other Mods
You do not need to install any other mods for you to be able to run this mod. Download the required Forge version and just place it together with the Nuclear Tech mod inside your mod folder and you’re good to go!
Trivia
- Considering its lore discovery and production methods in outdated versions, it implies that depleted Schrabidium fuel contains tiny amounts of Euphemium, but not enough to be of any worth.
- Of particular interest, only the base ingredients (ingots, nuggets, powder, etc.) of Euphemium tools and weapons appear in the creative menu, despite the whole set appearing in NEI.
- It supposedly tastes like strawberries (relating to its pink color perhaps), but we do not recommend you consume or make oral contact with any exotic matter.
- In older releases, Euphemium’s production has been buffed due to how easy Schrabidium was obtainable, then when Schrabidium’s production itself was buffed, it was «de-buffed» back to normal.
- Euphemium appears to be negative-energy type exotic matter, which means that it should
Negative energy should not be confused with antimatter, which is still positive energy. Instead of creating a massive energy release on contact (), it simply erases itself and whatever it contacted out of existence ().
erase matter and energy out of existence on contact (which it does in the custom nuke) without proper containment. Thankfully, it does not due to it being unusually inert.
- The name appears to be a reference to Euphemia li Brittania, a character from Code Geass. It would make sense as she was related to the creation of the F.L.E.I.J.A. bomb, which is also present in this mod and requires this material.
Background
The Hunter Chopper is an artificial boss mob crafted by the player in the Assembly Machine. It spawns as soon as it is placed down, like a spawn egg, and will immediately attempt to gun down any mob it finds, including you. Its only purpose is to drop scrap CMB steel for , other than that, it drops no XP or any other useful items. When finally killed, it explodes causing moderate terrain damage.
Creation
The Hunter Chopper is artificially constructed, it does not spawn naturally anywhere. It is primarily made of CMB steel, making it quite tough to make. It also uses expensive Fusionary Watz Plant calculation matrices for its onboard computer systems and presumed AI.
Dangers
The Hunter Chopper is automatically hostile to all mobs and players and will start attacking as soon as it reaches optimal altitude, if not instantly. It has an approximate health of 750 and very good resistance to damage.
It uses an «Emplacement Gun» that you gave it for its primary mean of attack. It is an automatic gun of some kind that does not run out of ammunition. It hits fast and it can kill mobs very quickly.
It also occasionally drops concussion bombs (bombs that don’t cause block damage) in groups of 5, usually when it is directly above a mob/player or in a scenario when its Emplacement Gun cannot be used effectively.
Uses/Farming
The only purpose of the Hunter Chopper is to acquire a warped piece of CMB steel for Gerald. Excess CMB scrap can be smelted back into CMB steel ingots.
You cannot use it for your own purposes directly, unfortunately (such as flying it or making it attack/protect certain players/mobs), but you can technically plant it in an enemy location and force them to kill it or relocate.
How to Bring it Down
The Hunter Chopper is highly resistant to conventional weapons, even some low-level turrets, and nuclear weapons.
It will attempt to evade slow-moving projectiles such as mini-nukes and Heavy Turret Shells.
If you have no ranged instant-kill weapons, you will be forced to use heavy anti-aircraft weapons.
The best method is to use the WIP Turret, which is a heavy anti-aircraft gun, it can take down a Hunter Chopper in ~2 well-placed hits, however, the AAA shell it uses causes heavy block damage, meaning it could destroy friendly structures or itself by accident. Stinger rockets are the next best thing to use, they do minor terrain damage and are guided so the Hunter Chopper cannot evade it. Turrets are slower, but can still work.
Production
See: Guide: Euphemium Creation for proper guide on all methods of production.
According to its «lore», it was first discovered among a pile of depleted Schrabidium nuclear fuel. Although it isn’t some kind of decay element, it does show that it is commonly formed when Schrabidium is put under intense conditions, practically the same as how Uranium turns into Schrabidium while under similar conditions.
In order to obtain Euphemium, you need to breed a quad Solinium (Schrabidium isotope, requires 4 heat to burn out) rod into a «Burnt Out Quad Schrabidium Rod», place it in a crafting table or your inventory 2×2 grid to make 1 Euphemium nugget, making it extremely expensive, as a Solinium quad rod is made by 2 ingots, 6 Solinium nuggets, each Schrabidium ingot costing ~+15 Million HE (considering if you used the Schrabidium Transmutation Device), all of that for just 1 nugget, so, value your Euphemium. This method is much easier if you only use Solinium as a waste product of Schrabidium fuel or other Euphemium production methods.
Another form of production is in the chemical plant, Euphemium dynosynthesis process, very expensive as well and requires a Euphemium ingot to start with.
Usage
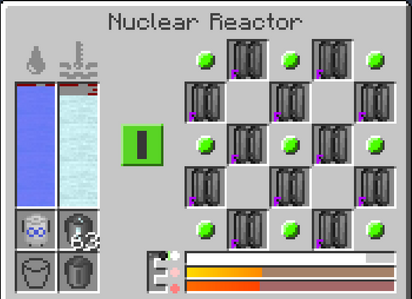
Nuclear Reactor GUI.
Fill it with Coolant and Water, then put any Fuel Rods of your choosing into it and press the red button to raise the rods.
Clicking on the E-shaped button next to the heat and steam gauges will switch the steam’s compression.
It won’t generate power on its own, but instead, produce Steam that can be pumped into Steam Turbines that do.
To completely fill it with quad rods, you’d need 32 nuclear fuel ingots.
Demonstration of rods placed next to each other.
Alternatively you can put niter blocks right next to the reactor to generate coolant passively.
You can significantly increase the amount of heat a rod produces by placing them next to each other.
You can show the grid in the GUI by pressing ALT.