Euphemium
Содержание:
- General Run Down
- The Burner Press
- Preamble
- The Hell Zone
- Uses
- Construction
- Things to do before you start
- Укреплённый камень[править | править код]
- Tips and Trivia
- Metallurgy 101
- Usage
- Шаровая сборка
- Mechanics
- Ядерная бомба[править | править код]
- Gerald The Construction Android
- Trivia
- NOTICE
- Uses
- Pros and Cons
- Trivia
- Production
- Usage
- Types
General Run Down
The Watz Power Plant needs pellets and a Titanium Filter to work, every pellet has his own statistics like max-age (how many ticks the pellet lasts at a maximum), power per tick (how much power it generates every tick), power multiplier (multiplies the power generated with each pellet), heat provided (how much heat the pellet generates, which effects waste per tick), heat multiplier (multiplies the heat generated with each pellet) and decay multiplier (multiplies the decay rate for every pellet in the power plant).
Emergency ejection
When a pellet reaches its end of life and depletes, it turns into a lead reflector and begins the cycle again. These lead reflector pellets turn into lead powder when they themselves deplete.
If the Poisonous Mud internal buffer of the power plant is full, the power plant will automatically eject the waste trough a random access hatch.
Typical «meltdown»
The Watz Plant has no maximum heat limit, but since heat also correlates with waste production, you may want to keep it down to prevent waste overflow.
If the waste overflows even emergency ejection, it will completely break off its casing from the overflow and leak mud all over the place. However, there is a small chance that the Watz will explode into a Fölkvangr Field like a F.L.E.I.J.A.
The Burner Press
The burner press uses (as the name implies) combustible materials (i.e. furnace fuel) to press ingots. Since ingots can be pressed into many different shapes, you need to make a demountable piece that helps the metal become the shape you want it to: The stamp. Flat stamps can be crafted with a desired material (for example, iron), some bricks and a pile of redstone dust. While a flat stamp does have some uses, they aren’t all that important, hence why we are going to upgrade it a little. For that, open your trusty template folder and select «Plate Stamp» on the first page, with the plate stamp’s material matching the one of the flat stamp you have just crafted. Voilà, you have created a stamp, ready for use! Now fire up your burner press, wait for the gauge to hit the yellow area, put the stamp on the top and some copper at the bottom, and now the magic starts: You have made yourself your very own copper plates. Note that even when idle, the press will burn fuel, so either remove unwanted fuel when not in use or use a lever to «pause» the press. Note that the temperature gauge will rise as long as fuel is burning, the hotter the press, the faster it will go. Don’t worry, the press will stop heating up if the maximum is reached, it cannot overheat.
Preamble
The Nuclear Tech Mod has many, many recipes, it’s unlikely that any one person can memorize them all. While there are plenty of mods that aid you in that regard, only Not Enough Items will show you all recipes, uncluding ones that make use of modded machines. Using NEI is crucial, and so is understanding how it works. Here are a few tips that might make your life a whole lot easier:
- The NEI overlay can be toggled by pressing ‘O’ while looking at your inventory
- On the bottom left corner of your inventory, given that the overlay is enabled, there is a button for an options menu. It is advised that you turn on the «Highlight Tooltips» option in the «World» caategory, as it will displaay the name of whatever block you are currently aiming at on screen. Alternatively, there is a NEI addon called «WAILA» which has the same core functionality, plus some extras.
- Pressing R on an item will show you how it’s made. In addition, pressing U allows you to see all the recipes it is used in.
- When looking at recipes, you might not always see what you want to at first glance. If multiple pages are available, on the bottom there’s buttons to go through pages of the crafting machine you’re looking at (e.g. if you’re looking at a workbench recipe, the bottom arrow buttons will lead you to more recipes of the workbench). The top arrow buttons, if available, will lead you to recipes in other machines (e.g. if you’re looking at a workbench recipe, the top arrows will lead you to recipes of other machines, for example the furnace). This is very important, since some items can be made in multiple machines, and the machine that comes up first might not be available to you at the moment.
The Hell Zone
The nether has not changed significantly since installing Nuclear Tech, aside from two things:
- There’s now a couple of ores spawning in the nether, most notably uranium, tungsten and sulfur, all of which are also found in the overworld
- The nether in its entirety is now slightly radioactive
The last fact might frighten you, but be assured it’s just a mild 0.1 RAD/s which isn’t all that big of a deal. It would take almost 3 hours for you to die in the nether from radiation, so take your time and get some quartz. Might as well use some phosphorous, but watch out for the white ingots — they’ll set you on fire if you don’t have a suit to protect yourself from them. There’s also plenty of uranium which becomes interesting later.
Uses
Its ingot and compound plate forms are what are primarily used, but its powder and unrefined blend form can also be used.
It is used to make tools. While the tools don’t have a harvest level any higher than iron, they have the advantage of being completely unbreakable. These tools can then be upgraded into Schrabidium tools which gives them numerous abilities, at the cost of them being no longer indestructible.
It is used in various mid-late game machines to make them much tougher. One missile fuselage can even be plated in Desh to increase its HP.
Unrefined Desh blend has 2 uses: the Desh Dynosphere and a Radiation Absorber upgrade.
Compound plates with Schrabidium nuggets can be used to upgrade a CMB Steel shredder blade into an indestructible Desh one.
It is used for production.
A Desh stamp for use in Presses is currently being worked on as an indestructible stamp. Low priority, so it will take a while to be added, if at all.
Compound Plate Recipe
Desh cannot be stamped, so it has to be made into a compound plate instead in one of the Anvils:
- 2 Desh Ingots
- 2 Polymer Powder
- 1 High-Speed Steel Ingot
(Produces 4)
Construction
Main Coils
The hadron comes in two major components for its coils, the plating and the coil itself. The coil is a 3×3 hollow circle, meaning there is 8 total coil blocks per segment, keep this fact in mind for later parts. All 12 exposed sides must be covered with plating in order to be valid. (See image) There are plating blocks provided with varying colors, but it may be expensive to manufacture (in terms of Steel) all of them especially if your hadron is very large as the recipe may require. At no point can the hollow path be obstructed or lack a coil or plating block.
Example cross-section of a hadron coil.
Core
The core (in a circular style hadron) is ideally in the center of one of the sides of the circle. The sides must be facing into the coil paths, otherwise it will fail to operate. An access terminal is usually required to open the GUI, it may be placed on any side as long as it is in the center of the segment.
Corners
Corners follow more or less the same principle as the main coils. They must turn the traveling particle at 90 degrees. The outer edge of the corner may be omitted however. (See image)
Example corner with some plating removed to show
Analysis Chamber
Unlike most other components of the hadron, the analysis chamber is more strict in its construction. It must be exactly 3 blocks in length and sometimes requires the use of lower tier coils directly adjacent to it if problems occur. Any of the blocks may be of a window variant however. It is usually directly opposite to the core and access terminal.
Example analysis chamber with window. Different plating type adjacent is purely cosmetic in choice.
Power Plugs
Power plugs provide the core and coils with electricity to work. Coils consume a lot of power, so there are several different tiers to power plugs with different charge rates. They can be upgraded easily by taking one and adding a fuse in your 2×2 crafting grid. The charge rates however may exceed the default NTM machine power transfer rate, so a Transformer (usually a DNT-20Hz one) is used to increase the rate and simultaneously act as a large buffer.
Example power source
Things to do before you start
One thing that you can do before engaging in the progression, as well as something you should always do if you have the time, is looting structures. Your world is littered with buildings and dungeons alike, all full of stuff free for the taking. You shouldn’t solely rely on structures for your resources, but they give you a head-start when it comes to progressing through the mod. Here’s a list of structures which are great for raiding in early-game:
- Antennas: A common structure with a few resources, mainly steel ingots, wires and basic circuits.
- Radio stations: A great source of concrete and steel, the small side building also has tanks filled with diesel. The chests often also contain revolvers and sometimes weaker shotguns which are fantastic alternatives to your stinky old vanilla bow.
- Relay stations: Huge antenna-like structures with loads and loads of steel. Steel sets are only marginally better than iron — but with steel so easily accessible and in such quantities, you’ll be able to make steel tools quickly.
- Crashed space ships: Somewhat rare and filled with items that aren’t very useful in early game, they still contain a considerable amount of steel and a chest full of rare items, more often than not consumables and rocket launchers.
- Crashed vertibirds: Helicopters that are buried in the desert, they are a good source of steel and often contain parts for power armor.
- Factories: Large structures made of brick which have many machines and chests full of raw materials. Some say there’s a treasure hidden in the lava.
However, this world isn’t a place filled with just candy and free stuff, there’s also places which you absolutely should not enter, or even approach, unless you are well equipped:
- Nuclear power plants: Easily recognizable by their large cooling towers and by the fact that everything in proximity to it is dead, these structures contain many valuable resources. However, every power plant also has its own on-site nuclear waste storage, which causes ambient radiation levels to skyrocket. Unprotected players may die within less than a minute if they choose to approach a power plant. To add insult to injury, high levels of radiation can also turn creepers into mutated nuclear creepers, may Lauren have mercy on your soul if you encounter one of these.
- Radiation hotspots: Rare, but extremely dangerous craters filled with rocks that are boiling from radiation. They offer no noteworthy loot, so it’s best to avoid them.
- Nuclear waste storage tanks: Tower-like structures with nuclear waste leaking out of them. Buried deep within all the nuclear waste usually lies a treasure chest, but without the equipment, you are unlikely to even get to see any of it without dying a dozen times.
- Duds: Not very dangerous per se, but you should not meddle with them. There are certain ways to extract resources from them, but those are very dangerous and not relevant to you unless you have reached end-game.
- Poison geyser: Easily recognizable from the lack of grass surrounding a patch of crumbled rock, the geyser periodically spits out a jet of poison gas. Below it there are a few blocks of yellowcake, although these aren’t very useful until you have reached the nuclear age.
Укреплённый камень[править | править код]
Укреплённый камень гораздо прочнее обычного и может выдержать взрыв крипера и ТНТ, более того, если поставить стену из такого камня, то даже при взрыве реактора блоки за ним остаются. Это полезно при использовании опасных схем для реактора, так как коробка из таких блоков (углы тоже нужно ставить) почти полностью поглотит урон (зависит от силы и расстояния от камня до источника взрыва). На английской вики рекомендуют минимальную толщину в 4 блока для полной нейтрализации ядерного взрыва.
С версии 1.6.4 в IndustrialCraft 2 Experimental получается только при нанесении распылителем пены на железные леса. После полученная укреплённая пена затвердеет и образуется укреплённый камень.
Выпадает после застывания при добыче киркой или буром.
Крафтправить | править код
Получается путём распыления пены на железные леса с возможным последующим нанесением на пену песка.
Крафт до экспериментальной версии:
| Ингредиенты | Процесс |
|---|---|
|
Камень +Композит |
Укреплённая дверь
| Тип |
Твёрдый блок |
|---|---|
| Требования |
Нет |
| Действует лигравитация |
Нет |
| Прозрачность |
Да |
| Светимость |
Нет |
|
150 |
|
| Инструмент | |
| Возобновляемый | |
| Складываемый |
Да (64) |
| Воспламеняемый | |
| Первое появление |
IC v4.73 |
Tips and Trivia
- The IRL RBMK technically isn’t a BWR, it’s design is unique to itself, but it’s referred to as a BWR for sake of simplicity and since that’s the reactor classification it most closely resembles.
- A planned machine called a «deaerator», which is a machine that purifies water by removing dissolved oxygen and other gases, is to work in tandem with the RBMK.
- Neptunium fuel (and other fast fissioning fuels) only requires fast neutrons to split, and splits into more fast neutrons. Use this to your advantage.
- Control rod groups can be very useful if used right.
- If things are getting out of control, AZ-5 could potentially make the difference between a saved reactor and a meltdown.
- The AZ-5/A3-5 button on the model of the console is actually called «SPAM» instead, which is a play on the word «SCRAM», which is basically the western equivalent to the A3-5.
- If you right click the «HOW 2 RBMK» book on the console, it will actually give you a guide book which is basically an abridged version of this wiki page.
- It can be burned in a furnace for 4 operations.
- Since the book is a part of the model, it will remain there even if you «take» it. There is a cooldown of several seconds until you can pick up another to mitigate this slightly.
- Highly prone to Chernobyl jokes.
- Some fuels are not finished.
- Spent fuel can contain Xenon-135
If you do not wish to have the Xenon byproduct, you can just expose the highly depleted rod to a neutron source rod (maybe near some neutron reflectors so you don’t have to use too many source rods) and when the Xenon burns away, remove it manually.
poison, which can be extracted in tiny amounts if it is high enough.
- While fuel rods cool much faster when inside the reactor, this may not be feasible if you are actively replacing depleting fuel rods or if the fuel is self-igniting, use a Spent Fuel Pool Drum to cool them down in these cases.
- Fuel rods increase in radioactivity as they deplete to simulate the effect of accumulating fission and neutron absorption products.
- This includes DRX as well.
- Xenon-135 also massively increases radiation.
- The exceptions are Highly Enriched Australium Fuel and Low Enriched Australium Fuel, which are fully stable even after depleting and accumulating Xenon.
Metallurgy 101
Armed with copper plates (which you can make into copper panels at an anvil for 4 pieces each) and hopefully some tungsten, you can now craft your second machine, the blast furnace. This machine has many recipes, but for now you’ll only need the two most important ones: Steel and minecraft grade copper (also known as red copper). The blast furnace can be powered with coal or lava, which gets stored internally so that nothing is lost when the furnace is currently idling.
- Steel: A piece of iron and a lump of coal make two ingots of steel
- Red copper: It’s an alloy of redstone and regular «industrial grade» copper.
The mod makes use of many alloys, but these two are the most important ones. The furnace is slow, so it would be a good idea to make multiple (or to steal them from a factory structure).
Usage
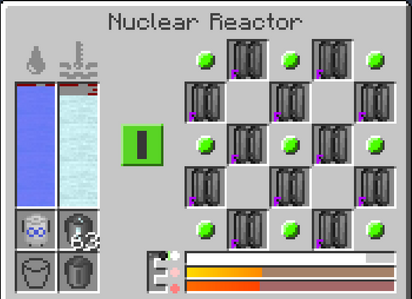
Nuclear Reactor GUI.
Fill it with Coolant and Water, then put any Fuel Rods of your choosing into it and press the red button to raise the rods.
Clicking on the E-shaped button next to the heat and steam gauges will switch the steam’s compression.
It won’t generate power on its own, but instead, produce Steam that can be pumped into Steam Turbines that do.
To completely fill it with quad rods, you’d need 32 nuclear fuel ingots.
Demonstration of rods placed next to each other.
Alternatively you can put niter blocks right next to the reactor to generate coolant passively.
You can significantly increase the amount of heat a rod produces by placing them next to each other.
You can show the grid in the GUI by pressing ALT.
Шаровая сборка
Но чаще всего в ядерном оружии применяют не уран, а плутоний-239. Его получают в реакторах, облучая уран-238 мощными нейтронными потоками. Плутоний стоит примерно в шесть раз дороже U235, но зато при делении ядро Pu239 испускает в среднем 2,895 нейтрона — больше, чем U235 (2,452). К тому же вероятность деления плутония выше. Все это приводит к тому, что уединенный шар Pu239 становится критичным при почти втрое меньшей массе, чем шар из урана, а главное — при меньшем радиусе, что позволяет уменьшить габариты критической сборки.

Слой алюминия использовался для того, чтобы уменьшить волну разрежения после детонации взрывчатки.
Сборка выполняется из двух тщательно подогнанных половинок в форме шарового слоя (полой внутри); она заведомо подкритична — даже для тепловых нейтронов и даже после окружения ее замедлителем. Вокруг сборки из очень точно пригнанных блоков взрывчатки монтируют заряд. Чтобы сберечь нейтроны, надо и при взрыве сохранить благородную форму шара — для этого слой взрывчатого вещества необходимо подорвать одновременно по всей его внешней поверхности, обжав сборку равномерно. Широко распространено мнение, что для этого нужно много электродетонаторов. Но так было только на заре «бомбостроения»: для срабатывания многих десятков детонаторов требовалось много энергии и немалые размеры системы инициирования. В современных зарядах применяется несколько отобранных по специальной методике, близких по характеристикам детонаторов, от которых срабатывает высокостабильная (по скорости детонации) взрывчатка в отфрезерованных в слое поликарбоната канавках (форма которых на сферической поверхности рассчитывается с применением методов геометрии Римана). Детонация со скоростью примерно 8 км/с пробежит по канавкам абсолютно равные расстояния, в один и тот же момент времени достигнет отверстий и подорвет основной заряд — одновременно во всех требуемых точках.

Из жизни огненного шара На рисунках показаны первые мгновения жизни огненного шара ядерного заряда — радиационная диффузия (а), расширение горячей плазмы и образование «волдырей» (б) и возрастание мощности излучения в видимом диапазоне при отрыве ударной волны (в).
Mechanics
Neutrons
Neutrons are what make fuel split and heat up. Neutrons are generated by fuels marked as self-igniting are in a fuel rod or when fuel is impacted by the right neutron type. Fuel has a tooltip which shows which neutron type it needs to split, as well as what type it splits into. Neutrons only travel horizontally and follow a straight path until they reach another fuel rod or a reflector. Self-igniting fuels generate neutrons automatically, and can react with itself; too many self-igniting fuel rods can lead to a meltdown.
Neutron source rods are a «special» type of self-igniting rod, they do not fission and do not produce a lot of heat on their own. They also deplete quickly, so you should remove it and replace it with a regular fuel rod once the reaction has started to be most efficient.
Heat
Fuel rods, when experiencing fission, generate heat. Heat is transferred to adjacent components, and can be used to generate steam for power generation. Components also gradually cool down through passive cooling, which increases depending on how many components your reactor has. This means you should be careful with adding too many structural columns, as it could cool the reactor down beyond any usable temperatures.
Xenon Poison
Xenon-135 is a common product resultant from fission reactions, which can build up in the fuel rods of a reactor and act as an undesirable neutron absorber. Simply put, this is something that slows down fuel reaction when you don’t want it. Xenon «burns» away at higher power, so if your reactor can output enough neutrons, you shouldn’t worry much about it. It may be problematic if you wish to run your reactor at low power however, as it may drop the reaction too much or halt the reaction entirely.
Xenon can also be a problem with certain types of fuels that require an initial neutron flux burst to initiate criticality and become self-sustaining or requires a significant driver to keep it critical. Xenon prevents this initial neutron burst from being as effective and thus requires increased power (ie raised control rods) to burn it off and attain criticality. This means that once the Xenon is burned off, the flux level will be at a level far higher than what would’ve been necessary, potentially causing a meltdown if the reaction doesn’t stabilize itself or by means of lowering control rods.
Fuel Temperature
When fuel reacts, it generates heat, which is shown as core and skin temperature. As stated before, core temperature doesn’t matter too much, as it can be way higher than the skin temperature which is what transfers to the fuel rod block. Skin temperature is almost always higher than the reactor temperature even if you have good cooling due to heat transfer. As long as the skin temperature is nowhere near the melting point of the rod and flux is stable, you should be fine.
Meltdown
RBMK meltdown mid-explosion. Notice the debris flying out.
Probably the most interesting part, a meltdown is when things get out of control and the reactor literally melts. It happens when the skin temperature gets past the melting point of a given fuel, or when a reactor component’s temperature reaches more than 1500 ºC. It explodes violently, releasing debris and high amounts of radiation into the environment. Debris can be collected by hand and will give you the respective debris item. They can’t be processed yet, and are just waste for now. After a meltdown, Corium replaces the fuel rods and is highly radioactive, while regular RBMK debris variants replace the rest of the components. Corium solidifies over time, turning into corium blocks which are fatally radioactive in seconds; cleanup is extremely difficult until they have decayed as a result. Reactor Corium and Sellafite-Corium are not to be confused.
ReaSim (Realistic Simulation)
ReaSim is both a gamemode and set of alternate components that are meant to give a more «realistic» style to the reactor on top of its mechanics. ReaSim fuel columns emit neutrons in a random set of 6 directions, instead of the 4 cardinal directions (they can also be made automoderated with a cheaper recipe). Steam boiling can be done within any component column, water can be inserted and steam extracted with special inlets, however the only steam compression type usable is super dense.
Ядерная бомба[править | править код]
Ядерная бомба
| Тип |
Твёрдый блок, сущность (после активации) |
|---|---|
| Действует лигравитация |
Только после активации |
| Прозрачность |
Нет |
| Светимость |
Нет |
| Инструмент |
Нет |
| Возобновляемый | |
| Складываемый |
Да (64) |
| Воспламеняемый |
Да (Активация) |
| Первое появление |
IC v4.73 |
Активированная ядерная бомба
|
Нет |
|
| ID сетевой игры | |
| ID сохранения |
Ядерная бомба — самый мощный тип взрывчатки в IndustrialCraft 2. Поражает огромную площадь, при этом уничтожая 75 % выпавших блоков. Аналогичным эффектом обладает взрыв ядерного реактора при перегреве, однако реактор бьёт больше вглубь, чем на радиус. Активируется только сигналом красного камня или любым переключателем. Время до детонации 15 секунд. На слабых компьютерах взрыв ядерного заряда может понизить количество кадров. Даже на мощных компьютерах большое количество взрываемых ядерных зарядов вызовет падение производительности.
Может использоваться для облегчения обнаружения и/или добычи алмазов и других руд, в том числе и урана. Просто разместите атомный заряд на высоте примерно 15-20 блоков от коренной породы, и если у вас нет нано/квантового костюма, бегите подальше или сделайте укрытие из двух слоёв укреплённого камня, поскольку прочность обсидиана в моде IndustrialCraft 2 сильно уменьшена. Огромная подземная дыра обычно имеет на краях множество руд.
В папке имеется файл , его можно открыть с помощью блокнота. В файле имеется строчка
# Maximum Explosion power of a nuke, where TNT is 4
  explosionPowerNuke=35.0
Можно выставить значение на свой вкус, но с увеличением мощности усиливается падение производительности на сервере, вплоть до его падения. Оптимальным является параметр с по .
Начиная с версии 1.106, взрыв ядерного заряда оставляет после себя заражённую радиацией область. К любому игроку или мобу, зашедшему на неё, будут применены эффекты Отравление и Голод.
Ядерная бомба, взорванная рядом с иссушителем, отнимет у него около половины здоровья. Это серьёзно облегчает битву с ним. При правильной организации места призыва иссушителя с парой ядерных бомб он может быть быстро убит, но использование более трёх бомб избыточно, и при любом использовании ядерного оружия следует учитывать его последствия в виде значительных разрушений.
В экспериментальной версии ядерная бомба активируется с помощью лежащего посередине урана или плутония и лежащих по краям блоков промышленного ТНТ.
Крафтправить | править код
В последних версиях рецепт крафта, как и сам блок, перенесен в разряд секретных.
| Ингредиенты | Процесс |
|---|---|
|
Утолщённый отражатель нейтронов +Улучшенная электросхема +Улучшенный корпус машины |
Использованиеправить | править код
В обычной версии ядерная бомба работает как обычный ТНТ (для активации её можно поджечь или дать сигнал красной пыли). В экспериментальной версии:
- В эти слоты помещаются промышленный ТНТ (ITNT). Количество ITNT в одном слоте будет продублировано в остальные. До 1 стопки на ядерный заряд.
- В этот слот помещается плутоний (как полный, так и кусочки) или различные виды урана. Плутоний в несколько раз мощнее, но мощность взрыва не зависит от использованной его формы. До стопки на ядерный заряд.
Gerald The Construction Android
Probably the most powerful weapon in the mod, its range is about 1000+ blocks and no radiation.
Its goal is to build a superweapon on the moon — Tom, or its other name «Project Horizons»
In order to use Gerald, you need to link him to a satellite designator and send him to the moon using Soyuz-FG and the Orbital Module. Then, when you launch Gerald to the moon, you can set the X and Z coordinates in the satellite designator, and Tom will fly to the place where you set the coordinates in the designator
- After you have launched Gerald, you will get the achievement «Apogee».
- After you specify the coordinates and launch the Tom, you will get the achievement «The Horizons».
- Gerald is a reference to Fallout: Equestria Project Horizons. Tom is the nickname of the moon rock missile that would launch at the Fo:E world and cause an extinction-level event. The robots that were sent to the moon to build it, were supposed to be Gerald The Construction Android.
Trivia
- Considering its lore discovery and production methods in outdated versions, it implies that depleted Schrabidium fuel contains tiny amounts of Euphemium, but not enough to be of any worth.
- Of particular interest, only the base ingredients (ingots, nuggets, powder, etc.) of Euphemium tools and weapons appear in the creative menu, despite the whole set appearing in NEI.
- It supposedly tastes like strawberries (relating to its pink color perhaps), but we do not recommend you consume or make oral contact with any exotic matter.
- In older releases, Euphemium’s production has been buffed due to how easy Schrabidium was obtainable, then when Schrabidium’s production itself was buffed, it was «de-buffed» back to normal.
- Euphemium appears to be negative-energy type exotic matter, which means that it should
Negative energy should not be confused with antimatter, which is still positive energy. Instead of creating a massive energy release on contact (), it simply erases itself and whatever it contacted out of existence ().
erase matter and energy out of existence on contact (which it does in the custom nuke) without proper containment. Thankfully, it does not due to it being unusually inert.
- The name appears to be a reference to Euphemia li Brittania, a character from Code Geass. It would make sense as she was related to the creation of the F.L.E.I.J.A. bomb, which is also present in this mod and requires this material.
NOTICE
The Watz Reactor is currently being reworked, this article may no longer be accurate when said reworking is completed and released.
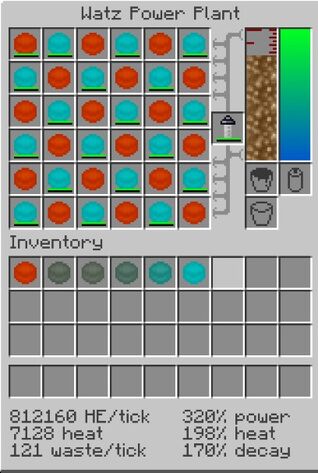
The Watz Power Plant is a multiblock reactor that generates power and Poisonous Mud using Pellets and a Titanium Filter. Using a Multiblock Structure marker is recommended when building it.
The Watz Plant is very large, here is the breakdown of all its required components:
- 96 Watz Stability Elements
- 88 Watz Reaction Chambers
- 44 Watz Supercoolers
- 88 Reinforced Control Rods
- 12 Electricity Ports
- 1 Watz Reactor Control Computer Core
- 4 Access Hatches
- 172 Reinforced Stone
Uses
Euphemium can be used for:
—Validating Ammo in the «Annihilation Ray ZOMG Cannon»
-Crafting the Pacifist’s Machine Gun
-Making extremely endgame items, such as Artificial Xen Crystal, Spark Blend, Euphemium Compound Plates (which can be used to make Euphemium armor), Dineutronium Dynosynthesis (Dineutronium is even more endgame), etc.
It has can be used in the Custom Nuke. It contributes 1 to its anti-mass stage. Ingots and nuggets contribute the same, so nuggets are preferred in this case.
Compound Plate Recipe
Euphemium cannot be stamped, so a plate form must be produced like this in one of the Anvils:
- 2 Euphemium Ingots
- 2 Volcanic Gems
- 1 Nether Star
(Produces 4)
Pros and Cons
Pros
- BWR, no coolant required.
- Can make huge amounts of power with the right setup and fuel.
- 100% modular, allows creativity.
- Can run on a multitude of fuels for your needs, capabilities, and desires.
- Will maintain use even in Fusion or Watz stages.
- Very aesthetic compared to the regular reactors.
- Extremely violent meltdown.
Neutral
- Designing can be complicated or take a lot of space.
- Fuel depletion percentage very slowly decreases effectiveness of the rods.
- Can take a long time to «fully» deplete (rather deplete to an appreciable percentage), which means breeding can take a very long time but the power produced is incredible even from little fuel.
Cons
- Egregiously expensive.
- Self-igniting fuels cannot be fully stopped from reacting unless manually removed.
- Steam production can be very high, requiring use of numerous Industrial or Leviathan Steam Turbines, which are also expensive.
- Extremely violent meltdown.
Trivia
- After its rework, the cyclotron has fewer recipes than it did before.
- The Cyclotron appears to have 4 small tanks on its corners, presumably by the way they look: 2 for antimatter storage and 2 for coolant storage.
- Each side has a different symbol on it, see the gallery.
- The side with the «powder» symbol uses a silhouette of the powder texture used as a base for Energy Powder, Nitanium, Desh, Spark, and thermonuclear ashes instead of the typical powder texture for material powders.
- Placing in Thermonuclear Ashes, The Book of Boxcars, a Mask Man
It as originally supposed to unlock special recipes, but it never got to that point.
coin, and a Diamond Gavel in the respective slots activates an «enchanted» mode with a fancy render.
Production
Desh blend must be refined and processed in a Chemical Plant with Mercury and Light Oil.
Desh blend itself is acquired from Rare Earth Ore, which must either be Centrifuged or Crystallized and then Centrifuged to get the best results. If you don’t have the Silk Touch enchantment, then the fragments dropped must be shredded and then crafted into the blend. Since Desh blend is just a collection of Rare Earth Metals, it can be artificially made using a Cyclotron.
Composition Breakdown
- 2 parts Boron
- 2 parts Lanthanum
- Lithium
- Cobalt
- Neodymium
- Cerium
- Niobium
- Some Mercury
For more information on the components themselves, see Rare Earth Elements.
Usage
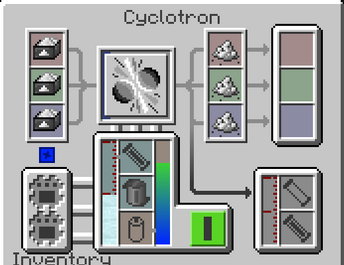
Example Cyclotron GUI
The compatible elements for boxes are: Lithium, Beryllium, Carbon, Copper, and Plutonium. They are made in the assembly machine combining one powder with one insulator.
Many of the elements produced have very few uses, usually for Nitanium production or being an intermediary step for another rare element, such as one of the Rare Earth Elements or trans-schrabidic super heavy elements, notably Australium.
Due to the expense of running, it should only be used for very rare elements (for further use in Nitanium or Desh for example) or Antimatter.
Although if you can afford to run this machine consistently (possibly utilizing a mining ship), you can use this machine as a stand-in for an energy-matter fabricator (think the replicator from Star Trek), though that would be purely for flex material as it is not sustainable in any sense.
The cyclotron can store up to 100 MHE and 32,000mb of coolant. Power is consumed very quickly at 690 million HE consumed per operation. Use all three slots at once to be most efficient. A Schrabidium Energy Storage Blocks at the minimum should suffice for a few operations. Coolant is consumed quite slow, so you don’t have to worry about that.
If it runs out of coolant, it will enter an overheat phase and shoot sparks and shrapnel all over. You have around a minute of continuous operation until it completely overheats and explodes into either: a mini-nuke explosion, a Balefire explosion, or spawn a black hole.
Antimatter and Antischrabidium
Antimatter is produced as a byproduct of operation, heavier element boxes produce more antimatter. The cyclotron has 8,000mb of internal storage for antimatter.
Antischrabidium is produced by bombarding an Antimatter cell with Plutonium.
Types
Special Meteors!!!
A video displaying all the specials meteors.
Each special type has a 1 in 300 chance of spawning. Disabled by default in the config
Large nuclear meteorite
A large meteorite which generates the outside entirely of treasure, and the inside entirely of stereotypical green ooze. WARNING: this is highly radioactive.
Giant ore meteorite
A giant meteorite with the outer layer generating meteor blocks, and the inner layer (basically a large meteor) entirely meteor ores.
Atomic meteorite
Creates a nuclear explosion on impact. The fallout spreads very far and creates a lot of radiation in the process. A direct hit from one of these meteors can very easily destroy your base.