Maps
Содержание:
Aberration[]
Elevation is listed in meters.
| Z | Description |
|---|---|
| Nothing special |
Obelisks
| Color | Lat | Lon | X | Y | Z |
|---|---|---|---|---|---|
| Red | 80.8 | 20.3 | -237600 | 246400 | 53500 |
| Green | 22.5 | 77.7 | 221600 | -220000 | 57300 |
| Blue | 18.9 | 16.1 | -271200 | -248800 | 66700 |
| Rockwell Terminal | 42.7 | 36.7 | -106400 | -58400 | -102900 |
Artifacts
| Artifact | Lat | Lon | X | Y | Z |
|---|---|---|---|---|---|
| Depths | 51.2 | 23.8 | -210000 | 11100 | 36000 |
| Shadows | 50.5 | 72.6 | 181170 | 4397 | -7593 |
| Stalker | 91.7 | 51.3 | 11063 | 333564 | 31971 |
Cave Entrances
| Cave | Artifact | Lat | Lon | X | Y | Z | Loot Crate Lvl |
|---|---|---|---|---|---|---|---|
| Old Railway Cave | Depths | 48.3 | 27.2 | -178400 | -13600 | 43000 | ? |
| Hidden Grotto | Shadows | 55.2 | 65.9 | 127200 | 41600 | 18000 | ? |
| Elemental Vault | Stalker | 82.4 | 48.2 | -14400 | 259200 | 13500 | ? |
Chamber Entrances
| Entrance | Lat | Lon | X | Y | Z |
|---|---|---|---|---|---|
| Fertile — Bio-Luminescent | 37.0 | 53.0 | 24000 | -104000 | 32900 |
| Bio-Luminescent — Molten Element | 62.2 | 68.2 | 145600 | 97600 | 15100 |
Surface Entrances
| Entrance | Lat | Lon | X | Y | Z |
|---|---|---|---|---|---|
| Northwest | 19.5 | 27.2 | -182400 | -244000 | 51100 |
| Northeast 1 | 26.8 | 63.2 | 106600 | -185500 | 49000 |
| Northeast 2 | 37.1 | 80.3 | 242400 | -103200 | 40500 |
| Southwest 1 | 52.3 | 23.3 | -213600 | 18400 | 54000 |
| Southwest 2 | 79.2 | 27.8 | -177600 | 233600 | 22300 |
Combat[]
This section describes the best way to fight against the Dragon and Manticore.
General
You (and if you have one) your tribe will want to have lots of rexes, along with other high damage and health creatures.
Where possible, wear a Gas Mask to counter the effects of Manticore’s torpidity cloud shrapnel.
Be mindful of the Rock Elementals that appears if the Manticore reached a certain health state. It could pose a huge issue especially if the Dragon is still alive at that point of time.
Strategy
The most commonly used strategy is bringing 18-19 rexes, a single yutyrannus, and perhaps an additional daeodon for increased survivability. Breeding the creatures for mutations in health or damage is recommended.
Using well bred Woolly Rhinos and a single Yutyrannus is also a good strategy.
Weaponry
It is not needed, but it may help if you bring firearms. If you do decide to bring a weapon, it is advised to bring at least 100 of the corresponding ammunition. It is ill-advised to bring any weapons that involve you getting close to one of the bosses with no mount.
Dangers
You will be fighting two bosses at the same time, and more wild and aggressive creatures will spawn than usual. Make sure you don’t get kicked off your mount, but if you do, find a new, vacant one as soon as possible to avoid death.
Most of dangers are similar to that of both Dragon and Manticore.
Что Такое Маяк?
Маяк также известен как ящик с припасами и отмечен цветным лучом света, поэтому новички не могут отличить его от обелиска. Ящики разного цвета содержат разные предметы, в том числе ресурсы, чертежи, строительные материалы и оружие. Нет никакой гарантии, какой предмет вы получите, но маяки появляются в определенных местах.
Маяк совершит процесс приземления, прежде чем вы сможете ограбить ящик, который он держит. Вы увидите паутину огней вверху и объект, медленно опускающийся в луче света. Как только он достигнет земли, паутина огней исчезнет, и ящик можно будет разграбить.
Однако они могут исчезнуть через определенное время, после чего свет погаснет. Вы также должны помнить, что нельзя стоять под маяком, так как это может толкнуть вас сквозь землю в глюке.
Хотя они несут невероятную добычу, вы должны быть осторожны, собирая их на серверах PVP, поскольку это часто приводит к дракам с другими. Есть также некоторые ящики, которые проходят сквозь объекты или приземляются в недоступных местах, поэтому не удивляйтесь, если вы случайно столкнетесь с одним из них.
Требования К Уровню
Есть множество разноцветных лучей света, и уровень вашего выжившего определяет, какие ящики с припасами вы можете открывать.
Цвета и соответствующие уровни игроков следующие:
- Белый: Уровень 3
- Зеленый: уровень 15
- Синий: уровень 25
- Фиолетовый: уровень 35
- Желтый: уровень 45
- Красный: Уровень 60
Самые Распространенные Места На Острове, Где Их Можно Найти
Маяки, как правило, появляются в определенных местах, причем цвета часто соответствуют сложности местности. Одним из примеров является то, что белые маяки предназначены для начинающих, и они могут помочь вам пережить первые дни.
Если вы ищете Маяк определенного цвета, то наиболее распространенные места, где их можно найти на Острове, следующие:
- Белый: пляжи
- Зеленый: немного в глубь суши от пляжей и к югу от центра карты.
- Синий: везде
- Фиолетовый: везде
- Желтый: везде
- Красный: глубокое море и северная и северо-западная части карты.
Как Это Использовать
Прежде всего вам нужно добраться до одного из этих столбов света. Самый простой способ найти их – взять прирученное летающее существо, такое как виверна, и летать вокруг, пока не наткнетесь на Маяк, который вы ищете.
Как только вы приземлитесь, один совет – избавить территорию от любых агрессивных динозавров, которые могут атаковать, и это обычное явление среди маяков более высокого уровня. Подождите, пока приземлится ящик с припасами, затем подойдите к сфере перед вами и нажмите кнопку, чтобы получить доступ к своему инвентарю.
Затем он поднимет предметы из ящика, и вы сможете переместить их в свой инвентарь.
Карта Ragnarok[]
|
Asgeir Waters Bay of Hope Castle of the Swamp Causeway of the Ancients Cliffs of Past Coastal Redwoods Cold Eye Ridge Costal Rise Crumbling Slopes Dag Rock Valley Dragon Breath Grotto Edric Rapids Egil Throughway Elysian Fields Elysian Flow Freyja Plains Glass Lake Hibbert’s Summit Hidana Highland Sands Highlands Bay Honor Ridge Ingrids Pass JackKnife Glacier Jarl River Joannas Inlet Knuffel Lake Lair of The Mask Lake Voges Light Redwoods Lower Craigs Lower Highlands Lower Redwoods Lowlands Mejo Plains Monkeyheim Northern Swamp Olga Beach Oluf Jungle Oscari Pass Pelagornis Bay Raven’s Peak Reta Forest Ruins of Etain Sands of Change Slope of the Gods Slosher Slope Snow Southern Flats Strip of the Bold Swamp Swamp of the Damned Taosst Creek The Ancients Tears The Burning Mists The Dark Waters The Dead Bluffs The Deep Woods The Greater Cliffs The Ivory Crag The Old River The Pit of Dreen The Sacred Bluff The Slopes The Source Thea Cliffs Titans Rise Twoshuk Forest Upper Hidana Upper Highlands Upper Pelagornis Bay Vali Ridge Vali’s Earthfall Vegurs Chasm Viking Bay Volcano Beach Volcano Plains Volcano Tippy Top Volcano UW Waterwall of the Ancients Wedlock Peak Western Highlands WhiteDove Falls Wyvern Forests Zelus Reef Ake Ridge Balder’s Pass Barnji Plateau Casun Islets Deathsands Erlend Rocks Fifer Plateaus Forbidden Valley Heru ur Rise Hidden Cavern Hidden Springs Highlands Highlands Lookout Ivan’s boats for less Jinx Point Katan Falls Little Snow Top Meshky’s Homestead Mithrim’s Fall Nataziel Spires Pepper’s Reef Perch of the Adventurer Rashaka Savanna Redwoods SW SW Tropics Scotland Spear of the Gods Forbidden Grotto Thunder Peak Timpanogos Twoshuk Bluff Upper Dagmar Lake Whisker’s Flats Maple Roost Murder Murder Snow MurderSnow Tyrannogon Bái Láng Cavern Dawson’s Bridge Donovan Bridge Ebling plateaus Ice Lake Snow Peak Snow Forest SnowCherub Lake Test hot Dragonmalte Trench Kamaka Ice Lake The Passages Glacier Hall The Tunnels Frozen Falls Pass Ice Queen Labyrinth Ice Queen Nest |
| Regions of the DLC Map Ragnarok |

Режимы Игры
Существует так много игровых режимов, которые являются эксклюзивными для определенных платформ, но это все игровые режимы, в которые вы можете играть повсюду. Они подходят для разных стилей игры и позволяют создавать более захватывающие серверы, поскольку добавляют немного собственного чутья и настраивают его по своему вкусу.
Режимы игры в Ark: Survival Evolved включают в себя:
- PvP (игрок против игрока)
- PvE (игрок против окружающей среды)
- Примитивный
- Хардкор
Однако невозможно перемещать вашего персонажа между разными режимами, например, персонаж PVP не может быть добавлен на сервер PvE. Это делает его справедливым, так что вы не можете присоединиться к серверу PVE и случайным образом прыгнуть на сервер PvP с полностью прокачанным персонажем.
PvP
Это суть игры Ark: Survival Evolved, поскольку она настраивает игроков друг против друга. Это позволяет проводить такие вещи, как войны племен и соревнование за ресурсы и припасы, поскольку вы сражаетесь не только с динозаврами, такими как Магмазавр, но и с людьми, которые бродят по карте.
Однако не рекомендуется начинать с PvP-сервера, пока вы не поймете основные механизмы игрового процесса. Это потому, что есть так много всего, чему нужно научиться, и это уже достаточно сложно в одиночной игре, и каждый игрок, с которым вы сталкиваетесь, не пытается вас убить.
PvE
Если сражаться на самом деле не ваше дело, но вы все еще хотите присоединиться к карте с другими людьми, вам следует присоединиться к этому серверу. Это не позволяет вам наносить урон другим игрокам, а также любым прирученным или чужим строениям, о чем каждый должен знать. Это позволяет создать мирную среду, в которой вы в первую очередь сосредоточитесь на строительстве и улучшении, а не становитесь самым грозным племенем на карте.
Примитивный
Вы начинаете вести довольно примитивный образ жизни, и этот игровой режим так и остается. Он забирает несколько энграмм, которые позволят вам улучшить и стать более технологически продвинутыми.
Если вам понравился этот режим, есть DLC под названием Primitive Plus, который добавляет энграммы, чтобы компенсировать потерю этих других предметов.
Хардкор
Этот игровой режим влияет на ваши уровни, так как после смерти все ваши уровни пропадают, и вам придется начинать все сначала. Это добавляет напряженности в игровой процесс, поскольку вы постоянно беспокоитесь о том, что что-то вас убьет.
Может показаться, что в этот режим вы никогда не захотите играть, но многим игрокам он действительно нравится из-за используемой стратегии. Это действительно похоже на игру на выживание, поскольку вы постоянно пытаетесь не умереть, поскольку начало игры меняет правила игры.
Differences from standard ARK
- Console Commands are not supported
- Artifacts are tributes for getting Blueprints or items at the Obelisks.
- Dungeons are the only way to get Tek and fight Bosses.
- Upper South Cave, North East Cave, The Caverns of Lost Hope, The Caverns of Lost Faith, and Tek Cave do not exist.
- Taming limit currently only 40 animals in singleplayer or 12 for each tribe member (up to 120) on multiplayer. Paying real money for Primal Pass will extend the limit to 60.
- Taming rate is set to 1.75.
- The equivalent of PC controls are as follows: Normal Attack= Left Click, Swipe up on movement side= Right Click, Swipe down on movement side= C key, Jump= Space bar
- Custom Consumables are not currently supported.
- Royal Griffins spawn on Far’s Peak. In order to tame or ride, the player must be respected. This can be achieved by being level 85+, wearing the Gold Crown cosmetic piece, or by sharing the same surname of the Griffin at level 40+.
- There is only one map on Mobile, it is The Island.
- Items such as the Motorboat and War Map are not included in the game.
- The Giant Bee is not in the game, and as such the only way to get Giant Bee Honey is from the craftable engram for the Giant Bee Hive.
- Dodo’s can be bred for varying sizes on Mobile. You can breed them to be large enough to be ridden or small enough to take them with your shoulder.
- The Equus comes with a stat known as Equus Power. Equus Power determines the speed and stamina of the Equus for racing.
- Phones with low storage quality will experience crashing and glitches, but these can be slowed down on airplane mode.
- Megatherium, Daeodon, Troodon, and most recently Pegomastax do not exist on the island. They must be killed in the dungeons and revived with Ancient Amber at the Obelisks or Revival Platform to tame.
- Tame Chronicling (Mobile) is available instead of Cryopod to free up some space. However, unlike cryopods it can’t be used to transport creatures trough narrow passages.
- No DLC in this mobile (Such Extinction, Genesis, Valguero and Ragnarok.)
Valguero[]
Elevation is listed in meters.
| Z | Description |
|---|---|
| Nothing special |
Obelisks
| Color | Lat | Lon | X | Y | Z |
|---|---|---|---|---|---|
| Red | 76.1 | 17.1 | -268098 | 213453 | -176 |
| Green | 48.8 | 76.1 | 213656 | -9431 | -12816 |
| Blue | 09.3 | 17.3 | -266886 | -331803 | 588 |
Artifacts
| Artifact | Lat | Lon | X | Y | Z |
|---|---|---|---|---|---|
| Brute | 47.7 | 88.0 | 309945 | -17829 | -7844 |
| Crag | 34.2 | 51.4 | 18235 | -121969 | -2315 |
| Cunning | 15.4 | 27.3 | -193360 | -28257 | -13027 |
| Destroyer | 67.0 | 89.0 | 319263 | 139142 | 32966 |
| Devourer | 48.7 | 90.3 | 329069 | -10066 | -3848 |
| Gatekeeper | 48.0 | 58.9 | 73261 | -16009 | -76504 |
| Immune | 74.3 | 35.8 | -115562 | 198013 | -25021 |
| Pack | 70.1 | 39.2 | -87882 | 164478 | -21879 |
| Skylord | 13.4 | 72.8 | 185989 | -298557 | -53736 |
| Strong | 72.2 | 36.5 | -109653 | 181848 | -20881 |
Cave Entrances
| Cave | Artifact | Lat | Lon | X | Y | Z | Loot Crate Lvl |
|---|---|---|---|---|---|---|---|
| The Lair | Strong,Immune,Pack | ? | ? | ? | ? | ? | ? |
| The Lost Temple | Brute,Devourer | ? | ? | ? | ? | ? | ? |
| The Unknown | Gatekeeper | ? | ? | ? | ? | ? | ? |
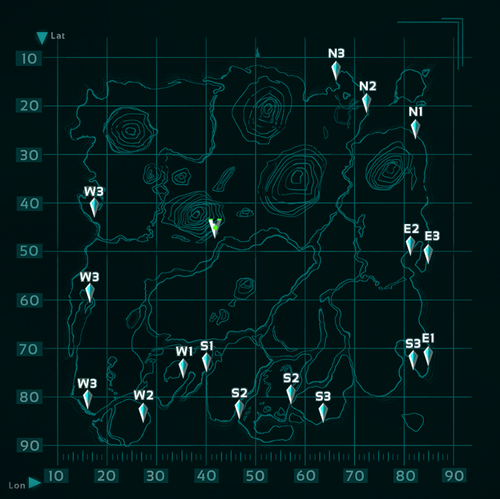
Карта Genesis
Ресурсы Арктического биома

Метал. Координаты 70.6 — 33.1; Можно найти много метала на подножье гора, а так же по пути.
Кристаллы. Координаты 76.5 — 32.4; Там есть тропинка, идущая вдоль горы, на которой много кристаллических руд.
Ресурсы болотного биома

Метал и кристаллы. Координаты 76.6 — 58.1; Начните с юго-западного края болотного биома и осмотритесь вокруг высоких деревьев. Вы найдете множество огромных металлических глыб, готовых к добыче. Посмотрите под деревьями и найдите несколько зеленых драгоценных камней.
Грибы и мед. Координаты 60.8 — 72.8; Поднимитесь по ветвям дерева и найдите целую среду обитания редких грибов. Кроме того, проверьте верхние ветви там будут несколько пчелиных ульев, полных меда.
Газ, сок и абсорбент. Координаты 84.0 — 74.0; Найдите кучу ядовитых деревьев, которые выделяют сок и газ. вам просто нужно подбежать к ним, чтобы иметь возможность собирать ресурсы и все-таки выжить.
Грибковая Древесина. Координаты 87.0 — 80.8; Не слишком далеко от ядовитой зоны вы обнаружите грибковые деревья, которые производят грибную древесину. Они безопаснее ядовитых деревьев, так что соберёте как можно больше.
Лунный биом
Амбра. Координаты 52.7 — 32.4; Вы можете добывать его из зеленых светящихся камней, разбросанных вокруг. Есть также несколько металлических камней.
Газ и нефть. Координаты 30.5 — 35.5; Идите вдоль газовых рек и соберите всю нефть и газ, которые накапливались здесь в течение многих веков.
Обсидиан. Координаты 19.8 — 23.5; Ищите обсидиановые камни по краям небольших плавучих островов. Они не так обильны, как вулканические, но все же их много.
Океанический биом
Метал. Координаты 20.8 — 47.1; Вокруг полно маленьких островков с большим количеством металлических камней. Просто прыгайте на один или два и начинайте майнить.
Обсидиан. Координаты 35.8 — 46.3; Большую часть обсидиана в этом биоме можно найти только на дне океана, поэтому ныряйте и попробуйте добывать его под водой.
Кварцевый Жемчуг. Координаты 19.4 — 52.7; Эти редкие жемчужины можно добывать из огромных раковин, которые прилипают ко дну океана. Ударь их пару раз, и они выплюнут жемчужины.
Вулканический биом
Обсидиан и осколки элементов. Координаты 27.2 — 73.3; Поднимитесь на скалистый холм и найдите целый участок обсидианового камня и несколько красных кристаллических образований, которые производят осколки элементов.
Сера. Координаты 25.5 — 76.6; Это идеальное место для добычи серы, которая нерестится под вулканическими горами или вблизи них. Просто идите под гору в пещеры и соберите столько серы, сколько вам нужно.
Нефть. Координаты 47.5 — 80.0; Эта область на южном краю биома полностью пропитана нефтью, так что собрать ее здесь будет очень легко.
Черная жемчужина. Координаты 20.4 — 78.2; Отправляйтесь в вулканическую пещеру и идите под гору. На дне пещеры вы найдете множество черных жемчужин, разбросанных по земле.
Unlocks[]
- Tekgrams
- Tek Foundation
- Tek Gauntlets
- Tek Hatchframe
- Tek Replicator
- Tek Trapdoor
- Tek Window
- Tek Windowframe
- Sloped Tek Roof
- Sloped Tek Wall Left
- Sloped Tek Wall Right
- Tek Boots
- Tek Catwalk
- Tek Ceiling
- Tek Dinosaur Gate
- Tek Dinosaur Gateway
- Tek Door
- Tek Doorframe
- Tek Fence Foundation
- Tek Foundation
- Tek Gauntlets
- Tek Generator
- Tek Hatchframe
- Tek Ladder
- Tek Pillar
- Tek Railing
- Tek Ramp
- Tek Replicator
- Tek Rifle
- Tek Staircase
- Tek Trapdoor
- Tek Trough
- Tek Wall
- Tek Window
- Tek Windowframe
- Mosasaur Tek Saddle
- Rex Tek Saddle
- Sloped Tek Roof
- Sloped Tek Wall Left
- Sloped Tek Wall Right
- Tek Boots
- Tek Catwalk
- Tek Ceiling
- Tek Dinosaur Gate
- Tek Dinosaur Gateway
- Tek Door
- Tek Doorframe
- Tek Fence Foundation
- Tek Foundation
- Tek Gauntlets
- Tek Generator
- Tek Grenade
- Tek Hatchframe
- Tek Helmet
- Tek Ladder
- Tek Pillar
- Tek Railing
- Tek Ramp
- Tek Replicator
- Tek Rifle
- Tek Staircase
- Tek Trapdoor
- Tek Trough
- Tek Turret
- Tek Wall
- Tek Window
- Tek Windowframe
Completing the harder difficulties will unlock all of the lower difficulty Tekgrams as well.
- Achievements
|
Survivor of the Center You defeated the guardians of The Center! |
The Center[]
Underground Sun (X, Y, Z): -25, 895, -275
Elevation is listed in meters.
| Z | Description |
|---|---|
| Nothing special | |
| -145 | Sea level |
| -520 | Underground world water level |
Obelisks
| Color | Lat | Lon | X | Y | Z |
|---|---|---|---|---|---|
| Red | 08.3 | 59.0 | 37440 | -211231 | 2000 |
| Green | 34.8 | 15.8 | -377280 | 42745 | -13600 |
| Blue | 50.7 | 81.2 | 250560 | 195130 | -8500 |
Artifacts
| Artifact | Lat | Lon | X | Y | Z |
|---|---|---|---|---|---|
| Hunter | 16.8 | 54.3 | -7500 | -130000 | -13100 |
| Skylord | 54.1 | 20.9 | -328200 | 228000 | -1900 |
| Massive | 10.3 | 52.9 | -20600 | -192100 | -24700 |
| Strong | 15.3 | 57.5 | 22500 | -144900 | -25900 |
| Clever | 19.3 | 24.2 | -296400 | -106000 | -8300 |
| Devourer | 24.1 | 26.2 | -277600 | -59600 | 2600 |
| Brute | 71.6 | 87.3 | 309000 | 395700 | -104400 |
| Immune | 49.3 | 65.5 | 100000 | 181300 | -29900 |
| Devious | 41.1 | 33.7 | -206000 | 103100 | -18400 |
| Cunning | 35.1 | 18.0 | -355700 | 45900 | -47000 |
| Pack | 60.7 | 53.8 | -12496 | 290792 | -32522 |
Cave Entrances
| Cave | Artifact | Lat | Lon | X | Y | Z | Loot Crate Lvl |
|---|---|---|---|---|---|---|---|
| Lava Oasis | Hunter | 15.8 | 50.5 | -44160 | -139351 | -10250 | ? |
| South Ice | Skylord | 60.0 | 22.5 | -312960 | 284261 | -4150 | ? |
| Lava | Massive, Strong | 11.2 | 67.4 | 118080 | -183437 | -2500 | ? |
| North Ice | Clever, Devourer | 18.7 | 29.7 | -243840 | -111557 | 8000 | ? |
| Southeastern Trench | Brute | 69.1 | 92.2 | 356160 | 371475 | -120000 | ? |
Jungle Cave
| Entrances | Lat | Lon | X | Y | Z |
|---|---|---|---|---|---|
| Land | 54.2 | 62.7 | 72960 | 228647 | -3750 |
| Ruins | 46.3 | 63.1 | 76800 | 152961 | -13550 |
| Flyer-accessible | 52.5 | 67.7 | 120960 | 212381 | -3500 |
| Underwater River | 45.0 | 64.0 | 85440 | 140501 | -19000 |
| Ocean | 50.8 | 71.3 | 155520 | 196088 | -14500 |
The Center Cave
| Entrances | Lat | Lon | X | Y | Z |
|---|---|---|---|---|---|
| Top | 35.9 | 34.4 | -198720 | 53287 | -4700 |
| Beneath 1 | 40.3 | 31.1 | -230400 | 95456 | -25000 |
| Beneath 2 | 36.4 | 35.0 | -192960 | 58079 | -25000 |
Cliffside Cavern
| Entrances | Lat | Lon | X | Y | Z |
|---|---|---|---|---|---|
| Flyer | 36.0 | 2.0 | -509760 | 54245 | -61150 |
| Land 1 | 58.1 | 12.8 | -406080 | 266051 | -53900 |
| Land 2 | 21.0 | 13.5 | -399360 | -89514 | -63700 |
Underground World
| Entrances | Lat | Lon | X | Y | Z |
|---|---|---|---|---|---|
| Flyer-accessible | 34.9 | 65.8 | 102720 | 43703 | 4000 |
| Ruins 1 | 34.3 | 53.3 | -17280 | 37952 | -13900 |
| Ruins 2 | 53.5 | 53.8 | -12480 | 221965 | -10750 |
| Underwater River 1 | 32.7 | 64.1 | 86400 | 22618 | -16000 |
| Underwater River 2 | 44.2 | 58.0 | 27840 | 132834 | -16000 |
| Underwater Ocean | 66.1 | 51.7 | -32640 | 343296 | -45000 |
Miscellaneous
Islands
| Island | Lat | Lon | X | Y | Z |
|---|---|---|---|---|---|
| Forgotten | 08.6 | 40.4 | -141120 | -208356 | -13900 |
| Skull Island | 64.3 | 69.7 | 140160 | 325473 | -10050 |
| Secluded Island | 69.6 | 59.2 | 39360 | 376268 | -14000 |
| Scorched Island | 04.4 | 80.3 | 241920 | -248609 | -13400 |
| Half-Burnt Island | 17.1 | 79.4 | 233280 | -126892 | -11500 |
| FeverFrost | 62.0 | 39.6 | -148800 | 303429 | -13400 |
Small Caves
| Nº | Lat | Lon | X | Y | Z |
|---|---|---|---|---|---|
| 01 | 29.7 | 54.0 | -10560 | -6134 | -10250 |
| 02 | 26.1 | 64.7 | 92160 | -40636 | -9120 |
| 03-1 | 26.9 | 65.9 | 103680 | -32969 | -9850 |
| 03-2 | 26.4 | 67.0 | 114240 | -37761 | -11500 |
| 04 | 29.1 | 61.3 | 59520 | -11884 | -4520 |
| 05 | 30.0 | 63.0 | 76672 | -3259 | -9550 |
| 06 | 35.1 | 67.4 | 118080 | 45620 | -12000 |
| 07-1 | 33.5 | 52.3 | -26800 | 30285 | -3683 |
| 07-2 | 33.3 | 50.0 | -48960 | 28369 | ? |
| 08 | 38.5 | 64.3 | 88320 | 78205 | ? |
| 09 | 40.3 | 60.9 | 55680 | 95457 | ? |
| 10 | 40.9 | 57.9 | 26800 | 101207 | ? |
| 11 | 42.6 | 56.6 | 14400 | 117500 | ? |
| 12 | 46.9 | 14.0 | -394560 | 158711 | ? |
| 13-1 | 89.4 | 38.5 | -159360 | 566031 | ? |
| 13-2 | 96.9 | 38.6 | -158400 | 637911 | ? |
| 14 | 82.5 | 53.5 | -15360 | 499901 | ? |
| 15 | 94.2 | 68.7 | 130560 | 612034 | ? |
Карта The Island[]
The Island представляет собой остров, окруженный водой. Чем дальше игрок углубляется внутрь острова, тем более часто встречаются ресурсы, но и возрастает опасность быть убитым сильными хищниками. Некоторые зоны имеют низкую температуру, в то время как другие имеют высокую, что сказывается на угрозе жизни игрока.
На Острове встречается 2 вида погоды, Дождь и Туман. Когда идет дождь игрок восполняет запасы воды и может наполнить бурдюк, бутылку для воды или флягу. Во время туманной погоды видимость резко сокращается и становится трудно видеть удалённые объекты.
Регионы
|
Underwater The Eastern Plains The Southeast Shores The Western Plains Southeastern Shores The Gulch of Lamentation Northeast Shores The Western Coast Cragg’s Island Southern Jungle The Eastern Forest The Footpaw The Deep Island The Dead Island Weathertop Far’s Peak Frozen Tooth The Grand Hills The Red Peak Writhing Swamps Drayo’s Cove Frozen Sea Whitesky Peak Underwater Cave The Frigid Plains The Redwood Forests Winter’s Mouth Frozen Fang Volcanic Maw Ice Wyrm’s Belly Lava Cave (The Island) The Belly of the Beast The Descent The Frigid Deep The Frozen Maw The Shadow Road The Throat of Borea The Throat of Flame The Caverns of Lost Faith The Caverns of Lost Hope Cave Northern Shores Smuggler’s Pass Southern Islets The Hidden Lake The Maw The Western Approach |
| Regions of the The Island |

-
Dead Island
-
Frozen Tooth
-
Hidden Lake
-
Northern Plains
-
North East Cave
-
Smuggler’s Pass
-
The Maw
-
Winter’s Mouth
-
Eastern Plains
-
Eastern Forest
-
Far’s Peak
-
Caverns of Lost Faith
-
Caverns of Lost Hope
-
Western Coast
-
Western Coast/North
-
Western Coast/South
-
Drayo’s Cove
-
Lava Cave
-
Lower South Cave
-
Southern Islets
-
Южная Гавань
-
Upper South Cave
-
Cragg’s Island
-
Footpaw
-
Southern Jungle
-
Weathertop
-
Western Approach
-
Grand Hills
-
Ice Wyrm’s Belly
-
North West Cave
-
Shadow Road
-
Snow Cave
-
Tek Cave
-
Throat of Borea
-
Throat of Flame
-
Volcano
-
Western Plains
-
Whitesky Peak
-
Central Cave
-
Redwood Forests
-
Red Peak
-
Swamp Cave
-
Writhing Swamps
-
Broodmother Arena
-
Dragon Arena
-
Megapithecus Arena
-
Overseer Arena
Map created by Felski
Utility[]
Roles
- Farm Animal
- Due to the Ovis’s unique shearing mechanic attacking them with a pair of Scissors adds Wool to your inventory. As of v254.5, the Ovis generates Wool faster as its Food stat increases. It is not necessary to tame the Ovis in order to shear it; any Ovis can be sheared. (Level Food)
- Mountain Climber
- The Ovis has the ability to climb very steep cliffs, making an ideal mountain climber (still being beaten by the Pulmonoscorpius). (Level Health and Speed)
- Food Source
- The Ovis drops Raw Mutton when slaughtered; a very efficient taming food for carnivores. Raw Mutton tames most carnivorous creatures approximately 1.5x faster than their preferred kibble in exchange for a slight decrease in taming effectiveness. It can also be cooked to make Cooked Lamb Chop; an extremely beneficial food. The amount of Raw Mutton increases with the Health stat.
- To efficiently slaughter an Ovis, wield a Pick and select Slaughter from the Ovis’ radial menu. The Health of the Ovis greatly affects the amount of Raw Mutton received, a level 10 ovis gives around 10-25, while a level 300 could give over 1000. (Level Health)
- Hide Source
- The Ovis drops Hide when slaughtered, especially when using a Therizinosaur spec’d for Delicate, or a Chainsaw. Like Raw Mutton, the amount of Hide increases with the Health stat. (Level Health)
Breeding
If a gestating ewe is on the ground when giving birth, the baby is often forced under the ground, making it impossible to reach. If she is on a ceiling, the baby often, but not always, falls through the ceiling. The best solution is to put the ewe facing uphill on a ramp, which tosses the baby into the air behind the ewe, and allows it to fall naturally onto the surface of whatever is under it.
Collectibles
The Ovis does not collect any resources by itself. However it can be sheared for Wool using Scissors which can allow survivors without access to Pelt to create Fur Armor and explore the snowy areas of the map, and killed for Raw Mutton, for food for taming and feeding carnivores, and cooking for feeding players.
Существа[]
- Аллозавр
- Альфа Карнотавр
- Альфа Мозазавр
- Альфа Раптор
- Альфа Тираннозавр
- Аммонит
- Анкилозавр
- Аранео
- Аргентавис
- 30px Артроплевре
- Археоптерикс
- Ахатина
- Базилозавр
- Барионикс
- Большерогий Олень
- Бронтозавр
- Выдра
- Галлимим
- Гиганотозавр
- Гигантопитек
- Дедикурус
- Деодон
- Дилофозавр
- Диметродон
- Диморфодон
- Диплодок
- Диплокаулус
- Додо
- Дунклеостей
- Единорог
- Жаба
- Игуанодон
- Инфицированная Пиявка
- Ихтиозавр
- Йети
- Кайруку
- Капрозух
- Карбонемис
- Карнотавр
- Кастороидес
- Кетцалькоатль
- Книдария
- Компсогнат
- Королевский Грифон
- Лидсихтис
- Лиоплеврадон
- Листрозавр
- Лютоволк
- Мамонт
- Манта
- Мегалодон
- Мегалозавр
- Меганевра
- Мегатерий
- Мезопитек
- Мозазавр
- Мосхопс
- Овираптор
- Оник
- Паразауролоф
- Парацератерий
- Пахиринозавр
- Пахицефалозавр
- Пегомастакс
- Пелагорнис
- Пиранья
- Пиявка
- Плезиозавр
- Прокоптодон
- Птеранодон
- Пурловия
- Раптор
- Саблезуб
- Саблезубый Лосось
- Саркозух
- Свирепый Медведь
- Скарабей
- Скорпион
- Спинозавр
- Стегозавр
- Тапежара
- Теризинозавр
- Тираннозавр
- Титанобоа
- Титанозавр
- Титаномуравей Солдат
- Титаномуравей Трутень
- Трилобит
- Трицератопс
- Троодон
- Тусотеутис
- Тушканчик
- Удильщик
- Ужасная Птица
- Фиомия
- Халикотерий
- Целакант
- Шерстистый Носорог
- Эвриптерид
- Эквус
- Электрофорус
Eerie Creatures
Eerie Creatures are a special variant of Creatures that appear in Dungeons. Eerie Creatures hрave a special glow and provide a challenge for survivors who wander into Dungeons.
- Eerie Achatina
- Eerie Allosaurus
- Eerie Ankylo
- Eerie Araneo
- Eerie Archaeopteryx
- Eerie Argentavis
- Eerie Arthropluera
- Eerie Baryonyx
- Eerie Beelzebufo
- Eerie Carbonemys
- Eerie Carno
- Eerie Castoroides
- Eerie Chalicotherium
- Eerie Compy
- Eerie Daeodon
- Eerie Dilophosaurus
- Eerie Dimetrodon
- Eerie Diplocaulus
- Eerie Dire Bear
- Eerie Dire Wolf
- Eerie Dodo
- Eerie Dung Beetle
- Eerie Equus
- Eerie Gallimimus
- Eerie Iguanodon
- Eerie Jerboa
- Eerie Kairuku
- Eerie Kaprosuchus
- Eerie Lystrosaurus
- Eerie Mammoth
- Eerie Megaloceros
- Eerie Meganeura
- Eerie Megatherium
- Eerie Mesopithecus
- Eerie Moschops
- Eerie Onyc
- Eerie Otter
- Eerie Parasaur
- Eerie Pachy
- Eerie Pachyrhinosaurus
- Eerie Pegomastax
- Eerie Pelagornis
- Eerie Phiomia
- Eerie Procoptodon
- Eerie Pteranodon
- Eerie Raptor
- Eerie Rex
- Eerie Sabertooth
- Eerie Spino
- Eerie Tapejara
- Eerie Terror Bird
- Eerie Therizinosaur
- Eerie Titanoboa
- Eerie Titanomyrma Drone
- Eerie Titanomyrma Soldier
- Eerie Triceratops
- Eerie Troodon
- Eerie Woolly Rhinoceros
Bosses
Bosses can be found in Dungeons and must be defeated to claim the rewards obtained in the Dungeons.
- Beelzemorbus
- Broodgenetrix
- Megapithecus Pestis
- Noctis
The Center Map[]
The Center consists of multiple climatic and geological regions, including several that are not featured on The Island map. The map’s most notable feature, a colossal floating island, can be found to the West of the map surrounded by treacherous swamps. To the far North, an active volcanic island can be found covered in basalt, lava, and dangerous predators. Numerous islands covered in jungles, tropical shorelines, mountains, and ancient ruins dot the varied archipelago. A unique set of caves push survivors to their limits in search of the Artifacts and their hidden rewards. Descend into Jules Verne’s Journey to the Center of the Earth where survivors will find themselves in a self-sufficient underground ecosystem far beneath the lush jungles. Similarly, survivors can dive down to either of two underwater domes to build their own naval bases of Atlantean proportions!
Regions
-
DeepOcean
-
Half-Burnt Island
-
Lava Biome
-
Lava Biome High
-
Lava Oasis Cave
-
LavaCave
-
Scorched Island
-
Eastern Islets
-
Eastern Trench
-
Tropical Island North
-
Tropical Island South
-
Underwater Dome (East)
-
Jumping Puzzle
-
Jungle Cave
-
Jungle Mid
-
Jungle Mid Beach
-
Jungle North
-
Jungle North Beach
-
Jungle South
-
Jungle South Beach
-
Ocean Under Center
-
Secluded Island
-
Skull Island
-
The Center (Floating Island)
-
The Center Cave
-
Underground World
-
Underwater Dome (South)
-
Underworld Ocean
-
Cliffside Cavern
-
Edge of the World
-
North Ice Cave
-
Penguin Pond
-
Snowy Grasslands
-
Snowy Mountain (North)
-
Snowy Mountain (South)
-
South Ice Cave
-
Swamp
-
Western Cliffs
-
Redwood Biome
-
The Bridge
The Center Arena
Approximate Spawn Locations
|
|
Spawn Locations
|