How to create «minecraft» maps with worldpainter
Содержание:
- Reduce WorldPainter’s memory usage
- There is water underneath all of my land
- Types of Terrain in WorldPainter
- Change Brush Size and Texture
- Applying a Layer Directly
- Présentation de World Painter
- Comments
- Using WorldPainter in your own code
- Check out the source code
- Install missing dependencies
- Les bases de World Painter
- Installing a Custom Terrain
- The water is uneven or there are square patches of water on the world
- What is WorldPainter?
- Types of Layers in WorldPainter
- What it does
- Build WorldPainter
- Run WorldPainter
- Creating a Filter
- Types of Tools in WorldPainter
- How do I change what Minecraft does when I use Populate? How do I get rid of all the small water and lava lakes?
- How do I get it to create villages, ravines or strongholds?
Reduce WorldPainter’s memory usage
If that didn’t work, you can try to get WorldPainter to use less memory during the export, by making it export fewer regions in parallel. Normally it tries to use all your CPU cores at once, but each parallel export takes up memory and reducing the parallelisation, while making the export go slower, might avoid the thrashing condition and allow it to actually complete.
1. Determine how many cores it’s trying to use
The first step is to determine how many cores WorldPainter was trying to use for the hanging export, by looking at the log file. The log file is called , and is located in on Windows, on Mac OS X and on UNIX/Linux. Open it using any text editor and look for a line that looks like this:
Make sure it is the one for the hanging export (probably the last one in the file, unless you tried more exports after that). The n is the number of cores it was trying to use.
If n is 1 then it was already using no parallelisation whatsoever and there is no use in proceeding.
2. Configure it to use fewer cores
To configure WorldPainter to use fewer cores, use a text editor to open the file (on Windows and UNIX/Linux) or (on Mac OS X) and add the following line:
Where n is one less than the number determined in step 1! For details about how to find and edit these files, see the MoreMemory page.
3. Rinse and repeat
Save the file, (re)start WorldPainter and retry the export. If it now works, great! If it doesn’t, repeat step 2 until you reach 1 core, at which point there is no use in proceeding.
Note: if you can’t get it to work, then remove this parameter from the file again! Otherwise it will unnecessarily keep throttling WorldPainter while you try other options.
There is water underneath all of my land
If there is ocean underneath your land after Exporting your world and opening it in Minecraft, you probably exported it in the wrong format with Populate enabled. If you Export the world in 1.12 format, and you used the Populate layer or you enabled «allow Minecraft to populate the entire terrain», and then you open the map in Minecraft 1.13 or later, then Minecraft will regenerate (part of) all the chunks marked as «to populate».
To prevent this, Export the world in Minecraft 1.15+ format. Unfortunately Minecraft 1.13 and later don’t support populating chunks, so you will have to use WorldPainter layers to generate all the structures you need, including vegetation, trees, lakes, buildings, etc..
Types of Terrain in WorldPainter
| Terrain Type | Terrain Description |
|---|---|
|
Grass |
grass with flowers, tall grass and ferns |
|
Dirt |
bare dirt |
|
Sand |
bare sand |
|
Desert |
sand with a cactus or dead shrubs |
|
Bare Grass |
bare grass |
|
Stone |
bare stone |
|
Rock |
mix of stone and cobblestone |
|
Sandstone |
sandstone |
|
Obsidian |
extremely tough volcanic glass |
|
Cobblestone |
cobblestone |
|
Mossy Cobblestone |
mossy cobblestone |
|
Gravel |
gravel |
|
Clay |
clay |
|
Water |
flowing water |
|
Lava |
flowing lava |
|
Deep Snow |
thick layer of snow |
|
Netherrack |
netherrack |
|
Soul Sand |
soul sand |
|
Netherlike |
netherrack with lava, soul sand and glowstone |
|
Mycelium |
mycelium |
|
End Stone |
end stone |
|
Bedrock |
unbreakable bedrock |
|
Resources |
stone on surface with coal, ores, gravel and dirt, lava and water |
|
Beaches |
grass with patches of sand, gravel and clay |
By changing the size of the brushes, you can make a small lava pit or a vast river or ocean. It is easy to make a grassy oasis in a desert world. In our Minecraft desert map, an oasis will be a big help for players, as they will need water and dirt blocks to farm their own food and go fishing.

I used a small, round brush to apply a jungle layer to this strand of grassland.
Change Brush Size and Texture
In the right toolbar of WorldPainter, there are fourteen brush tools of differing sizes and textures. There are also more brush options, such as rotation, intensity, and more specific level adjustments. Using these tools properly can help you create a sparse forest, a deep ocean, and other natural landmarks. The brush tools include the following:
- Spike Circle
- Spike Square
- Noise
- Linear Circle
- Linear Square
- Cracks
- Sine Circle
- Sine Square
- Constant Circle
- Plateau Circle
- Plateau Square
- Constant Square
- Dome Circle
- Dome Square
Different types of brushes are more suitable for different terrain; for example, you’ll want to use a circle-shaped brush to make a large body of water for a more natural look. You can use the cracks brush to sprinkle grassy land with rock or snow. Experiment with the brushes to figure out which ones suit your need best.

Editing your dimension properties is a great way to completely customize your map.
Applying a Layer Directly
A layer can also be applied to a world directly, without a height map but optionally with a filter:
wp.applyLayer(layer) // See "Loading a Layer"
    .toWorld(world) // See "Loading a World" or "Creating a World from a Height Map"
    .toLevel() // Optional. The level to which to set the layer. The default is half the maximum for the layer type (or "on" for 1-bit layers such as Frost). See the discussion above under Applying a Height Map as a Layer
    .withFilter(filter) // Optional. Specifies conditions for where the layer will be applied. See below for details about creating a filter
    .applyToSurface() // Optional. Mutually exclusive with applyToNether() and applyToEnd(). Indicates that the layer should be applied to the Surface dimension. This is the default
    .applyToNether() // Optional. Mutually exclusive with applyToSurface() and applyToEnd(). Indicates that the layer should be applied to the Nether dimension
    .applyToEnd() // Optional. Mutually exclusive with applyToSurface() and applyToNether(). Indicates that the layer should be applied to the End dimension
    .setAlways() // Optional. Mutually exclusive with setWhenLower() and setWhenHigher(). Indicates that the layer intensity must always be overridden, no matter what it was before. This is the default
    .setWhenLower() // Optional. Mutually exclusive with setAlways() and setWhenHigher(). Indicates that the layer intensity must only be overridden if the value from the image is lower than what was already there in the world
    .setWhenHigher() // Optional. Mutually exclusive with setAlways() and setWhenLower(). Indicates that the layer intensity must only be overridden if the value from the image is higher than what was already there in the world
    .go();
For the layer value to specify with toLevel(), see the discussion above under Applying a Height Map as a Layer
Présentation de World Painter
Ce logiciel se démarque clairement des autres par le biais de son aspect plutôt simpliste et optimisé, afin de répondre aux attentes des utilisateurs les plus exigeants.
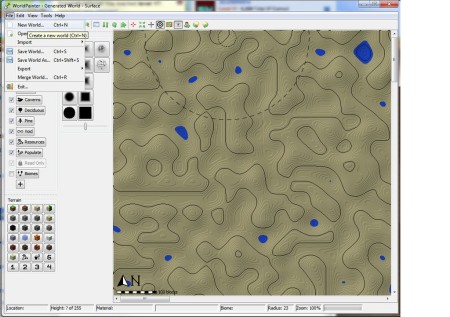 Interface du logiciel et carte générée
World Painter est pourvu de nombreux boutons permettant de varier les résultats : on peut ainsi construire une gigantesque montagne comme une petite forêt de pins. Il offre aussi la possibilité de créer des pyramides plus ou moins grandes, des souterrains, de grandes fosses, etc.
On appréciera aussi la possibilité de visualiser en 3D les résultats de la création en direct, afin d’avoir une légère impression du rendu en jeu.
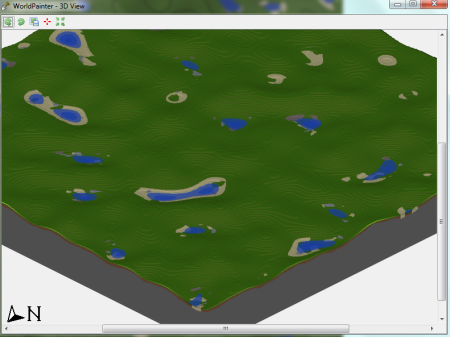 Vue en 3D de la carte
Enfin, il est aussi envisageable de gérer les différents biomes : on peut donc choisir d’avoir un monde entièrement désertique comme uniquement marécageux. Il est bien évidemment possible de les répartir dans plusieurs zones pour augmenter la diversité des lieux ! Voici ses autres fonctionnalités :
- Peinture personnalisée du biome
- Créez vos propres brush personnalisés
- Ajouter au monde des objets personnalisés à partir de fichiers bo2 ou de schémas
- Personnaliser l’emplacement et la fréquence des minerais et des ressources souterraines
- Ajouter de la neige et de la glace
- Des outils faciles à utiliser, mais flexibles et puissants qui ressemblent à de la peinture
- Créer des océans, des masses terrestres, des plaines et des montagnes
- Changer le type de terrain, ajouter des arbres et créer des cavernes
Comments
Alexandra on August 29, 2015:
I like to make world for minecraft
Jessica Peri (author) from United States on March 24, 2014:
Yeah it will definitely export into those file types. I’d love to hear how it goes if you do! I don’t run any roleplaying campaigns, and the GM isn’t really that thorough with our roleplaying. I’ve always thought this could be a big help for campaigns, though!
Cameron Corniuk from Painesville, OH on March 24, 2014:
Thanks, Dreamhowl.An image like PNG, or JPG is what I was looking for. It could be a new way to make some of my RPG maps.
Jessica Peri (author) from United States on March 24, 2014:
Unless there is another option hiding in the menu, you can only export it as a Minecraft map file, an image file (looks like all types), or as a height map.
Cameron Corniuk from Painesville, OH on March 24, 2014:
I’m curious, what other export options are there for this application?
Jessica Peri (author) from United States on January 03, 2014:
I haven’t messed much with the more advanced features, but maybe you could edit the biome to remove or prevent frost? I’ll have to take a closer look — I’ll let you know if I figure it out!
trying to remove frost…. on January 03, 2014:
my name says it!
Using WorldPainter in your own code
If you only want to write your own code making use of WorldPainter, rather than make changes to WorldPainter itself, then you don’t need to build WorldPainter! The WorldPainter binaries, along with Javadoc and source code jars, are in Maven Central. For details, see this page.
Check out the source code
The WorldPainter source code is hosted on GitHub: https://github.com/Captain-Chaos/WorldPainter
Check it out from there, or fork it and then check out your own fork. The command for checking out the code anonymously from the command line is:
git clone https://github.com/Captain-Chaos/WorldPainter.git
Install missing dependencies
WorldPainter uses some dependencies which are not present in Maven Central, either because they are commercial products, or they are too old, or the creators aren’t aware of Maven. Some of these dependencies (JPen; the NetBeans Dark Look and Feel) are hosted in a private Maven repo on www.worldpainter.net (see the pom.xml for the WorldPainter module), but some you will have to download and install manually:
TODO: JPen has native libraries, which are currently missing (meaning the tablet support won’t actually work. This has yet to be incorporated in the build somehow.
Les bases de World Painter
Malgré l’interface accessible à tous, comptez tout de même une bonne heure avant de prendre connaissance des bases du logiciel : le résultat final variera bien sûr selon la minutie dont vous avez fait preuve.
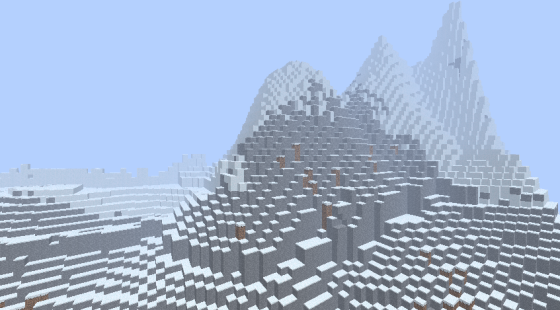 Une chaine de montagne générée par World Painter
Si vous désirez percer dans l’originalité, vous pouvez vous servir des fonctionnalités du logiciel pour créer des volcans, des monts habitables, des pyramides glacées… C’est à vous de faire marcher votre imagination et de fixer vos limites !
Le programme est très simple d’utilisation. Les boutons à gauche servent a sélectionner l’outil, les clics gauche et droit à utiliser les outils (le bouton droit ayant la fonction inverse du gauche, pour surélever ou creuser le terrain)
La fonction « Load » (charger) et « Save »(sauvegarder) utilisent le format WorldPainter. Ce format pourra changer et l’avenir et ne plus être compatible avec vos maps actuelles
La fonction « Export » exporte les maps au format Minecraft dans le dossier spécifié. Elles peuvent être exportés directement dans le dossier de sauvegarde ou dans un autre emplacement.
20 façon d’utiliser le logiciel Worldpainter.
Installing a Custom Terrain
Before you can actually use a Custom Terrain you must first install it on the world using the following operation:
var customTerrainIndex = wp.installCustomTerrain(terrain) // The Custom Terrain to install on the world. See "Loading a Custom Terrain"
    .toWorld(world) // The world on which to install the Custom Terrain. See "Loading a World"
    .inSlot(1) // Optional. The Custom Terrain slot from 1 to 24 (inclusive) on which to install the terrain. When not specified the first free slot will be used. If there are no free slots an exception will be thrown
    .go(); // Returns the terrain index to use for actually placing this Custom Terrain using other operations
The water is uneven or there are square patches of water on the world
There are various ways this could have happened, for instance:
- There used to be a bug in WorldPainter which could cause patches of water to remain behind if you cancelled a Flood operation. These patches would only be visible after saving and loading the world. The bug has been fixed, but if this happened to your world in the past the water patches might still be there.
- You can get standing columns or walls of water if you flood a valley, and then expand the valley by lowering the land around the edge without re-flooding the lake. When you expand a flooded valley, make sure to re-flood the lake by right-clicking on the water once with the Flood tool, and then left-clicking.
- Another way to get discrepancies in water height is by using the Sponge tool to reset the water level, and not finishing the entire area. When using the Sponge tool to reset the water level (by right-clicking), be careful to apply it to the entire body of water.
Regardless of how it happened, there are a few ways in which you can fix it:
- You can reset the water on the entire map using the «reset all water or lava» operation of the Global Operations tool (Ctrl+G or the globe icon on the Tools panel). This will reset the fluid level and type on the entire map to whatever you originally specified on the New World screen. The downside is of course that any valleys you dried will be refilled and lakes at other than default elevations will be removed or changed.
- Another technique for easily fixing a large body of water is to right-click with the Flood tool on an area of the water that is at the correct height (this will lower any water which was at a higher level), and then left-click to raise it back to the desired height (this will raise any water which was at a lower level).
- For more manual control you can use the Sponge tool. Left clicking completely removes water and lava. Right-clicking resets the water level to the default. See above for how to change the default water level.
What is WorldPainter?
WorldPainter is an interactive map generator for Minecraft that allows you to “paint” landscapes as you would in Microsoft Paint or another paint program. The program starts users off with a basic Minecraft map, which can be edited with numerous terrain, material, tree, and shape brushes. WorldPainter is a great resource for Minecraft players looking to create their own themed or multiplayer maps.
WorldPainter is free to download, use, and distribute as open-source software licensed under the GNU Public License. The program is not affiliated with Mojang, the makers of Minecraft, in any way and was created by pepsoft.org. WorldPainter itself is largely self-explanatory: the buttons are all defined, and the controls are easy to understand. If you are unfamiliar with paint programs, however, WorldPainter can seem a bit daunting.

Learn how to use WorldPainter, a paint program that helps you generate and create maps with brushes, layers and other tools!
Types of Layers in WorldPainter
| Layer Type | Layer Description |
|---|---|
|
Frost |
Cover the ground with snow and turn water to ice |
|
Caverns |
Generate underground caverns of varying size |
|
Chasms |
Generate underground tunnel or ravine-like chasms of varying size |
|
Deciduous |
Generate a deciduous forest |
|
Pine |
Generate a pine forest |
|
Swamp |
Generate swamp land |
|
Jungle |
Generate a jungle |
|
Void |
Just the long drop into nothingness |
|
Resources |
Underground pockets of coal, ores, gravel and dirt, lava and water |
|
Populate |
Let Minecraft populate the land with vegetation, snow, resources and water and lava pools |
|
Biomes |
Enable Custom biomes in the Edit menu to enable biome editing |
By using different brush textures and layers, users can create many different features on their Minecraft map. The jungle layer above the water above was applied with the spike circle brush to create a soft of oasis for players; this way, wood can be obtained outside of the desert. Experiment with different types of terrain to see what you like!

The pyramid tool is a fun way to add large, realistic structures to a desert world.
What it does
Biomes (in Minecraft) are different combinations of temperature, precipitation, vegetation type, etc.. They are stored per horizontal (x, z) coordinate (in other words, per column of blocks) and they influence the colour of grass and leaves, whether it rains, snows or is dry, whether water freezes and which mobs will spawn.
When Minecraft generates land, it does so in two steps:
In step one, it calculates the biomes according to its own world generating algorithm and then generates the actual land mass, surface terrain (grass, sand, etc.), river or ocean water and caves, according to the biome. Since WorldPainter pre-generates the chunks, Minecraft never performs this step for those chunks.
In step two, the «populate» step, Minecraft adds underground resources (ores, lava and water lakes), creates the vegetation (trees, tall grass, mushrooms, flowers, lily pads, etc.), small lava and water lakes on the surface and structures (abandoned mines, NPC villages, strongholds, dungeons and desert and jungle temples). It does this according to the biome settings stored in the chunk. This second step can be performed by Minecraft on chunks generated by WorldPainter, because there is a flag for each chunk in the map data telling Minecraft whether that chunk has been populated yet.
This second step is what the Populate layer controls. If you paint the Populate layer on a chunk, or check «allow Minecraft to populate the entire terrain», WorldPainter will turn off the flag saying the chunk is already populated for that chunk (or all chunks), which will cause Minecraft to populate it the first time it loads the chunk. If you don’t use Populate, the chunk will be left as it is (which may include trees, etc. generated by WorldPainter using the other layers) when it is loaded by Minecraft.
Exactly what Minecraft will do depends on the biomes you painted (or WorldPainter chose automatically) for that chunk. Note that all WorldPainter can do is tell Minecraft to populate the chunk, or not populate the chunk. It has no control over what Minecraft will do exactly. For instance, there is no way to tell it not to generated surface lakes of water or lava. If you don’t want those, your only option is not to use Populate.
Note that whether or not you use Populate, the biomes will still determine the colour of grass and leaves, whether it will rain or snow or be dry, whether water will freeze and what kinds of mobs will spawn.
Build WorldPainter
Now you can build WorldPainter itself. Execute the following command from inside the WorldPainter directory, or use your favourite IDE to build the WorldPainter module or invoke the install Maven goal on it. There are some rudimentary unit tests, but they take a while to run and don’t contribute much, so I recommend skipping them:
mvn install -DskipTests=true
Repeat this whenever you change code in any of the modules below the WorldPainter directory. Or of course use your favourite IDE, preferably one with good Maven support, to build the project.
Run WorldPainter
Once it is built, you can run WorldPainter from the command line with the following command, executed from inside the WPGUI directory:
mvn exec:exec
You can also define a run configuration in your favourite IDE. The main class is .
Creating a Filter
The height map, layer and terrain application operations described above can take a filter. Here is how you create one:
var filter = wp.createFilter()
    .aboveLevel() // Optional. Apply the operation only at and above the specified terrain level
    .belowLevel(255) // Optional. Apply the operation only at or below the specified terrain level
    .feather() // Optional. When applying a continuously-valued layer, let it fade out around the specified terrain levels, instead of being cut off sharply
    .aboveDegrees() // Optional. Mutuatlly exclusive with belowDegrees(). Specifies the slope in degrees above which the operation must be applied. PLEASE NOTE: only works well with worlds created from high res (16-bit) height maps or sculpted manually in WorldPainter!
    .belowDegrees() // Optional. Mutuatlly exclusive with aboveDegrees(). Specifies the slope in degrees below which the operation must be applied. PLEASE NOTE: only works well with worlds created from high res (16-bit) height maps or sculpted manually in WorldPainter!
    .onlyOnTerrain() // Optional. Mutually exclusive with all other onlyOn* and exceptOn* conditions. Specifies the terrain index of the terrain on which the operation should only be applied
    .onlyOnLayer(layer) // Optional. Mutually exclusive with all other onlyOn* and exceptOn* conditions. Specifies the layer which must be present for the operation to be applied
    .onlyOnBiome() // Optional. Mutually exclusive with all other onlyOn* and exceptOn* conditions. Specifies the biome ID of the manually painted biome on which the operation should only be applied
    .onlyOnAutoBiome() // Optional. Mutually exclusive with all other onlyOn* and exceptOn* conditions. Specifies the biome ID of the automatically set biome on which the operation should only be applied
    .onlyOnAutoBiomes() // Optional. Mutually exclusive with all other onlyOn* and exceptOn* conditions. Specifies that the operation must only be applied on automatically set biomes
    .onlyOnWater() // Optional. Mutually exclusive with all other onlyOn* and exceptOn* conditions. Specifies that the operation must only be applied on flooded areas
    .onlyOnLand() // Optional. Mutually exclusive with all other onlyOn* and exceptOn* conditions. Specifies that the operation must only be applied on dry areas
    .exceptOnTerrain() // Optional. Mutually exclusive with all other onlyOn* and exceptOn* conditions. Specifies the terrain index of the terrain on which the operation must NOT be applied
    .exceptOnLayer(layer) // Optional. Mutually exclusive with all other onlyOn* and exceptOn* conditions. Specifies the layer which must NOT be present for the operation to be applied
    .exceptOnBiome() // Optional. Mutually exclusive with all other onlyOn* and exceptOn* conditions. Specifies the biome ID of the manually painted biome on which the operation should NOT be applied
    .exceptOnAutoBiome() // Optional. Mutually exclusive with all other onlyOn* and exceptOn* conditions. Specifies the biome ID of the automatically set biome on which the operation should NOT be applied
    .exceptOnAutoBiomes() // Optional. Mutually exclusive with all other onlyOn* and exceptOn* conditions. Specifies that the operation must only be applied on manually painted biomes
    .exceptOnWater() // Optional. Mutually exclusive with all other onlyOn* and exceptOn* conditions. Specifies that the operation must only be applied on dry areas
    .exceptOnLand() // Optional. Mutually exclusive with all other onlyOn* and exceptOn* conditions. Specifies that the operation must only be applied on flooded areas
    .go();
For an overview of the actual terrain type indices to use in onlyOnTerrain() or exceptOnTerrain() and the terrain types to which they correspond, see this page. For an overview of the biome IDs to use in onlyOnBiome(), onlyOnAutoBiome(), exceptOnBiome() or exceptOnAutoBiome() see page.
Types of Tools in WorldPainter
| Tool Types | Tool Descriptions |
|---|---|
|
Raise Rotated Pyramid |
Raises square pyramid out of the ground rotated 45 degrees |
|
Raise Pyramid |
Raises square pyramid out of the ground |
|
Flood |
Flood an area with water |
|
Lava |
Flood an area with lava |
|
Height |
Raise or lower the terrain |
|
Flatten |
Flatten an area |
|
Smooth |
Smooth the terrain out |
|
Raise Mountain |
Raises a mountain out of the ground |
|
Spawn |
Change the spawn point |
|
Sponge |
Dry up or reset water and lava |
|
Global Operations |
Fill or clear the world with a terrain, biome or layer |
By using these tools, you can create natural features like large, spanning mountains and massive lava-filled volcanoes. The spawn tool allows you to change the spawn point of players, a useful tool when you want to keep players from spawning into lava, voids and other dangerous map features.

Using the cracks brush will speckle terrain on your map as opposed to a solid brush.
How do I change what Minecraft does when I use Populate? How do I get rid of all the small water and lava lakes?
The small water and lava lakes aren’t created by WorldPainter, they are created by Minecraft when you use the Populate layer, or enable the «allow Minecraft to populate the entire terrain» option. WorldPainter has no control over what Minecraft does when it populates a chunk, at least not for the Default and Large Biomes world types. All it can do is tell it to populate the chunk, or not, for each individual chunk. If Minecraft populates a chunk it will add underground resources, vegetation, trees, small water and lava lakes, snow and ice, villages, ravines, strongholds and abandoned mines. It will not generate caves. For more details about the proper use of the Populate layer, see the Populate page.
If you don’t want the small water and lava lakes, you do have one option: you can set the world type to Superflat, and then use the Superflat preset to configure exactly what you want Minecraft to do during the population step. For more details about this technique, see this YouTube video by Fornan II.
You should also consider whether you need Populate, as WorldPainter has its own layers for almost everything. The only thing that WorldPainter can’t generate itself is structures (mines, villages, etc.). By default the Resources layer is «on everywhere», so WorldPainter already generates underground resources. You can use the other layers to add things like Deciduous or Pine forests, snow and ice, underground Caverns and Chasms, etc.
How do I get it to create villages, ravines or strongholds?
WorldPainter can’t generate any type of structure by itself. However it can direct Minecraft to generate structures in the generated map. You can do this by either selecting «allow Minecraft to populate the entire terrain» on the Export (or Dimension Properties) screen, to get them everywhere, or by painting in the Populate layer locally. Also make sure to leave the Structures option enabled on the Export screen.
Please note that WorldPainter has no control over where these structures will be generated! Minecraft will place them randomly according to the seed and its own algorithms. Also, using Populate will also cause Minecraft to generate trees, tall grass and flowers, underground resources, small water and lava lakes everywhere. If you used WorldPainter’s tree layers, or the Resource layer (which is on by default) you may get double the trees and/or resources.
If you don’t want this, you do have one option: you can set the world type to Superflat, and then use the Superflat preset to configure exactly what you want Minecraft to do during the population step. For more details about this technique, see this YouTube video by Fornan II. For more details about the proper use of the Populate layer, see the Populate page.
Note that you could use custom object layers to add structures to the world. See the CustomObjects page for more details.