Android-x86
Содержание:
- Building smaller image
- Key Features
- Other boot options
- OpenThos
- Testing
- Bliss OS-x86
- LineageOS
- Как же все-таки установить андроид на планшет, ноутбук, или компьютер?
- Android-x86 упоминается на CNews совместно со следующими персонами и организациями:
- Key Features
- Released Files
- Step by Step
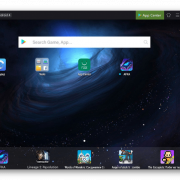
- Remix OS for PC
- Released Files
- Установка Android 6.0
- Debug Howto
- PrimeOS
- Released Files
- Key Features
- Особенности интерфейса
- Phoenix OS
- Android-x86
Building smaller image
Since marshmallow-x86, the generated Android-x86 core filesystem will be compressed by squashfs by default. Before that, squashfs is used only if you have squashfs-tools 4.0 (older version will not work) installed in your host. The generated iso file is much smaller (only about 30-40%). However, if you hope to disable it for some reasons, add USE_SQUASHFS=0 to make. You can put it to buildspec.mk:
USE_SQUASHFS := 0
Before froyo-x86 (included), If you hope to get a more smaller image, you may remove the debugging symbols by adding
TARGET_STRIP := 1
Since gingerbread-x86, the debugging symbols are stripped by default. So the option is unnecessary.
Key Features
The 8.1-r1 release is based on the latest Android 8.1.0 Oreo MR1 release (8.1.0_r60). The features include:
- Support both 64-bit and 32-bit kernel and userspace with latest LTS kernel 4.19.15.
- Support OpenGL ES 3.x hardware acceleration for Intel, AMD, Nvidia and QEMU(virgl) by Mesa 18.3.1.
- Support OpenGL ES 2.0 via SwiftShader for software rendering on unsupported GPU devices.
- Support hardware accelerated codecs on devices with Intel HD & G45 graphics family.
- Support secure booting from UEFI and installing to UEFI disk.
- A text based GUI installer.
- Add theme support to GRUB-EFI.
- Support Multi-touch, Audio, Wifi, Bluetooth, Sensors, Camera and Ethernet (DHCP only).
- Auto-mount external usb drive and sdcard.
- Add Taskbar as an alternative launcher which puts a start menu and recent apps tray on top of your screen and support freeform window mode.
- Enable ForceDefaultOrientation on devices without known sensors. Portrait apps can run in a landscape device without rotating the screen.
- Support arm arch apps via the native bridge mechanism. (Settings -> Android-x86 options)
- Support to upgrade from non-official releases.
- Add experimental Vulkan support for newer Intel and AMD GPUs. (Boot via Advanced options -> Vulkan support)
- Mouse integration support for VMs including VirtualBox, QEMU, VMware and Hyper-V.
Other boot options
- Live CD — Run Android-x86 without installation
The item means to boot Android-x86 directly. This is useful to check if your hardware is compatible with Android-x86 quickly. All data is stored in RAM (tmpfs) and will lose after poweroff.
Live CD — Debug mode
See the debug howto for more details.
Live CD — Vulkan support (experimental)
Enable the experimental Vulkan support. Not all GPUs support it.
Live CD — No Setup Wizard
Skip the Setup Wizard. It’s useful if you want to test some apps quickly in live mode.
Live CD VESA mode — No GPU hardware acceleration
Disable GPU hardware acceleration. If you encounter black screen after booting, you may try this mode to see if it’s bootable.
OpenThos
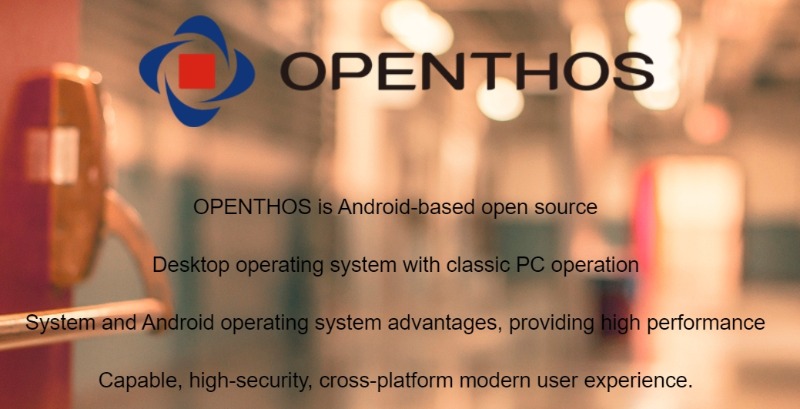
OpenThos is a relatively new Android operating system for PCs that lets you enjoy both Android and Linux applications side by side. The apps can be run on a windowed mode enabling you to multitask and manage several apps at a time.
It uses the Android Lollipop kernel and runs only on computers with 64-bit technology. You also don’t need to install any driver as it will detect your PC or laptop automatically. However, OpenThos doesn’t include Playstore so you need to get that from a third-party site.
Since this is a Chinese app, you will have some difficulty to download and install the OS. Also, there are not that many English instructions online.
Testing
The generated image is located at
out/target/product/$TARGET_PRODUCT/$TARGET_PRODUCT.iso
You can easily test the iso file by a virtual machine like virtual box or qemu. Alternatively, on a Linux host you can use the qemu-android script (available since nougat-x86) to run android-x86 in qemu directly:
To test the image on a real x86 hardware, you can burn the iso to a compact disc (CD), then boot it on the target device. Check the manual of your vendor to see how to boot from a CD. On booting it will automatically detect your hardware and load necessary modules.
Since honeycomb-x86, we support the hybrid iso format. That is, the iso could be dumped to a usb disk directly. For example,
where /dev/sdX is the device name of your USB disk. The feature is available for all iso files released after 2011/12/25.
If you build an rpm file, install it to your Linux host and run the qemu-android script directly. Or reboot and choose android-x86 item from the booting menu.
For more details about how to use the iso or install it, see the installation howto.
Bliss OS-x86
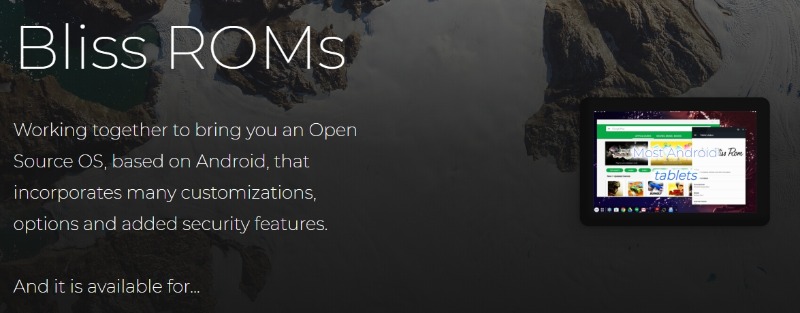
Bliss OS-x86 is an open source Android-based operating system for PC computers and tablets. Hardware wise, this Android OS flavor can be installed and run on any Windows/Linux PC, Chromebook, Macbook or Tablet released in the last 4 years (i.e 2016 and later).
The current version of Bliss uses the Android 9.0 Pie codebase and is designed to work with both the mobile systems as well as with desktop and laptops. The new Bliss OS 12 will be based on Android 10.
Their main focus of Bliss OS is to provide quality ROMs that can be installed on as many hardware platforms as possible. This can run on most of your devices, preserving customizations and options. The x86 variant is of course for Desktop PC computers that are equipped with x86/x86_64 compatible CPUs.
The User Interface can be configured as either Desktop UI or Tablet UI based on the launcher being used.
LineageOS
The original name of LineageOS was “Cyanogen” which was a very popular custom ROM used for flashing smartphones with an enhanced OS.
Lineage is of course based on the Android OS and is free and open-source. It offers customization for your personalization and preference as everyone is unique and your device should be too.
Although LineageOS is mostly installed on smartphones and tablets by users, it can also be installed and run on Windows or Linux PCs. Here is a video showing how to install it on a PC and dual-boot with Windows 10 https://www.youtube.com/watch?v=HGB_OV0yCUo
Because this software has a very big community, it is actively developed and supports even the latest Android versions.
Moreover, with its enhanced tools and exclusive APIs, it will turn any device into the perfect device for apps development.
Как же все-таки установить андроид на планшет, ноутбук, или компьютер?
Довольно часто версия программного обеспечения от гугла устаревает. В этом случае помогает прошивка планшета на андроиде. По сути дела, прошивка планшета на андроиде – это обновление программного обеспечения. Разработчики постоянно улучшают программное обеспечение, и поэтому требуется обновлять прошивку планшетов регулярно.
Предварительно, перед прошивкой планшета на андроиде, нужно его полностью зарядить. При перепрошивке планшета на андроиде он выключится, тогда может сгореть память или Вы просто потеряете свои данные. Когда устройство полностью заряжено, нужно зайти в настройки андроида и посмотреть версию программного обеспечения. Далее ищите в интернете прошивку для планшета на андроиде, которая новее Вашей.
В случае неудачной прошивки планшета на андроиде, нужно будет восстановить ту, которая Вас была. Для этого создайте резервную копию, перед тем как прошить планшет на андроиде. Подключите флешку к устройству. Резервную копию нужно распаковать на карту памяти в папку script. После этого, подключаем флешку к устройству и включаем его. Резервная копия автоматически скопируется на съёмный носитель.
Когда резервная копия создана, включаем карту памяти в компьютер. Заменяем фаллы прошивки планшета на Android, и вставляем флешку в устройство. Включаем планшет, и прошивка автоматически обновится.
Обычно, когда человеку нужно запустить Андроид-приложение на компьютере, он использует один из доступных эмуляторов. Но, есть ещё один способ, к сожалению, он несколько сложнее.
С помощью двойной прошивки вы можете превратить свой компьютер в Android-устройство. При включении компьютера вы сможете выбрать загрузку Android OS вместо Windows, а работать он будет точно также, как на смартфоне или планшете.
С установкой Андроид на компьютер придётся повозиться немного больше времени, чем с установкой оной на мобильных устройствах. Проблема заключается в поддержке драйверов процессора, видеокарты и жёсткого диска, поэтому вам придётся найти дистрибутив, который бы не конфликтовал с драйверами вашего ПК/ноутбука.
Феникс (Phoenix OS)
Как и Ремикс, Феникс – это операционная система, разработанная на базе Android 7.1/5.1, на которой вы можете запустить любое из существующих приложений.
Разработчики этой операционки адаптировали её специально для персональных компьютеров, а использование Android-приложений будет таким же удобным, как на смартфоне/планшете. Для установки вам понадобится сделать следующее:
Android-x86
Android-x86 – это операционная система с открытым исходным кодом для персональных компьютеров, которая работает на базе Андроид 8.1 Oreo. В последнем обновлении Android-x86 была добавлена поддержка новой системы уведомлений и управления работы фоновых приложений, функции Smart Text Selection и аппаратного ускорения OpenGL ES 3.x на устройствах с графикой Intel/AMD/Nvidia.
Команда разработчиков Android-x86 добавила несколько новых настроек, связанных с кастомизацией интерфейса. Теперь вы можете сделать рабочий стол похожим на рабочий стол в Windows. В новой версии была добавлена новая панель задач, а также поддержка мультиоконного режима.
Чем хороша Android-x86, так это широкими возможностями кастомизации. Вы можете использовать различные темы, лаунчеры и много чего другого, не опасаясь за работоспособность своего компьютера и системы. На официальном сайте можно посмотреть список поддерживаемых устройств. Если хотите установить эту операционную систему на свой компьютер – сделайте следующее:
Android-x86 упоминается на CNews совместно со следующими персонами и организациями:
|
Intel Corporation
10773 |
|
AMD — Advanced Micro Devices
3485 |
|
Google LLC
9388 |
|
Samsung Electronics
8918 |
|
VMware
1960 |
|
Microsoft Corporation
20947 |
|
Huawei
3125 |
|
Xiaomi
966 |
|
Apple Inc — Эппл Рус
10077 |
|
Nokia Corporation
5230 |
|
Meizu
143 |
|
Nvidia Corp
3005 |
|
XDA Developers — Сообщество мобильных разработчиков
54 |
|
Wi-Fi — Wireless Fidelity LAN — Wi-Fi 802.11 Wave — IEEE 802.11 — Стандарт беспроводной связи
10051 |
|
Ethernet — Семейство технологий пакетной передачи данных
2847 |
|
Bluetooth — Bluetooth Smart — Bluetooth LE — Bluetooth Low Energy
6226 |
|
USB — Universal Serial Bus — Универсальная последовательная шина
9136 |
|
ARM64 — Архитектура процессора
1216 |
|
SD — Secure Digital — Формат флэш-карт — Secure Digital High Capacity (SDHC) — SD Ultra Capacity (SDUC) — SD eXtended Capacity (SDXC) — MicroSD — уменьшенная версия популярного формата карты памяти SD Secure Digital
4849 |
|
UEFI — The Unified Extensible Firmware Interface — Интерфейс между операционной системой и микропрограммами — Развитие BIOS
94 |
|
OpenGL ES — подмножество графического интерфейса
62 |
|
UEFI Secure Boot — протокол
24 |
|
USB-накопитель — USB-устройство — USB-носитель
776 |
|
Google Android
11614 |
|
Intel x86 — архитектура процессора
1264 |
|
Google Android 8 Oreo
142 |
|
Microsoft Windows 10
10078 |
|
Google Android 9 Pie
167 |
|
Meizu Flyme Android OS
44 |
|
Google Android M — Google Android 6 Marshmallow
120 |
|
Apple Face ID
132 |
|
Apple Touch ID
217 |
|
OpenGL — Язык программирования
213 |
|
Google Material Design — Google Material UI — стиль графического дизайна интерфейсов программного обеспечения и приложений
38 |
|
QEMU
23 |
|
Samsung DeX — Desktop eXperience
49 |
|
Google Android 10
179 |
|
Meizu mTouch
10 |
|
Mesa — библиотека графических API OpenGL и Vulkan с открытым исходным кодом
9 |
|
Microsoft Surface — Планшет
323 |
|
Google Play — Google Store — Android Market
2628 |
|
Microsoft Windows 7
1727 |
|
ZIP — Формат архивации файлов и сжатия данных
261 |
|
Google Android 1 Cupcake
2 |
|
Google Android 5 Lollipop
150 |
|
Apple iPhone — серия смартфонов
5798 |
|
Apple iPhone XS — Серия смартфонов
130 |
|
Xiaomi MIUI — MI User Interface — Операционная система на Android
180 |
|
Huawei EMUI — Huawei Emotion UI — графическая оболочка
200 |
|
Apple iPhone X — Серия смартфонов
220 |
|
Apple iPhone XR — Серия смартфонов
103 |
|
Microsoft Windows
1329 |
|
Samsung Galaxy S — серия смартфонов
1226 |
|
Samsung One UI
45 |
|
Apple macOS
1216 |
|
Linux OS
7152 |
|
Apple iOS
6187 |
|
Nvidia GeForce GTX
3051 |
|
США — Калифорния
3062 |
|
Google I/O Всемирная конференция разработчиков
100 |
Key Features
The 9.0-rc1 release is based on the latest Android 9.0.0 Pie release (android-9.0.0_r50). The features include:
- Support both 64-bit and 32-bit kernel and userspace with latest LTS kernel 4.19.80.
- Support OpenGL ES 3.x hardware acceleration for Intel, AMD, Nvidia and QEMU(virgl) by Mesa 19.0.8.
- Support OpenGL ES 3.0 via SwiftShader for software rendering on unsupported GPU devices.
- Support hardware accelerated codecs on devices with Intel HD & G45 graphics family.
- Support secure booting from UEFI and installing to UEFI disk.
- A text based GUI installer.
- Add theme support to GRUB-EFI.
- Support Multi-touch, Audio, Wifi, Bluetooth, Sensors, Camera and Ethernet (DHCP only).
- Auto-mount external usb drive and sdcard.
- Add Taskbar as an alternative launcher which puts a start menu and recent apps tray on top of your screen and support freeform window mode.
- Enable ForceDefaultOrientation on devices without known sensors. Portrait apps can run in a landscape device without rotating the screen.
- Support arm arch apps via the native bridge mechanism. (Settings -> Android-x86 options)
- Support to upgrade from non-official releases.
- Add experimental Vulkan support for newer Intel and AMD GPUs. (Boot via Advanced options -> Vulkan support)
- Simulate WiFi adapter by Ethernet to increase app compatibility.
- Mouse integration support for VMs including VirtualBox, QEMU, VMware and Hyper-V.
Released Files
This release contains four files. You can choose one of these files depends on your devices. Most modern devices should be able to run the 64-bit ISO. For older devices with legacy BIOS, you may try the 32-bit ISO.
- 64-bit ISO: android-x86_64-8.1-r1.iso
sha1sum: b8e83b66ca98b0e38fd295d6640c02b60b767129
- 32-bit ISO: android-x86-8.1-r1.iso
sha1sum: 4267750e698b89b853450f27cf1d1cf76c8a4d8b
- 64-bit rpm: android-x86-8.1-r1.x86_64.rpm
sha1sum: 4f0cfbe83417829def3c0a9644b944489b579205
- 32-bit rpm: android-x86-8.1-r1.i686.rpm
sha1sum: d3b586fceaaced28cc2f3b1b8217a22ff9ee8291
To use an ISO file, Linux users could just dump it into a usb drive to create a bootable usb stick like:
where /dev/sdX is the device name of your usb drive.
Windows’s users can use the tool Win32 Disk Imager to create a bootable usb stick.
Please read this page about how to install it to the device.
Except the traditional ISO files, we also package android-x86 files into a Linux package rpm. It allows Linux users to easily install the release into an existing Linux device with a standalone ext4 root partition. On an rpm based device (Fedora/Red Hat/CentOS/SUSE…), just install it like a normal rpm package:
This will update your older installation like 7.1-r2 or 8.1-rc2 if you have.
On a deb based device (Debian/Ubuntu/LinuxMint/…), please use the alien tool to install it:
All files will be installed to the /android-8.1-r1/ subdirectory and boot entries will be added to grub2 menu. Reboot and choose android-x86 item from the menu to boot Android-x86. Alternatively, you can launch Android-x86 in a QEMU virtual machine by the installed qemu-android script:
Note Android-x86 running in QEMU and the real machine (after rebooting) share the same data sub-folder.
Step by Step
- Download an iso image from a mirror site. Usually you should just use the latest image.
- Burn the iso image to cdrom, or create a bootable USB disk (recommended). See the for details.
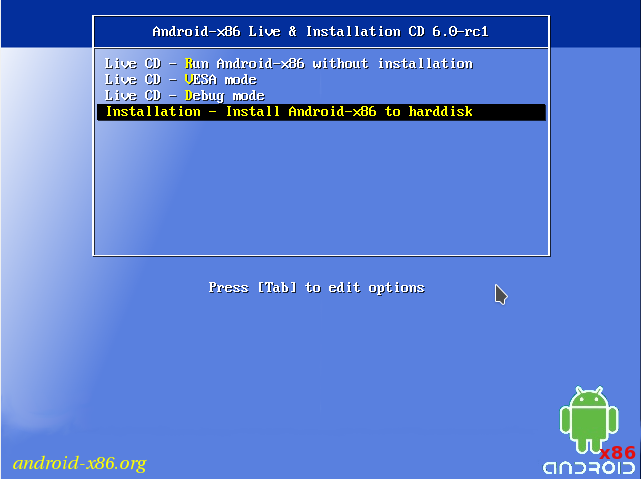
- Boot from the Android-x86 installation CD/USB, choose the ‘Install Android-x86 to harddisk’ item, as shown below:
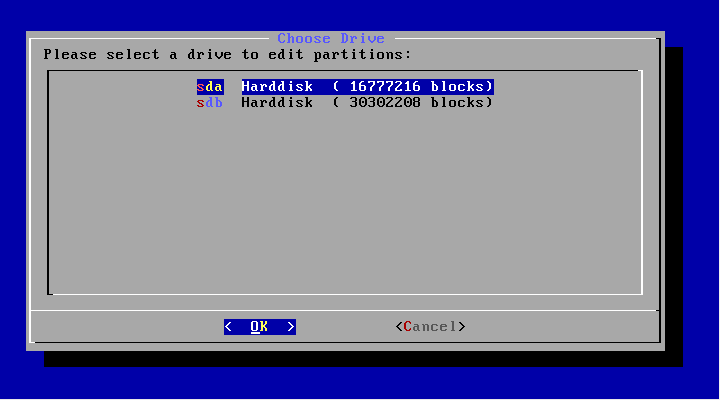
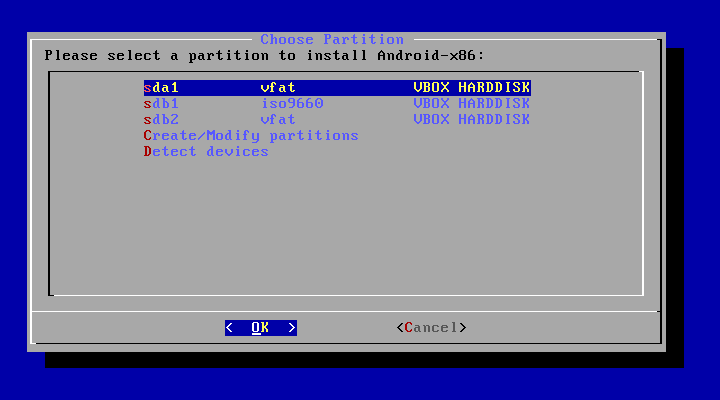
- After seconds of booting, you will see a partition selection dialog. You can choose an existing partition to install Android-x86, or you can create or modify partitions by choosing ‘Create/Modify partitions’. Note you can install Android-x86 to an external disk like USB drive. If the target drive is not shown, try ‘Detect devices’.
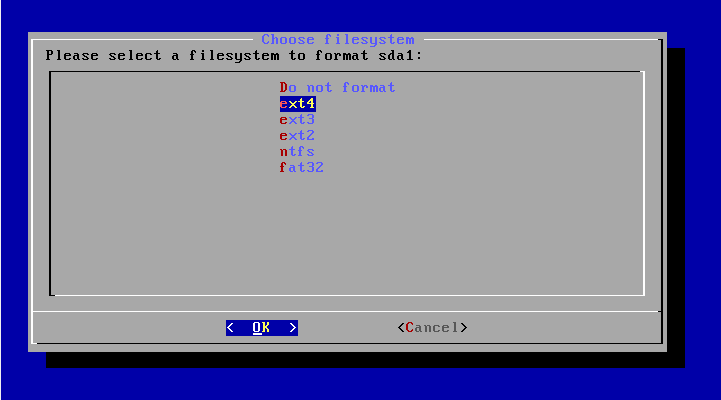
- Android-x86 can co-exist with other operating system or data in the chosen partition. If the partition is formatted, you may choose ‘Do not re-format’ to keep existing data. Otherwise, choose a filesystem type to format. Note the type you chose must match the partition id, or the boot loader will fail to boot.
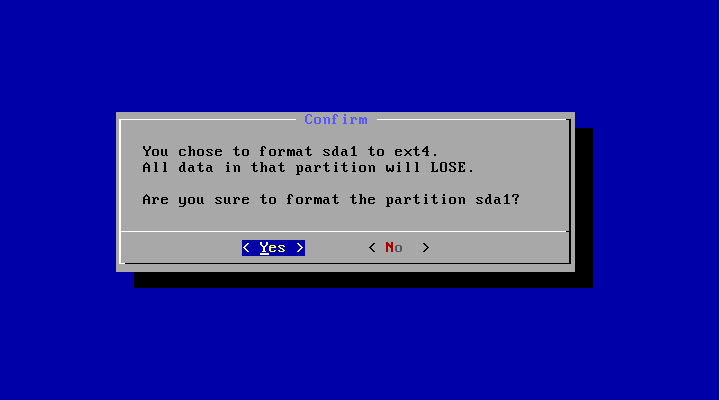
- If you choose to format the partition, you will see a warning like below. Select ‘Yes’ to confirm, or select ‘No’ to keep the original filesystem.
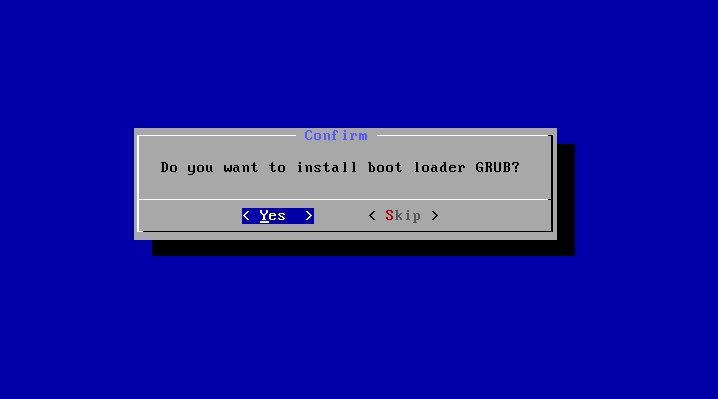
- Next question is whether to install boot loader Grub. Usually you should answer ‘Yes’, unless you want to install boot loader by hand yourself.
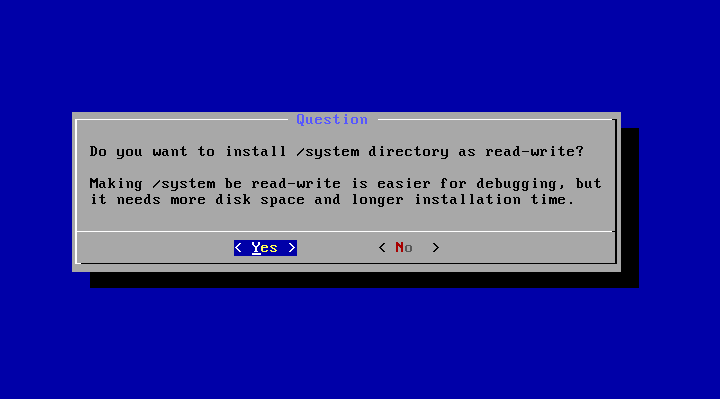
- Then the installer will ask if you want to install /system directory as read-write. If you want to modify the system for some purposes (e.g., debugging), select ‘Yes’.
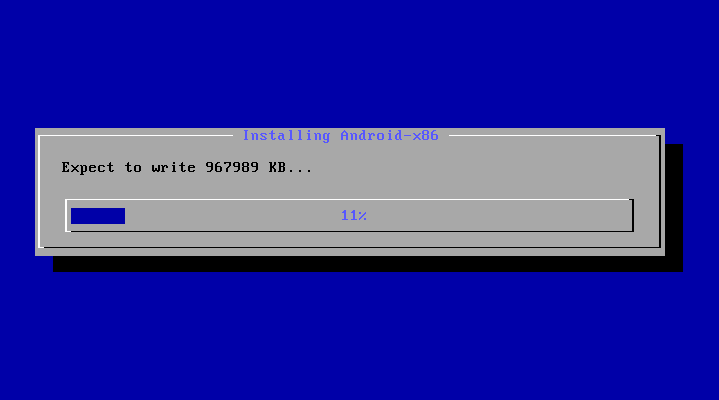
- If you are lucky, the installation will begin, and you will see the progress bar.
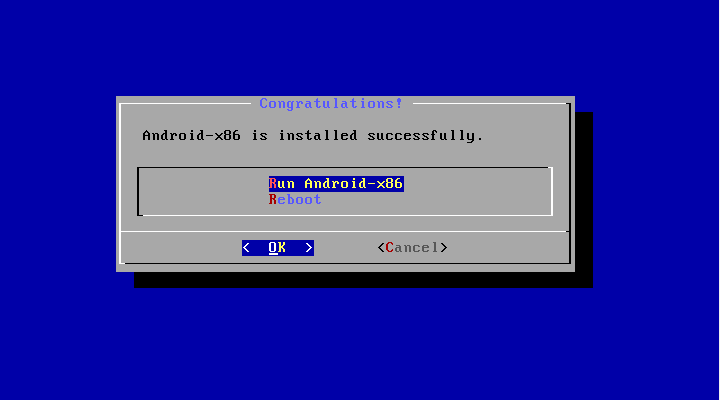
- If you see the following screen, the installation is complete. Congratulations! Now you can run Andrond-x86 directly, or you can reboot and run it:
Remix OS for PC
Remix OS started out as a very promising Android OS for computers but the developers (jide) stopped maintaining it. However you can still download the software and check it out, although it uses the codebase of the old Android Marshmallow 6.0 version (based on Android-x86).
The taskbar of the system and right-click function is similar to Windows 10. Remix OS has a super easy installation process and you can utilize the system on an older PC as it’s easier to operate compared to Linux or Windows.
The hardware requirements are pretty low, with 2 GHz dual-core processor, 2 GB RAM and minimum 8 GB of hard disk space. It also works on both 32 and 64 bit systems.
Released Files
This release contains four files. You can choose one of these files depends on your devices. Most modern devices should be able to run the 64-bit ISO. For older devices with legacy BIOS, you may try the 32-bit ISO.
- 32-bit ISO: android-x86-7.1-rc1.iso
sha1sum: d1b61d6ad1979496cddd800182b0011df3b0d5b9
- 64-bit ISO: android-x86_64-7.1-rc1.iso
sha1sum: 0b839ef59f9ff8f1c1ac42205d61efd72cb4b48c
- 32-bit rpm: android-x86-7.1-rc1.i686.rpm
sha1sum: 4a85315ca879d08cf8317b1925e06d973058fdf1
- 64-bit rpm: android-x86-7.1-rc1.x86_64.rpm
sha1sum: c0b07e49cd0410de094bd27dd7ab92befefac847
To use an ISO file, Linux users could just dump it into a usb drive to create a bootable usb stick like :
where /dev/sdX is the device name of your usb drive.
Windows’s users can use the tool Win32 Disk Imager to create a bootable usb stick.
Please read this page about how to install it to the device.
In doubt, try the 32-bit files for legacy BIOS devices and 64-bit files for UEFI devices. Please read this page about how to install it to the device.
rpm
This will update your older installation like 6.0-r2 or 6.0-r3 if you have.
On a deb based device (Debian/Ubuntu/LinuxMint/…), please use the alien tool to install it:
All files will be installed to the /android-7.1-rc1/ subdirectory and boot entries will be added to grub2 menu. Reboot and choose android-x86 item from the menu to boot Android-x86. Alternatively, you can launch Android-x86 in a QEMU virtual machine by the installed qemu-android script:
Note Android-x86 running in QEMU and the real machine (after rebooting) share the same data sub-folder.
Установка Android 6.0
Шаг 1. Начало установки
Сразу же после перезагрузки компьютера вы увидите такое окно загрузчика. Тут вы можете либо загрузиться в Live систему, либо перейти к ее установке. Нас будет интересовать последний пункт, установка:
Установщик запуститься очень быстро:
На первом шаге вам предстоит выбрать диск, на который будете выполнять установку:
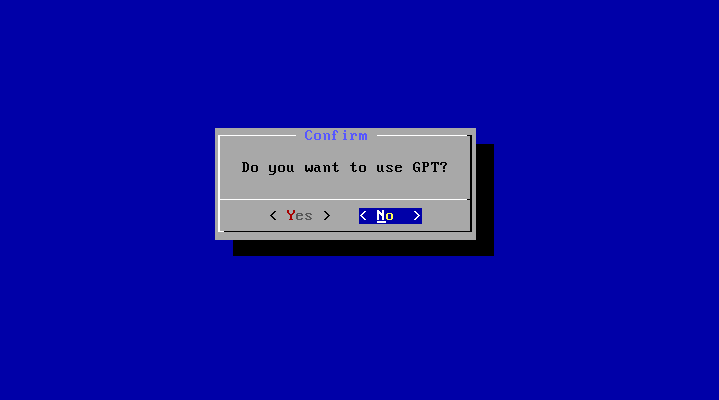
Шаг 4. Таблица разделов
Дальше, если этот диск еще не размечен необходимо выбрать таблицу разделов. Можно использовать GPT, но я не рекомендую это делать, поскольку большая вероятность того, что установка просто зависнет. Поэтому на этом шаге выбираем No. В таком случае будет использована MBR:
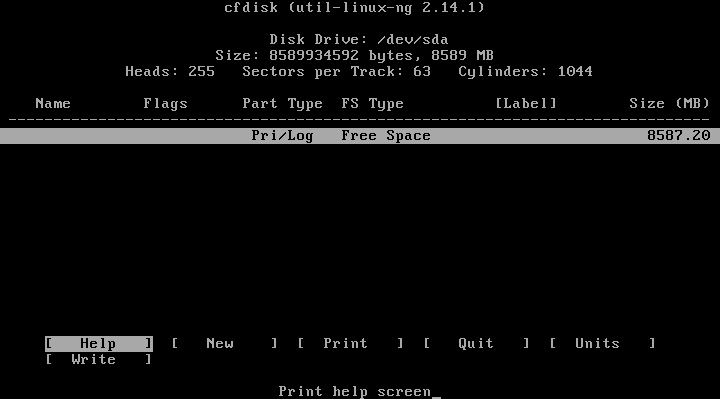
Шаг 5. Создание раздела
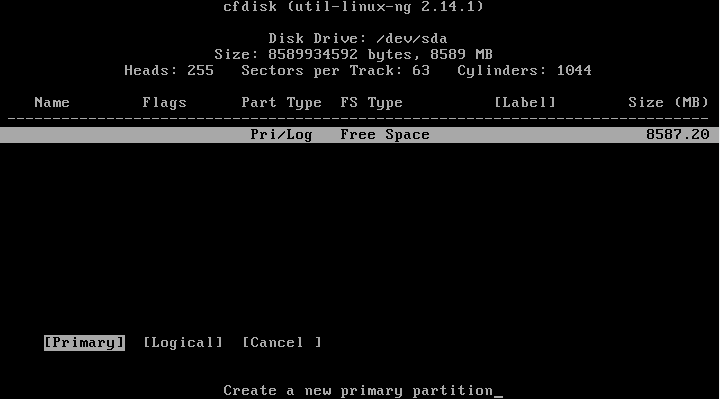
Установка Android x86 6.0 выполняется только на один раздел. И на этом шаге нам предстоит его создать. Для этого будет использоваться утилита cfdisk. Сначала нажмите New, чтобы создать новый раздел. Перемещаться по кнопкам можно стрелками влево/вправо, а нажимать с помощью Enter:
Выберите тип primary, первичный:
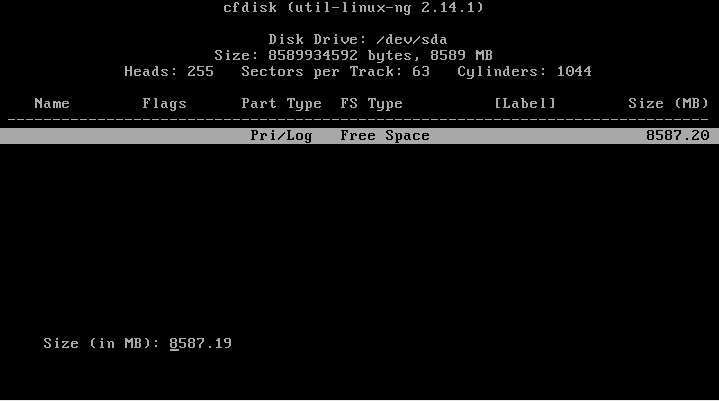
Дальше укажите размер, вернее, согласитесь с тем, что указала программа нажатием Enter:
Найдите кнопку Bootable и нажмите Enter, чтобы сделать этот раздел загрузочным:

Найдите и нажмите кнопку Write, чтобы записать изменения на диск. Для подтверждения наберите yes:
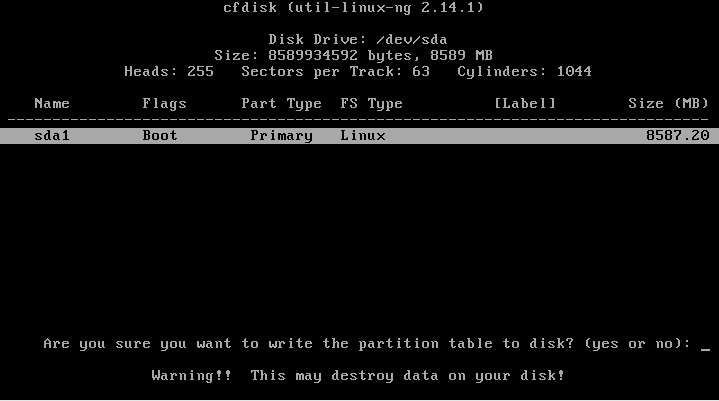
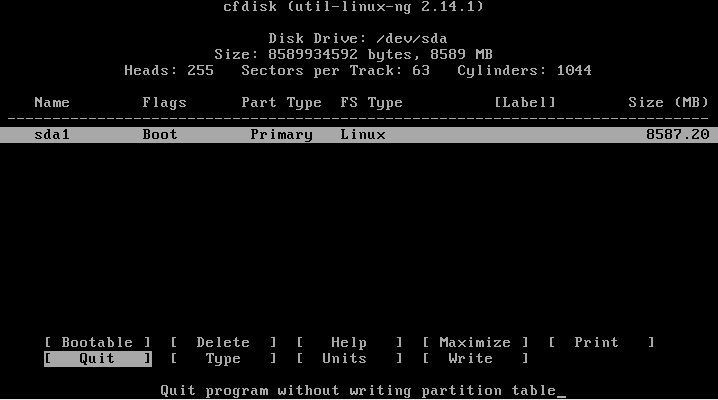
Осталось нажать кнопку quit для выхода из программы:
После завершения разметки вам нужно выбрать только что созданный раздел:
Выберите файловую систему, например, ext4
Поскольку нам нужен чистый раздел, соглашаемся с тем, что он будет отформатирован:
Загрузчик нам понадобится, поэтому выберите Yes:
А вот EFI загрузчик нам не нужен, учитывая, что мы использовали MBR. Выберите Skip:
Шаг 11. Режим доступа
В этом окне нужно выбрать нужно ли монтировать системный раздел /system в режиме чтения и записи. Это будет полезно для установки новых программ, поэтому выберите Yes:
Дождитесь распаковки всех файлов:
Шаг 13. Перезагрузка
Когда установка Android на компьютер будет закончена выберите пункт Reboot, чтобы перезагрузить компьютер и войти в новую систему:
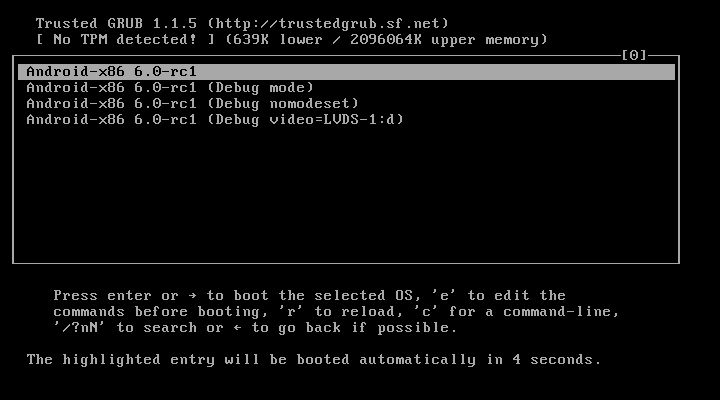
Выберите первый пункт загрузчика:
Шаг 16. Готово
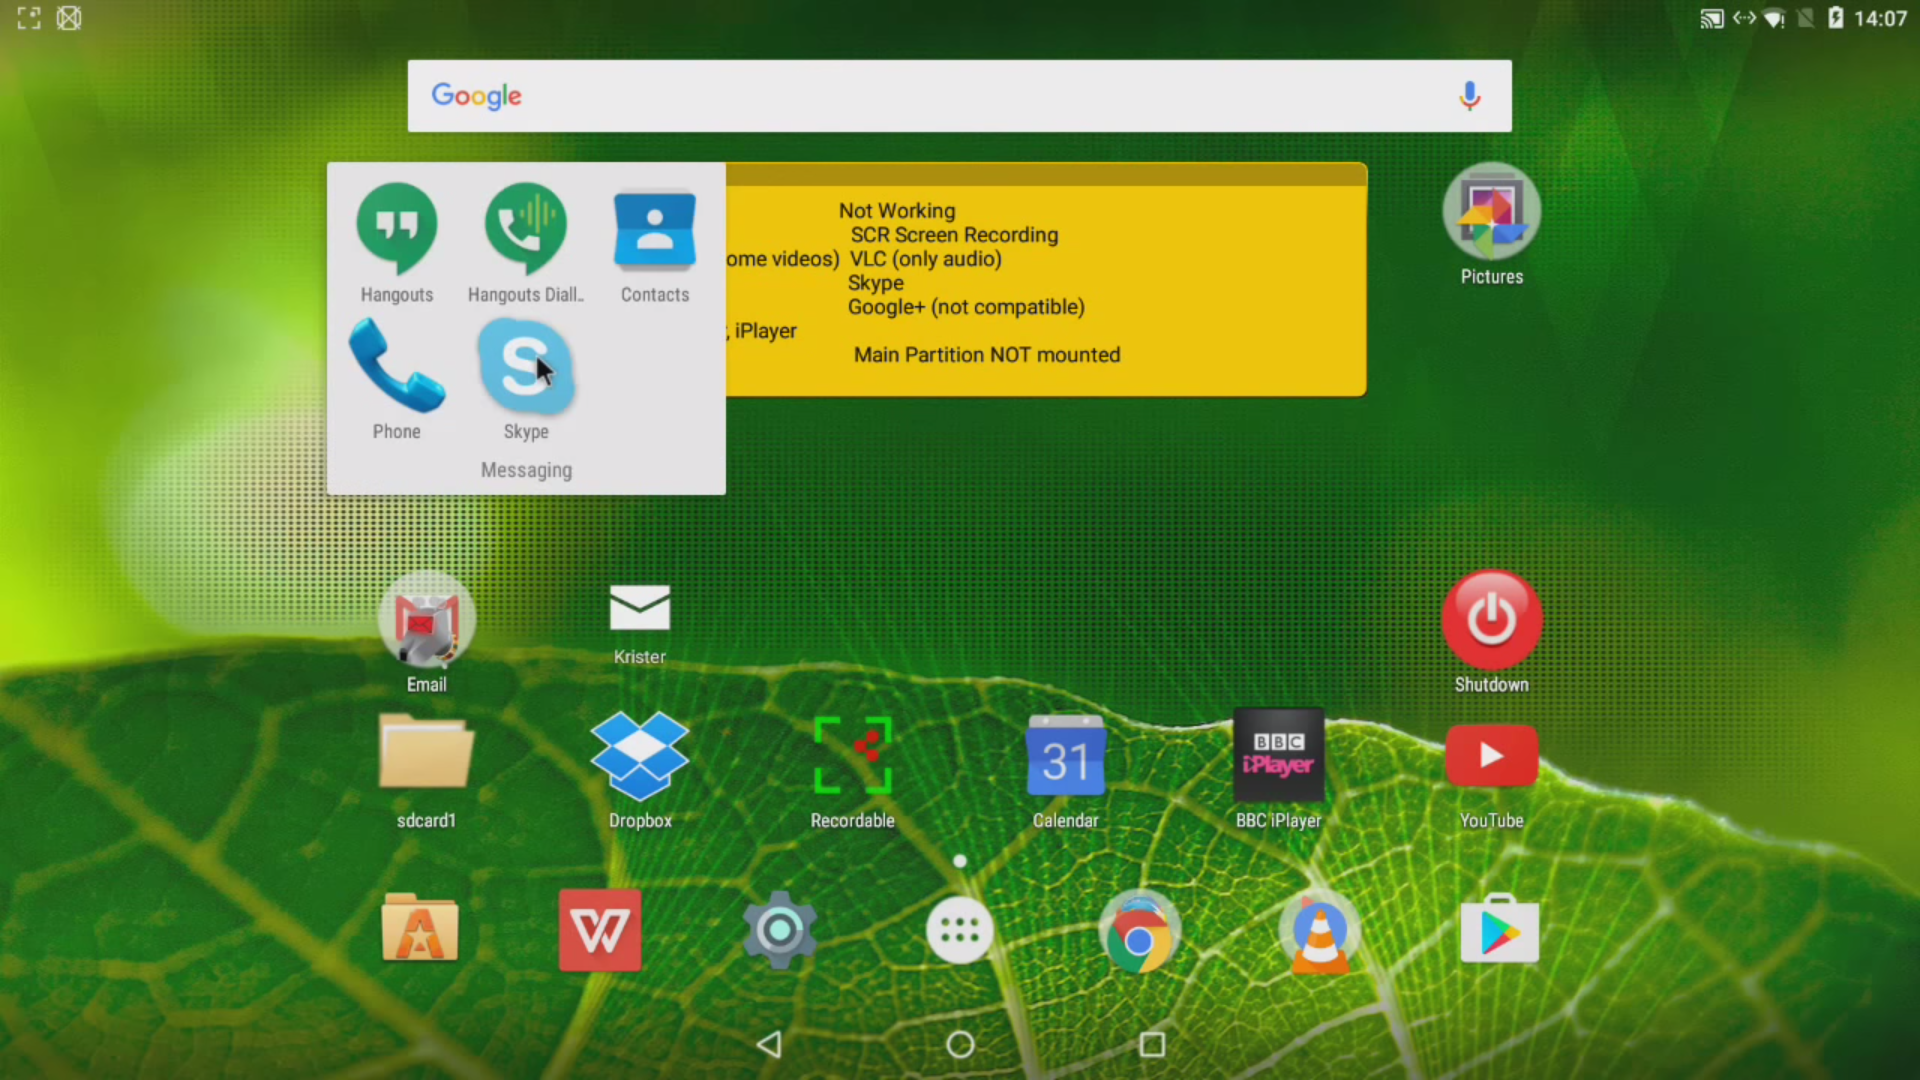
Вот и все, установка Android x86 на компьютер завершена. Теперь вы можете использовать Android прямо на своем компьютере. Вы можете устанавливать и запускать Android-приложения, играть игры:
Debug Howto
This page explains how to use adb and gdbserver with VirtualBox
1. use adb:
• In the VirtualBox network configuration, it is simplest to configure it for Host-Only or Bridged.
• boot up Android iso image on the VirtualBox.
• setup ethernet (normally, it will do DHCP by default)
• find the IP address of the android VM, by going to the console <Alt-F1> and then typing: netcfg
• you can go back to the UI by pressing <Alt-F7>
• on you host machine, cd <android source code root directory>/out/host/linux-x86/bin/
• ./adb kill-server
• ./adb connect <VirtualBox IP address>:5555, after this command, you should see something like below
* daemon not running. starting it now *
* daemon started successfully *
connected to <VirtualBox IP address>:5555
2. using adb with a NAT’ed VM
• The steps above work nicely if you have a VM which is set up to use Bridged or Host-Only adapters
• However, if you have a NAT’ed VM you cannot connect to the VM IP from the host
• You will need to set up port forwarding for a host port to be forwarded to the VM port 5555 (which is adb)
• VBoxManage modifyvm <VMName&rt; —natpf1 adb,tcp,*,<localport&rt;,*,5555
• Example from one machine:
• VBoxManage modifyvm froyo —natpf1 adb,tcp,*,5555,*,5555
• Once this is done, you should see the local port (i.e. 5555 in this case) bound on the host via netstat -a
• You can now connect to the VM by adb localhost:5555
2.a using adb with KVM (qemu)
If you are using KVM instead of Virtualbox you may find the following useful.
Example of running a iso using kvm:
kvm -soundhw es1370 -net nic -net user,hostfwd=tcp::4444-:5555 -cdrom buildname.iso
adb connect localhost:4444
adb disconnect
-usb -usbdevice host:2.*
3. how to use gdb with gdbserver:
Android-x86 comes with a preinstalled gdbserver. And you can find it in /sbin/gdbserver. To use gdb to debug your process, you need to:
• set up host-only network as mentioned earlier
• in the terminal emulator, run su
• in the terminal emulator, run gdbserver <VirtualBox ip address>:1234 or
• on your host machine, run gdb
• gdb > target remote <VirtualBox ip address>:1234
• gdb > set solib-search-path <the path to all the shared library binaries>
• gdb > c
4. Stop zygote to run automatically:
in the vendor/asus/eeepc/init.rc, change following lines
service zygote /system/bin/app_process -Xzygote /system/bin —zygote —start-system-server
socket zygote stream 666
onrestart write /sys/android_power/request_state wake
onrestart write /sys/power/state on
service zygote /system/bin/app_process -Xzygote /system/bin —zygote —start-system-server
socket zygote stream 666
onrestart write /sys/android_power/request_state wake
onrestart write /sys/power/state on
disabled
oneshot
PrimeOS
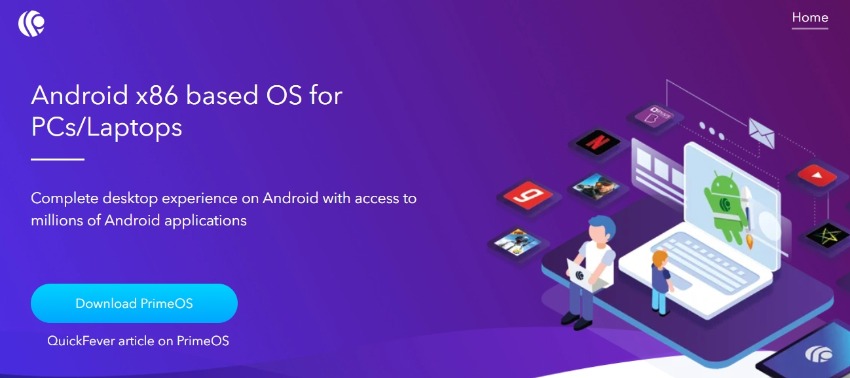
PrimeOS is basically a desktop optimized version of Android for laptops and desktops. Their mission is to liberate the power of Android and empower everyone with its productivity.
This software is using Android x86 based OS for PCs to give a complete desktop experience similar to Windows or MacOS with access to millions of Android applications.
You can play any Android games with a keyboard and mouse to get full comfort. The software is designed to give you the best of both worlds (Android flexibility with million of apps and power of a PC or laptop computer).
With the key mapping functionality, you can assign keyboard keys to Android game controls.
What I like about PrimeOS is that you can install it on your computer in dual-boot mode together with your Windows OS. This means that you will create a separate disk partition for PrimeOS so that every time you power up your computer you will have the option of booting into either Windows or PrimeOS.
Released Files
The release contains these files. Except the images built with kernel 4.9 as before (the first four files), we also provide experimental images built with kernel 4.19 (the last two files). If you have newer devices not supported by kernel 4.9, you may try the kernel 4.19 version. Most modern devices should be able to run the 64-bit ISO. For older devices with legacy BIOS, try the 32-bit ISO.
- 64-bit ISO: cm-x86_64-14.1-r5.iso
sha1sum: 4c00748c451923bb27c52375e59bc0bfeed8f32f
- 32-bit ISO: cm-x86-14.1-r5.iso
sha1sum: 4c96ce5b0259c1351805df3de4105d4f778ae668
- 64-bit rpm: cm-x86-14.1-r5.x86_64.rpm
sha1sum: edac951267ccffaaef52042de213cc3ec6998175
- 32-bit rpm: cm-x86-14.1-r5.i686.rpm
sha1sum: cd5b8661e02ee0af5c84b4bcb5ba97516ca8a805
- 64-bit ISO with kernel 4.19: cm-x86_64-14.1-r5-k419.iso
sha1sum: 973050d4dc2d4addc14a7aa310926cbf98f76dae
Recommended for newer devices - 32-bit ISO with kernel 4.19: cm-x86-14.1-r5-k419.iso
sha1sum: 7acdc986be6473fd4d9580a1ac2686cff68f81d8
Recommended for newer devices
You can choose one of these files depends on your devices. In doubt, try the 32-bit ISO for legacy BIOS devices and 64-bit files for UEFI devices.
To use an ISO file, Linux users could just dump it into a usb drive to create a bootable usb stick like :
where /dev/sdX is the device name of your usb drive.
Windows’s users can use the tool Win32 Disk Imager to create a bootable usb stick.
In doubt, try the 32-bit files for legacy BIOS devices and 64-bit files for UEFI devices. Please read this page about how to install it to the device.
Except the traditional ISO files, we also package android-x86 files into a Linux package rpm. It allows Linux users to easily install the release into an existing Linux device with a standalone ext4 root partition. On an rpm based device (Fedora/Red Hat/CentOS/SUSE…), just install it like a normal rpm package:
On a deb based device (Debian/Ubuntu/LinuxMint/…), please use the alien tool to install it:
All files will be installed to the /cm-x86-14.1-r5/ subdirectory and a boot entry will be added to grub2 menu. Reboot and choose cm-x86 item from the menu to enter the system. Alternatively, you can launch cm-x86 in a QEMU virtual machine by the installed qemu-android script:
Note Android-x86 running in QEMU and the real machine (after rebooting) share the same data sub-folder.
To uninstall it:
Key Features
The 9.0-r1 release is based on the latest Android 9.0.0 Pie release (android-9.0.0_r53). The features include:
- Support both 64-bit and 32-bit kernel and userspace with latest LTS kernel 4.19.105.
- Support OpenGL ES 3.x hardware acceleration for Intel, AMD, Nvidia and QEMU(virgl) by Mesa 19.3.4.
- Support OpenGL ES 2.0 via SwiftShader for software rendering on unsupported GPU devices.
- Support hardware accelerated codecs on devices with Intel HD & G45 graphics family.
- Support secure booting from UEFI and installing to UEFI disk.
- A text based GUI installer.
- Add theme support to GRUB-EFI.
- Support Multi-touch, Audio, Wifi, Bluetooth, Sensors, Camera and Ethernet (DHCP only).
- Simulate WiFi adapter on devices with Ethernet only to increase app compatibility.
- Auto-mount external usb drive and sdcard.
- Add Taskbar as an alternative launcher which puts a start menu and recent apps tray on top of your screen and support freeform window mode.
- Enable ForceDefaultOrientation on devices without known sensors. Portrait apps can run in a landscape device without rotating the screen.
- Support arm arch apps via the native bridge mechanism. (Settings -> Android-x86 options, 64-bit only)
- Support to upgrade from non-official releases.
- Add experimental Vulkan support for newer Intel and AMD GPUs. (Boot via Advanced options -> Vulkan support)
- Mouse integration support for VMs including VirtualBox, QEMU, VMware and Hyper-V.
Особенности интерфейса
Android 8.1 Oreo, модифицированный в рамках проекта Android-x86, обладает классическим оконным интерфейсом Microsoft Windows, включающим в себя панель задач. Пользователь может размещать на панели ярлыки наиболее часто используемых программ (по аналогии с панелью быстрого запуска в ранних версиях Windows). Кроме того, предусмотрена замена меню «Пуск», которое в данном случае содержит список всех установленных приложений, перечень недавно запущенных программ и документов и строку поиска. Здесь же находится кнопка управления питанием, позволяющая выключать и перезагружать устройство.
Дополнительное сходство с Windows системе от Android-x86 придает появившийся в новой версии обновленный многооконный режим FreeForm, аналог режима многозадачности. В отличие от мобильной версии Android, в Android-x86 можно запускать больше двух приложений и произвольно менять размеры и расположение их окон. Можно развернуть одно приложение на весь экран или свернуть его до размеров иконки на панели задач.
Phoenix OS
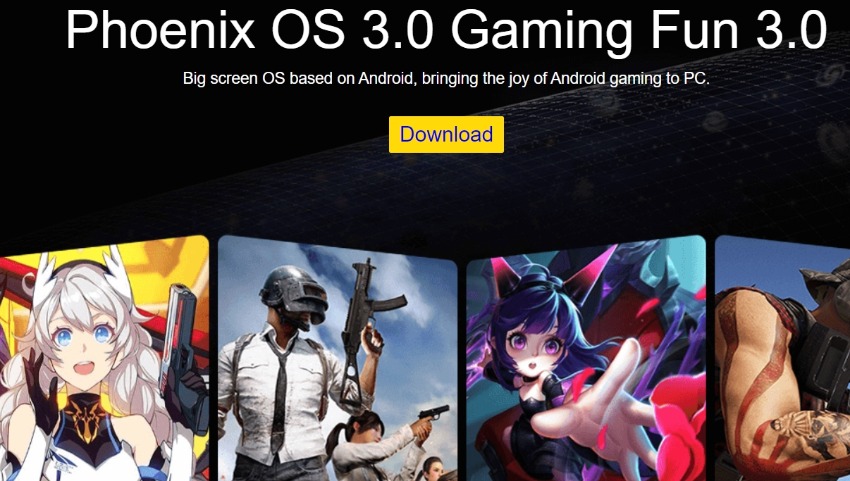
Phoenix OS supports both 32-bit and 64-bit computers and is one of the best options in this list (currently supported and maintained by the developers).
The current version development is based on Android 7.1 which is a fairly new and stable version. It comes in two versions, the default one which is for PCs and another version for ARM hardware processors.
You’ll need at least 2GB internal hard disk storage to install the Phoenix OS on your computer and the beauty of it is that when installed it does not affect the original document system.
Moreover, you can even install it on a USB which should be more than 6GB capacity and high-performance.
With this software, you’ll get to have the PC browsing experience along with the fun of the android operating system. It enables you to have multiple fully resizable windows open at a time. The Phoenix OS is an excellent choice for those who want to have a full-fledged android experience on their windows PC.
Android-x86
This OS option has the goal of being a “complete solution for Android on common x86 platforms.” according to the developers. As they say on the official website, “You may think Android-x86 as an Android BSP (Board Support Package) of generic x86 platforms.”
There are tons of software that lets you use Android on PC but not all work the same. Android-x86 is one of the finest open-source systems for your x86 or x64 computer.
It provides a wide range of supports such as a multi-touch screen, Wi-Fi, Bluetooth, camera, and many more features.
The Android-x86 uses the Linux kernel 4.19.15 which enables it to support a wide variety of hardware. Overall, it is one of the most resourceful Android OS systems out there. Currently, the developers are working to support Android 10 as well (the current version is 9).