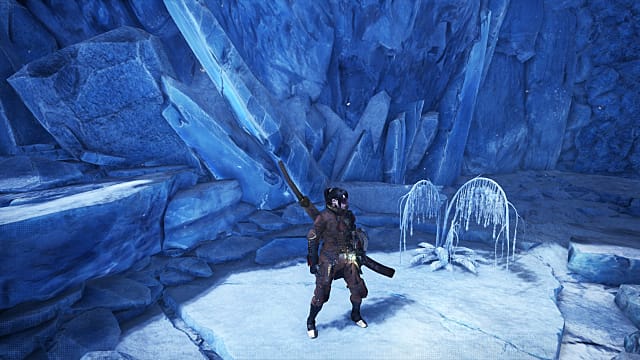
Best great sword builds for iceborne 2020-2021
Содержание:
- Story: M★6 Outline
- Elige tu región
- Escolha a região
- Улучшайте своего верного друга
- Farming Frozen Foliage
- Monster Hunter World Iceborne Hunting Horn Endgame Meta Build
- Gameplay Overview
- 请选择地区。
- Zinogre
- Story: M★3 Outline
- Monster Hunter World Iceborne Charge Blade Progression Build
- Banbaro
- Farming Decorations
- Monster Hunter World Iceborne Sword and Shield Endgame Meta Build
- Scegli un paese
- Новые Яркие Моменты
- Найдите себе миньонов
- Choose Region
- Story: M★4 Outline
- Научитесь балансировать между агрессией и защитой
- The Six Ingredients for Felyne Zoomaster
Story: M★6 Outline
| Seliana | |
|---|---|
| ① | Once the meeting is over, head to Origin Isle・After arriving at Origin Isle you will fight a few montsers in succession so prepare yourself |
| Special Quest: To The Guided, A Paean | |
|---|---|
| ② | Slay Ruiner Nergigante・Achieve MR22・Ruiner Nergigante has many new attacks so beware |
| Special Quest: To The Guided, A Paean | |
|---|---|
| ③ | Once you slay Ruiner Nergigante there will be a scene and you will move onto your next hunt・Achieve MR23・You will have a long fight coming up so use a Farcaster to return to camp and restock on supplies |
| Seliana | |
|---|---|
| ④ | Speak with the Field Team Leader and head to Elder’s Recess to investigate Ruiner Nergigante |
| Investigation: Guiding Lands | |
|---|---|
| ⑤ | As you pursue Nergigante, you will come across a new map, the Guiding Lands. Continue on your investigation as normal |
Elige tu región
Elige tu regiónAlemaniaArabia SaudíArgentinaAustraliaAustriaBaréinBélgicaBoliviaBrasilBulgariaCanadáCatarChileChipreColombiaCoreaCosta RicaCroaciaDinamarcaEcuadorEl SalvadorEmiratos Árabes UnidosEslovaquiaEsloveniaEspañaEstados Unidos de AméricaFinlandiaFranciaGreciaGuatemalaHondurasHong KongHungríaIndiaIndonesiaIrlandaIslandiaIsraelItaliaJapónKuwaitLíbanoLuxemburgoMalasiaMaltaMéxicoNicaraguaNoruegaNueva ZelandaOmánPaíses BajosPanamáParaguayPerúPoloniaPortugalReino UnidoRepública Checa (La)RumaníaRusiaSingapurSudáfricaSueciaSuizaTailandiaTaiwánTurquíaUcraniaUruguayOtroDD12345678910111213141516171819202122232425262728293031MM123456789101112YYYY190019011902190319041905190619071908190919101911191219131914191519161917191819191920192119221923192419251926192719281929193019311932193319341935193619371938193919401941194219431944194519461947194819491950195119521953195419551956195719581959196019611962196319641965196619671968196919701971197219731974197519761977197819791980198119821983198419851986198719881989199019911992199319941995199619971998199920002001200220032004200520062007200820092010201120122013201420152016
Escolha a região
Escolha a regiãoÁfrica do SulAlemanhaArábia SauditaArgentinaAustráliaÁustriaBahreinBélgicaBolíviaBrasilBulgáriaCanadáCatarCheca, RepúblicaChileChipreColômbiaCosta RicaCroáciaDinamarcaEl SalvadorEmirados Árabes UnidosEquadorEslováquiaEslovêniaEspanhaEstados UnidosFinlândiaFrançaGréciaGuatemalaHondurasHungriaÍndiaIrlandaIslândiaIsraelItáliaKuwaitLíbanoLuxemburgoMaltaMéxicoNicaráguaNoruegaNova Zelândia (Aotearoa)OmãPaíses Baixos (Holanda)PanamáParaguaiPeruPolôniaPortugalReino UnidoRomêniaRússiaSuéciaSuíçaTurquiaUcrâniaUruguaiOutrosDD12345678910111213141516171819202122232425262728293031MM123456789101112YYYY190019011902190319041905190619071908190919101911191219131914191519161917191819191920192119221923192419251926192719281929193019311932193319341935193619371938193919401941194219431944194519461947194819491950195119521953195419551956195719581959196019611962196319641965196619671968196919701971197219731974197519761977197819791980198119821983198419851986198719881989199019911992199319941995199619971998199920002001200220032004200520062007200820092010201120122013201420152016
Улучшайте своего верного друга
Охота в одиночку в Monster Hunter: World может карать очень сильно, ведь у вас нет союзников, на которых можно положиться. Однако в такие моменты с вами всегда присутствует Палико — ваш верный кот-компаньон.
Если вы охотитесь в одиночку или в группе из двух человек, обязательно создавайте новые инструменты для своего мохнатого товарища. Не сосредотачивайтесь лишь на своей собственной броне и оружии. Создавайте новые и для своего Палико, ведь разница между обмундированным и слабым котом невероятно большая в Monster Hunter World: Iceborne. Сами сражения не являются чем-то лёгким, и вы определённое заметите разницу, если сможете заставить своего компаньона нести ответственность на поле битвы за самого себя.
Каждое устройство Палико в Iceborne несёт в себе новую способность. Для их разблокировки вам нужно повышать уровень своего инструмента. Выберите те, которые вам нравятся больше всего, после чего придерживайтесь их. Рекомендовано использовать «Коралловый оркестр» (Coral Orchestra) для снятия дебаффов или «Спрей исцеляющей осы» (Vigorswap Spray), чтобы сохранить как своё здоровье, так и Палико.
Farming Frozen Foliage
Your best bet for getting all the canteen ingredients you need in the Hoarfrost Reach is going on an expedition while Frozen Foliage is flourishing. Time of day and weather conditions don’t matter.
Your primary farming zones will be Area 7 and Area 15, where a total of nine patches of foliage grow. So long as they’re flourishing, you’ll only need to wait about five minutes or so between gathering.
Farming Moonlight and Snowpeak Icebloom
Neither of these materials will take you too long to farm. You’ll be able to collect either ingredient from any Frozen Foliage you come across.
Moonlight Icebloom is relatively common, and you’re liable to get your hands on it within your first few gathers. Snowpeak Icebloom will take you more time. It’s a rare gather, but you’ll know you’ve got it when your hunter digs excitedly twice and raises their arm high.
You’ll only need one instance of both plants. Once you have them, it’s time to move onto the tough part.
Where to Find Petalcryst
The final ingredient on your list only appears during flourishing Frozen Foliage, and only in a single small cave in Area 2.
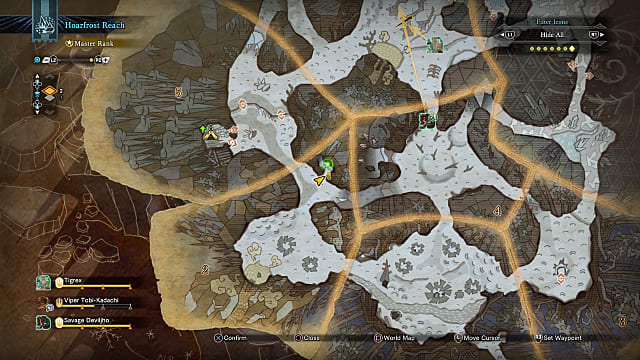
I only had luck finding petalcryst on the lower levels, and there’s still a chance you might not get it. Thankfully, the plants here respawn at the same rate as their non-cavebound counterparts.
Once you’ve managed to nab a sprig of petalcryst, you should have every ingredient you need to activate Felyne Zoomaster. Now go out and get those pets!
—
That’s all you need to know about the Felyne Zoomaster skill in Monster Hunter: World Iceborne. Here are some other great Iceborne articles while you’re at it:
- Iceborne Not Loading on PC Fix
- Iceborne Greatsword Builds
- Iceborne: How to Find Hot Spring Stones
- Iceborne Save Overwrite Fixes
- Iceborne Monster Slogbone Farming Guide
- Keep an eye on our Iceborne guide hub for even more.
Monster Hunter World Iceborne Hunting Horn Endgame Meta Build
Endgame Fatalis Armor Build
| Weapon | Decorations | |
|---|---|---|
|
Fatalis Menace Wailer |
Challenger Jewel+ 4 x1Challenger Jewel+ 4 x1 |
|
| Armor | Decorations | |
| Head |
Dragonhead Beta + |
Attack Jewel+ 4 x3 |
| Armor |
Dragonhide Beta + |
Expert Jewel+ 4 x2Jumping/Expert Jewel 4 x1 |
| Vambraces |
Dragonclaws Beta + |
Jumping/Expert Jewel 4 x1Jumping/Expert Jewel 4 x1Jumping/Expert Jewel 4 x1 |
| Waist |
Dragonbarbs Beta + |
Critical/Maintenance Jewel 4 x3 |
| Legs |
Dragonfeet Beta + |
Flawless/Evasion Jewel 4 x3 |
| Charm |
Challenger Charm V |
None |
Fatalis Build Skill List
| Skills | |
|---|---|
| Attack Boost 7 | Critical Eye 7 |
| Agitator 7 | Evade Window 5 |
| Tool Specialist 5 | Weakness Exploit 3 |
| Critical Boost 3 | Stun Resistance 3 |
| Peak Performance 3 | Horn Maestro 2 |
| Evade Extender 2 | Flinch Free 1 |
| Fatalis Legend 4 |
| A Hunting Horn skilll setup that’s focused on damage. The slugger skill was removed in favor of dealing damage and other QoL skills like Evade WIndow, Horn Maestro, and Flinch Free to ensure that the buffs never stops coming. |
Gameplay Overview
Monster Hunter World: Iceborne is the highly anticipated massive expansion to Monster Hunter: World, the bestselling Capcom title of all time with more than 12 million units shipped worldwide adding to the series total of more than 53 million units to date. This gargantuan follow-up rivals the gameplay volume from the original release and features a new icy setting, storyline, monsters, gameplay options, and more. The game’s all-new story picks up after Monster Hunter: World and whisks hunters away to the newly discovered chilly locale that, once fully explored, becomes the largest region in World so far. The new locale is home to several new and returning monsters ready to challenge hunters throughout their expeditions, and raises the stakes with the added higher difficulty Master Rank. Iceborne continues the skill-based progression and robust crafting system found in World, and expands that with several new gameplay features that broaden the player’s combat repertoire. All this leads to the ultimate hunter test against the mysterious new flagship monster, Velkhana.
请选择地区。
请选择地区。印度尼西亚香港新加坡泰国台湾韩国马来西亚其他YYYY190019011902190319041905190619071908190919101911191219131914191519161917191819191920192119221923192419251926192719281929193019311932193319341935193619371938193919401941194219431944194519461947194819491950195119521953195419551956195719581959196019611962196319641965196619671968196919701971197219731974197519761977197819791980198119821983198419851986198719881989199019911992199319941995199619971998199920002001200220032004200520062007200820092010201120122013201420152016MM123456789101112DD12345678910111213141516171819202122232425262728293031
Zinogre

Уязвимые места: голова и пузо.
Слабость к стихиям: лед и вода.
Стихия (в античной и средневековой натурфилософии — одна из четырёх первооснов мира: земля, вода, воздух и огонь): гром.
Статусные недуги: громовая порча, паралич.
Жесткий монстр с уникальным набором движений, которые включают внедрение громовых насекомых, благодаря чему когти становятся на электрифицированными. После зарядки монстр становится более проворным и агрессивным. У него два состояния заряда, при этом последний символизирует то, что пора бежать куда-то в горы. Он может далековато прыгнуть, быстро развернуться и ударить вас прежде, чем вы сообразите, что делать.
Тем не мение, у вас будет около пяти секунд на то, чтобы остановить противника от внедрения насекомых. Во время этого процесса он становится неподвижным. Сконцентрируйтесь на голове, чтобы сбить его с толку. Время от времени это позволит заблокировать зарядку.
Лучшее время для атаки — когда он не заряжен электричеством, так как это значит, что враг двигается медленнее.
Story: M★3 Outline
| Astera | |
|---|---|
| ① | Head to Seliana |
| Seliana | |
|---|---|
| ② | Accept the quest Blizzard Blitz |
| Assigned Quest: Hoarfrost Reach | |
|---|---|
| ③ | Hunt a Barioth・Achieve MR7/Unlock M★3 quests・Unlock the next level of equipment upgrades・Receive a Warming Jewel +2 from the Commander |
| Astera | |
|---|---|
| ④ | Investigate the strange happenings in Ancient Forest |
| Investigation:Ancient Forest | |
|---|---|
| ⑤ | Go on an expedition in Ancient Forest |
| Astera | |
|---|---|
| ⑥ | Accept the following quests: Never-ending Shadow The Scorching BladeSearch for signs of a Velkhana in each area |
| Assigned Quest: Ancient Forest | |
|---|---|
| ⑦ | Hunt a Nargacuga・Achieve MR8 |
| Assigned Quest: Wildspire Waste | |
|---|---|
| ⑧ | Hunt a Glavenus・Achieve MR9 |
| Astera | |
|---|---|
| ⑨ | Accept the following quests: Absolute Power A Smashing Cross Counterhrl]Search for signs of a Velkhana in each area |
| Assigned Quest: Rotten Vale | |
|---|---|
| ⑩ | Hunt a Tigrex・Achieve MR10 |
| Assigned Quest: Elder’s Recess | |
|---|---|
| ⑪ | Hunt a Brachydios・Achieve MR11・A new request is available at the Botanical Resource Center・Unlock a quest to upgrade the Glider Mantle・Unlock a quest to upgrade the Challenger Mantle・Unlock a quest to upgrade the Fireproof Mantle |
| Expedition/Free: Any Map | |
|---|---|
| ⑫ | Complete your search for Velkhana tracks and return to Astera |
| Astera | |
|---|---|
| ⑬ | Accept the quest A Tale of Ice and Fire |
| Assigned Quest: Elder’s Recess | |
|---|---|
| ⑭ | Drive back the Velkhana・Achieve MR12・Unlock a quest to upgrade the Evasion Mantle・Unlock a quest to upgrade the Bandit Mantle |
Monster Hunter World Iceborne Charge Blade Progression Build
Starter Iceborne Build
| Weapon | Decorations | |
|---|---|---|
|
Defender’s Shield V |
—— | |
| Armor | Decorations | |
| Head |
Guild Cross Circlet Beta |
Steadfast Jewel 1 x3 |
| Armor |
Damascus Mail Beta |
Artillery Jewel 1 x3 |
| Vambraces |
Kaiser Vambraces Alpha |
Vitality Jewel 1 x1 |
| Waist |
Damascus Coil Beta |
Ironwall Jewel 1 x2Protection Jewel 1 x1 |
| Legs |
Empress Greaves Beta |
Tenderizer Jewel 2 x1Magazine Jewel 2 x1 |
| Charm |
Ironside Charm III |
None |
Starter Iceborne Skill List
| Skills | |
|---|---|
|
Guard 5 |
Divine Blessing 3 |
|
Focus 3 |
Health Boost 3 |
|
Weakness Exploit 3 |
Artillery 3 |
|
Stun Resistance 3 |
Capacity Boost 1 |
| A defensive endgame build from MHWs base game for the charge blade. It also has Artillery to improve the impact phial’s damage so you can take down MR rank monsters much faster, |
Early Iceborne Progression Build
| Weapon | Decorations | |
|---|---|---|
|
Wild Force I |
Sharp Jewel 2 x1— |
|
| Armor | Decorations | |
| Head |
Jagras Helm Alpha + |
Tenderizer Jewel 2 x1 |
| Armor |
Banbaro Mail Alpha + |
Tenderizer Jewel 2 x1 |
| Vambraces |
Banbaro Vambraces Alpha + |
Tenderizer Jewel 2 x1 |
| Waist |
High Metal Coil Alpha + |
Vitality Jewel 1 x1Grinder Jewel 1 x1 |
| Legs |
Alloy Greaves Alpha + |
Shield Jewel 2 x1 |
| Charm |
Artillery Charm III |
None |
Early Iceborne Skill List
| Skills | |
|---|---|
|
Attack Boost 2 |
Speed Eating 3 |
|
Offensive Guard 2 |
Health Boost 3 |
|
Weakness Exploit 3 |
Speed Sharpening 2 |
|
Windproof 1 |
Protective Polish 1 |
|
Capacity Boost 1 |
Defense Boost 2 |
|
Guard Up 1 |
| Block those hits perfectly but make sure to polish your weapon first! A block oriented build that makes use of QoL skills to make you last long into the fight. |
Mid-Late Iceborne Progression Build
| Weapon | Decorations | |
|---|---|---|
|
Chrome Fortress III |
Attack Jewel 1 x2— |
|
| Armor | Decorations | |
| Head |
Zorah Headgear Alpha + |
Challenger Jewel 2 x2 |
| Armor |
Zorah Hide Alpha + |
Handicraft Jewel 3 x1Attack Jewel 1 x1 |
| Vambraces |
Banbaro Vambraces Alpha + |
Magazine Jewel 2 x1 |
| Waist |
Zorah Spine Alpha + |
Handicraft Jewel 3 x1Elementless Jewel 2 x1 |
| Legs |
Uragaan Greaves Alpha + |
Attack Jewel 1 x1 |
| Charm |
Handicraft Charm III |
None |
Mid-Late Iceborne Progression Build Skill List
| Skills | |
|---|---|
|
Artillery 5 |
Tremor Resistance 3 |
|
Health Boost 2 |
Guard 2 |
|
Offensive Guard 2 |
Flinch Free 1 |
|
Quick Sheath 1 |
Handicraft 5 |
|
Capacity Boost 1 |
Agitator 2 |
|
Non-elemental Boost 1 |
Attack Boost 4 |
| Zorah Magdaros Essence |
| An Artillery build setup for the Charge Blade and its Impact Phial. We utilzed the secret of the Magdaros set to raise the artillery skill to 5. Non-Elemental Boost was also mixed to further your weapon damage. Just don’t add in some free elem skills or you’ll ruin it! |
Banbaro

Уязвимые точки: голова и ноги.
Слабость к стихиям: дракон (best), огонь.
Стихия: лед.
Статусные недуги: ледяная порча.
Совсем новый монстр, внешне напоминающий огромного лося. Используйте в бою новый девайс — коготь. Банбаро использует одну основную спецатаку в тот момент, когда между вами есть расстояние. Он начинает собираться с силами, рыть землю и потом ускоряется, сбивая все на своем пути. Могут отлетать снежные камни. Если он ударит вас, то вы схватите ледяную порчу, из-за чего будете двигаться медлительнее прежнего и потеряете выносливость. Используйте ягоды Nulberry для лечения порчи. Если же в вас попадут осколки деревьев, то вы получите обычный урон.
Важно уклоняться в сторону абсолютно каждый раз, когда Банбаро атакует. Если вы держите дистанцию, вам даже может не потребоваться кувырок или бег
Сохранение выносливости — сверхключевой фактор, поскольку вам нужно будет часто ускоряться к Банбаро, чтобы штурмовать его.
В конце заряженной атаки Банбаро ударит по земле. Когда он подымается, чтобы ударить, бегите к задней части монстра, чтобы нанести несколько ударов. Голова Банбаро — наилучшее место для ваших ударов, но попасть по ней не так просто, да и опасно. Более ограниченный метод — атаковать лапы. Если вы находитесь под монстром, он будет обычно подымать одну из ног, чтобы затем попытаться раздавить вас. Просто уклонитесь в сторону другой, опорной лапы, и продолжайте штурмовать. Также, когда вы находитесь под Банбаро, он может задействовать атаку вращением, но ее обычно можно избежать, просто напросто стоя у ног.
Farming Decorations
Aside from being granted by armor, skills are acquired by slotting your equipment with decorations. These can be obtained in a number of ways, including clearing main story quests and crafting them in the elder melder’s pot. The best way to farm decorations, however, is to run tempered monster investigations.
Tempered monsters investigations reward you with one to five reward boxes that contain either feystones or streamstones. When appraised, feystones turn into random decorations.
Decorations are categorized into four tiers: C, B, A, and S. Each tier has a specific chance of appearing after appraising various types of feystones. The chances that a reward will contain a specific feystone also depends on the threat level of the investigation.
Feystone Appraisal and Drop Rates
| Feystone | Appraisal | Drop Rates |
|---|---|---|
| Mysterious Feystone |
|
|
| Gleaming Feystone |
|
|
| Worn Feystone |
|
|
| Warped Feystone |
|
|
The table above should guide you on which tempered monster investigations to farm when aiming for specific decorations. Attack jewels, for example, are A tier decorations. They have the highest chance of appearing after appraising warped feystones. Doing threat level 2 investigations then will grant you the best odds of obtaining them.
C Tier Decorations
| C Tier | ||
|---|---|---|
| Intimidator | Sporepuff Expert | Divine Blessing |
| Fortitude | Scholar | Resuscitate |
| Palico Rally | Botanist | Tool Specialist |
| Free Meal | Stealth | Fire Resistance |
| Water Resistance | Thunder Resistance | Ice Resistance |
| Dragon Resistance | Poison Resistance | Blast Resistance |
| Paralysis Resistance | Sleep Resistance | Bleeding Resistance |
| Effluvia Resistance | Iron Skin | Geologist |
| Aquatic Expert | Airborne | Entomologist |
| Heavy Artillery | Hunger Resistance |
B Tier Decorations
| B Tier | ||
|---|---|---|
| Fire Attack | Water Attack | Thunder Attack |
| Ice Attack | Dragon Attack | Poison Attack |
| Evade Window | Affinity Sliding | KO |
| Speed Sharpening | Horn Maestro | Item Prolonger |
| Partbreaker | Speed Eating | Recovery Speed |
| Quick Sheath | Constitution | Flinch Free |
| Tremor Resistance | Stun Resistance | Stun Resistance |
| Blight Resistance | Health Boost | Stamina Thief |
| Critical Eye | Recovery Up | Evade Extender |
| Weakness Exploit | Slinger Capacity | Poison Shot |
| Bombardier | Earplugs | Defense |
| Wind Resistance | Non-Elemental Boost | Wide Range |
A Tier Decorations
| A Tier | ||
|---|---|---|
| Resentment | Normal Shots | Attack |
| Protective Polish | Power Prolonger | Maximum Might |
| Sleep Attack | Paralysis Attack | Latent Power |
| Stamina Surge | Capacity Boost | Adrenaline |
| Agitator | Guard | Guard Up |
| Special Ammo Boost | Blast Attack | Blast Shots |
| Paralysis Shots | Sleep Shots | Peak Performance |
| Elder Seal Up |
S Tier Decorations
| S Tier | ||
|---|---|---|
| Free Elem/Ammo Up | Piercing Shots | Marathon Runner |
| Bow Charge Plus | Spread/Power Shots | Mind’s Eye/Ballistic |
| Handicraft | Mushroomancer | Focus |
| Critical Boost | Critical Draw | Artillery |
The Greatest Jagras Event Quest
The Greatest Jagras is a limited event that lets you easily farm feystones even without completing the quest. You will be pitted against an incredibly large Great Jagras that hits very hard and has massive amounts of health. Be warned as the monster can easily take out even well-equipped hunters in one strike.
After it eats, the Great Jagras will vomit up to 30 feystones that you can pick up. They will mostly be mysterious and glowing feystones, though worn and warped ones can randomly appear. You can return to camp even without completing the objective to keep the ones you have obtained.
Monster Hunter World Iceborne Sword and Shield Endgame Meta Build
Full Fatalis Build
| Weapon | Decorations | |
|---|---|---|
|
True Fatalis Sword |
Challenger Jewel+ 4 x1Evasion Jewel+ 4 x1Augment: Health Regen/Affinity |
|
| Armor | Decorations | |
| Head |
Dragonhead Beta + |
Critical/Maintenance Jewel 4 x3 |
| Armor |
Dragonhide Beta + |
Handicraft/Maintenance Jewel 4 x2Attack Jewel+ 4 x1 |
| Greaves |
Dragonclaws Beta + |
Expert Jewel+ 4 x2Attack Jewel+ 4 x1 |
| Waist |
Dragonbarbs Alpha + |
Attack Jewel+ 4 x2Handicraft Jewel 3 x1Shaver Jewel 3 x1 |
| Legs |
Rimeguard Greaves Gamma + |
Attack Jewel 1 x1Handicraft Jewel+ 4 x1 |
| Charm |
Challenger Charm V |
None |
Full Fatalis Skills
| Skills | |
|---|---|
| Critical Eye 7 | Challenger Jewel 7 |
| Attack 7 | Handicraft 5 |
| Tool Specialist 5 | Peak Performance 3 |
| Stun Resist 3 | Critical Boost 3 |
| Weakness Exploit 3 | Evade Window 3 |
| Quick Sheathe 2 | Clutch Claw Boost |
| A sample endgame buid utilizing peak performance, critical eye, and agitator for increased damage and affinity. The usual critical boost and weakness exploit are there to further increase critical hit damage. Other QOL skills like clutch claw boost, evade window, and tool specialist are also mixed in to further improve performance. |
Scegli un paese
Scegli un paeseArabia SauditaArgentinaAustraliaAustriaBahrainBelgioBoliviaBrasileBulgariaCanadaCileCiproColombiaCorea del SudCosta RicaCroaziaDanimarcaEcuadorEl SalvadorEmirati Arabi UnitiFinlandiaFranciaGermaniaGiapponeGreciaGuatemalaHondurasHong KongIndiaIndonesiaIrlandaIslandaIsraeleItaliaKuwaitLibanoLussemburgoMalesiaMaltaMessicoNicaraguaNorvegiaNuova ZelandaOmanPaesi BassiPanamaParaguayPerùPoloniaPortogalloQatarRegno UnitoRep. CecaRomaniaRussiaSingaporeSlovacchiaSloveniaSpagnaStati UnitiSudafricaSveziaSvizzeraTaiwanThailandiaTurchiaUcrainaUngheriaUruguayAltroDD12345678910111213141516171819202122232425262728293031MM123456789101112YYYY190019011902190319041905190619071908190919101911191219131914191519161917191819191920192119221923192419251926192719281929193019311932193319341935193619371938193919401941194219431944194519461947194819491950195119521953195419551956195719581959196019611962196319641965196619671968196919701971197219731974197519761977197819791980198119821983198419851986198719881989199019911992199319941995199619971998199920002001200220032004200520062007200820092010201120122013201420152016
Новые Яркие Моменты
Шара-ишвалда
MHW:I
26 дек. 2020 г.
Опрокидывание Шара-ишвалды отличается по механике от все остальных монстров. Во-первых, она не пытается вас сбросить, Шара продолжает всех атаковать, не обращая никакого внимания на наездника. Во-вторых, все атаки имеют характер сбрасывания, то есть ваша выносливость будет часто усиленно расходоваться, независимо от того на какой части тела вы висите. Чтобы успешно завершить опрокидывание, используйте закрепление в моменты атак, не пытайтесь никуда перепрыгивать, это не поможет.
Шара-ишвалда
MHW:I
26 дек. 2020 г.
Как в первой, так и во второй фазе боя с Шара-ишвалдой присутствуют скалы-ловушки, которые могут быть использованы для нанесения огромного урона. Необходимо толкнуть Шара-ишвалду в правильном направлении (ловушки указаны на карте), при столкновении со стеной в области ловушки произойдет обрушение большой груды камней.
Баррот
MHW:I
26 дек. 2020 г.
Баррот: «Больше всего бесит, когда ты пол часа намазывался грязью, чтобы солнце не припекало, а тут эта вечно мокрая рыба-переросток выскакивает из ниоткуда и давай тереться своими скользкими плавниками. Вся грязь смывается! Что остается потом… По новой в грязевые ванны… И так весь день!».
Баррот
MHW:I
26 дек. 2020 г.
Беспомощный охотник, залипший в куски отлетевшей от Баррота грязи, становится легкой целью для его мощного тарана!
Баррот
MHW:I
26 дек. 2020 г.
Прохаживаясь по своим владениям, Баррот часто сбрасывает с себя лишнюю грязь мощными круговыми движениям всего тела. Покрытый защитным панцирем, он не всегда ощущает сколько именно грязи еще осталось и нередко попадает в неловкую ситуацию, когда сбрасывать уже нечего!
Баррот
MHW:I
26 дек. 2020 г.
Используя Водяное Зерно можно легко сбить всю грязь с Баррота. Это хорошая тактика, если вам мешают куски грязи, постоянно сваливающиеся с него!
Баррот
MHW:I
26 дек. 2020 г.
Вы можете легко оглушить Баррота, если направите его мощный таран на какое-нибудь препятствие. Главное четко рассчитать траекторию!
Баррот
MHW:I
26 дек. 2020 г.
Баррот любит грязь и болота. Если вы видели, как он спит, то наверное понимаете, почему в процессе эволюции его голова приняла такую форму. Для дополнительных наград, вы можете атаковать преимущественно в голову, после определенного кол-ва урона, верхняя часть головы Баррота может отломиться.
Баррот
MHW:I
26 дек. 2020 г.
Нанесенная на тело грязь, играет еще одну важную роль в жизни Баррота: с помощью нее он метит свою территорию. Обильный слой грязи на стенах предупреждает всех непрошенных гостей о том, кто здесь хозяин. Правда тех кто этого боится, очень и очень мало…
Баррот
MHW:I
26 дек. 2020 г.
Если вы хотите испортить день Барроту, запаситесь Водяными Зернами… или натравите на него Юратода! Несущийся к болотам Баррот, нередкая картина в Дикогорье.
Найдите себе миньонов
Если вы охотитесь в одиночку, то перед каждой охотой ищите себе миньонов — это коты, которые помогают вам в битвах. Для этого вам надо искать на карте маленькие кошачьи иконки или использовать «Tailraider Signal», который вы получите после того, как подружитесь с Боабоа (Boaboa) в Морозном просторе (Hoarfrost Reach), новой локации.
Боабоа (Boaboa)Боабоа (Boaboa)
Если ваш миньон терпит поражение, лучше всего пойти и взять ещё одного перед тем, как продолжить бой. Их ловушки и урон, который они могут наносить, играют важную роль в более сложных охотах. Они также отвлекают монстров, что даёт вам больше шансов на успешное распитие нужных зелий.
Об этих маленьких существах легко забыть, однако в самых сложных битвах в Monster Hunter World: Iceborne они бесценные союзники.
Choose Region
Choose RegionArgentinaAustraliaAustriaBahrainBelgiumBoliviaBrazilBulgariaCanadaChileColombiaCosta RicaCroatiaCyprusCzech RepublicDenmarkEcuadorEl SalvadorFinlandFranceGermanyGreeceGuatemalaHondurasHong KongHungaryIcelandIndiaIndonesiaIrelandIsraelItalyJapanKoreaKuwaitLebanonLuxembourgMalaysiaMaltaMexicoNetherlandsNew ZealandNicaraguaNorwayOmanPanamaParaguayPeruPolandPortugalQatarRomaniaRussian FederationSaudi ArabiaSingaporeSlovakiaSloveniaSouth AfricaSpainSwedenSwitzerlandTaiwanThailandTurkeyUkraineUnited Arab EmiratesUnited KingdomUnited States of AmericaUruguayOtherMM123456789101112DD12345678910111213141516171819202122232425262728293031YYYY190019011902190319041905190619071908190919101911191219131914191519161917191819191920192119221923192419251926192719281929193019311932193319341935193619371938193919401941194219431944194519461947194819491950195119521953195419551956195719581959196019611962196319641965196619671968196919701971197219731974197519761977197819791980198119821983198419851986198719881989199019911992199319941995199619971998199920002001200220032004200520062007200820092010201120122013201420152016
Story: M★4 Outline
| Astera | |
|---|---|
| ① | Go on an expedition to Hoarfrost Reach |
| Investigation: Hoarfrost Reach | |
|---|---|
| ② | Investigate Hoarfrost Reach・Delivery Quest: Setting Up Camp: Hoarfrost Reach II ┗ Hoarfrost Reach: Unlock Northeastern Camp |
| ③ | Hunt a Shrieking LegianaComplete your investigation and return to base・Achieve MR13/Unlock M★4 quests・New items at the Elder Melder |
| Seliana | |
|---|---|
| ④ | Accept the quest The Thunderous Troublemaker! |
| Assigned Quest: Hoarfrost Reach | |
|---|---|
| ⑤ | Hunt a Fulgur Anjanath・Achieve MR14・Unlock a quest to upgrade the Thunderproof Mantle・Poogie appears in Seliana |
| Seliana | |
|---|---|
| ⑥ | Head to Astera |
| Astera | |
|---|---|
| ⑦ | Accept the following quests: The Disintegrating Blade Bad Friends, Great Enemies |
| Assigned Quest: Rotten Vale | |
|---|---|
| ⑧ | Hunt an Acidic Glavenus・Achieve MR15 |
| Assigned Quest: Coral Highlands | |
|---|---|
| ⑨ | Hunt an Ebony Odogaron・Achieve MR16・Unlock a quest to upgrade the Iceproof Mantle |
| Astera | |
|---|---|
| ⑩ | Accept the quest The Defense of Seliana |
| Assigned Quest: Seliana Supply Cache | |
|---|---|
| ⑪ | Defend the base・Achieve MR17・Unlock a quest to upgrade the Rocksteady Mantle・New stock on the Argosy |
Научитесь балансировать между агрессией и защитой
Данный совет, пожалуй, является одним из самых важных. Monster Hunter World: Iceborne будет проверять ваши навыки охотника по максимуму, так что вам необходимо изучать новые приёмы и тактики, если вы хотите убить последних «Древних драконов». Сложнее всего в игре научиться оставаться агрессивным, при этом не давая себя убивать.
На каждую охоту даётся 50 минут и, вероятнее всего, в самом начале вы будете использовать каждую отведённую минуту
По мере того, как вы продолжаете усердно охотиться, не поддавайтесь желанию играть осторожно. Если вы не научитесь бить монстра прямо в лицо и при этом оставаться в живых, вы никогда не победите «Древних драконов»
У монстров огромное количество здоровья на ранге «Мастер», поэтому каждое сражение — это ещё и битва со временем. По мере того, как сложность битв увеличивается, становится всё труднее отступать и защищаться. Начните приучать себя уворачиваться только тогда, когда вам необходимо использовать зелье, в противном случае вы потеряете много времени пытаясь убить «Древнего дракона» до истечения этих самых 50 минут. И имейте в виду, что у вас есть только три жизни, поэтому уклоняйтесь от атак после того, как нанесли удар по монстру.
В целом Iceborne — это весьма сложное, но хорошо сделанное расширение для Monster Hunter World. Если вы не будете играть на одном уровне с игрой, то потерпите неудачу, а ваше времяпрепровождение будет неудовлетворительным. Но если вы посвятите себя тому, чтобы стать лучшим охотником, Iceborne щедро вознаградит вас одним из самых приятных геймплеев.
- В трейлере Monster Hunter World: Iceborne показали новых монстров и геймплей
- Бета-тест Monster Hunter World: Iceborne для владельцев PS4 стартует уже в эту пятницу
- Танцующие зомби и дружелюбный Тиран — в Monster Hunter: World добавят героев RE2
The Six Ingredients for Felyne Zoomaster
You’ll get half of what you need by completing the Grammeowster Chef’s questline. The other half of the ingredients are rare and semi-rare drops from Frozen Foliage in the Hoarfrost Reach, one of which is only available when Frozen Foliage is flourishing.
The ingredients and their associated quests and locations are as follows:
- Glacial Vodka and Toasting Tequila: The Nighty Night Nightshade quest (2nd in the Grammeowster Chef questline)
- Simmering Spirit: Simmer and Slice quest (4th and final quest in the Grammeowster Chef questline)
- Crystal Quaff: Deliver Petalcryst rare plantlife (only available in Hoarfrost Reach during flourishing Frozen Foliage)
- Snowmelt Snifter: Deliver Moonlight Icebloom (from Frozen Foliage)
- Frostpeak Fizz: Deliver Snowpeak Icebloom (from Frozen Foliage)
You may have noticed that the 1st and 3rd quests aren’t required for the ingredients you need. That doesn’t mean you can skip them. You have to do all four quests to get your hands on these special canteen ingredients.
The first quest is Trapping the Tree Trasher, and the third is a delivery quest of Twisted Stouthorn, which you receive from breaking a Diablos’ horns and either carving or capturing it.